NOTICE: You are in the old ClientSpace Help system. Please link to the new ClientSpace Help here https://extranet.clientspace.net/helpdoc/home/ClientSpace.htm
Adding Widget Layouts in ClientSpace
Widgets in ClientSpace represent a step forward in the ability to deliver targeted information. The advent of widgets greatly alleviates the need for custom programming to present Departmental dashboards or dataform headers. Data can be presented via configurable widget layouts, and the presentation of these layouts can be controlled via condition expressions, allowing you to present many different views of a home page, workspace landing page or dataform header, depending on department or role security. This article describes the configuration of widget layouts.
Step-by-step guide
- Go to System Admin > Widget Layouts.
The Widget Layouts list is displayed. From here you can add and manage widget layouts for your ClientSpace installation. - Review the numbered items in the following image along with their descriptions.
- To add a new widget layout, click Add.
The Widget Layout Details form opens.
- Search /More - Works like standard ClientSpace searches, by default the list only displays Published widgets.
- Add - Click to add a new widget layout.
- Edit - Select a Widget from the List and Click to edit an existing widget layout.
- Widget Layout List - Displays a list of the Widget Layouts in your ClientSpace install
Widget Layout Details
Complete the form using the numbered items and their descriptions.
- Name - Type the name of your new layout here. This should be descriptive of layout type and audience, for example, "Payroll Home"
- Target Type - Target Type determines where in the ClientSpace application this layout will be presented, more on target types below.
- Weight - Weighting determines the priority with which layouts will be presented to the ClientSpace user. All things being equal (conditions) the weight given the layout will determine which is presented. The higher the weight number, the more likely it is the dashboard will be selected.
- Add Widgets - Click here to select and add widgets from the widget library (see below) to your widget layout.
- Set Conditions (optional) - Use "Set Conditions" once you have added a widget layout to determine the conditions under which a layout will be displayed. These conditions range from Departmental or role based to field value expressions, such as the status of a Client. Which conditions are available for use will vary based on the Target Type selected (see below).
Target Type
Target Type selection determines where the configured widget layout is displayed within the ClientSpace application, as well as what display conditions are available for use.
- Workspace - This target type will add the widget to the Workspace Landing page based on the assigned Weight and Conditions set.
- Home - This target type will create a "Home" page which will be displayed based on the assigned Weight and Conditions set.
- Dataform - Selecting a dataform name will create a dataform header widget layout which will be displayed when that dataform opens based on the assigned Weight and Conditions set.
Widget Library
The widget library is the current list of available widget types that may be added to Layouts.
- Search - while the widget library is currently small and easily manageable, we envision this will grow to the point you may need to search to find the widget type you want to add.
- Widget Types - The current list of widget types available with a short description of what they will display.
- Add Widgets - Select one (or more) widgets and click here to add the widget(s) to your layout. You may then re-arrange the widgets to your liking.
Configuring Widgets and Widget Layouts
After widgets have been added to the layout, you are returned to the Widget Layout grid. This grid allows the Global Administrator to decide the size and placement of the selected widgets.
- Settings - The settings control allows you to add settings to Widget Types which require additional configuration. If the Widget type does not require configuration, the settings control will not appear.
- Delete - Remove this widget from the layout
- Re-Size - Click and drag the arrow in the lower right corner of the widget to resize** the widget control. The system will automatically snap to the nearest Grid line when your mouse button is released.
- Grid Area - The grid area represents the white space on the page that can be utilized to add widgets to your layout. Widgets may be dragged and dropped in this grid area to change your Widget Layout.
Once you have configured your widget layout, Select "Publish" to activate the widget and begin using it in your ClientSpace installation. Published widgets may be Un-Published to allow an administrator to edit them.
**A note on re-sizing widgets
Some widget types may not be re-sized. Currently, this includes Notifications and Watch. Attempts to resize these widget types in your layout will lead to unexpected behavior in the application.
Set Conditions - Adding Security and display conditions to your widgets
Adding conditions to your widget layout is essentially adding the trigger conditions which determine if the widget will display.
PRIMARY CONDITION
- Primary Condition - The primary condition must be met before all other conditions are evaluated. Primary Conditions are not required, but if present they must be satisfied.
- Add Additional Conditions - Additional conditions allow you to configure complex display conditions which when combined with the weighting system discussed previously provides the ability to create complex trigger conditions when used in an expression (see below).
- When adding Additional Conditions you will have a "Label" field to complete - the Label value is used when constructing
- Expression - As conditions (other than the primary) are added, they act as OR conditions - adding 3 additional conditions without an expression would mean "if 'This' or 'That' or 'The Other Thing' - then display the widget" Expressions may be used to create more complex conditions under which the widget will display - "('This' AND 'That') OR 'The Other Thing'" would be an example. A detailed breakdown of a complex condition expression may be found in condition expressions (see below).
Departments and Security Entities
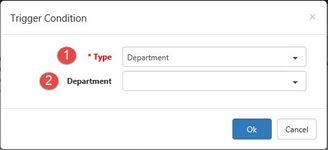
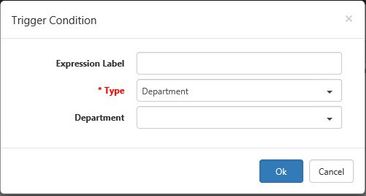
Departmental and Security Entity Conditions work in a similar fashion - Choose the type (Department/Security Entity) and select the associated value. This is always an "Equals" condition.
- Type - Department / Security Entity / Field Value Expression (see below)
- AssociatedType -
- Department - The user's Default department as selected on the user profile. If a Department trigger is set the user must be in that department to satisfy the condition
- Security Entity - An Entity associated with a role of which the user is a member. If an Entity trigger is set the user must be in a role with at least View access to that Entity.
- Expression Label (option) - When adding additional conditions the Expression Label field is exposed - this is used when building condition expressions (see below).
Field Value Expressions
Commonly used in Workflow, Field Value Expressions are the most robust of the trigger conditions.
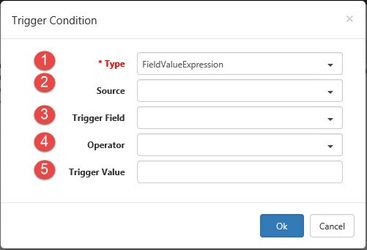
- Type - When FieldValueExpression is selected as the type, additional fields display to allow configuration of the source dataform and associated elements.
- Source - Select the Dataform which will determine the triggering condition
- Trigger Field - Select the field from the Source dataform
- Operator - Select the logical operator to be used (Equals, does not Equal, Greater than and so on. These operators are field specific, so if the Trigger field selected is a Text field numerical operators will not be available and so on...
- Trigger Value - The value to the right of the operator in the equation - this determines whether the condition is met, for example Pricing State Source | State Field | Equals Operator | "FL" Trigger Value means "if the Pricing State, State field Equals 'Florida'. "
- Expression Label (option) - When adding additional conditions the Expression Label field is exposed - this is used when building condition expressions (see below).
Condition Expression - Bringing it all together
Condition Expressions use Labels from Display Conditions along with AND, OR, and NOT operators to control precedence and sequence. See Condition Expressions.
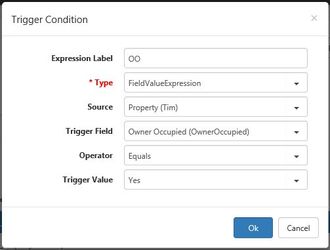
Once additional conditions have been configured with labels, you can use these labels to build complex Condition Expressions. In the Dataform header widget sample above, the Primary condition is that the "Number Of Stories" field must be Greater than 2 - if this primary condition is met the system then analyzes the additional conditions using the Condition Expression. This condition expression is built using the Expression labels on the additional conditions and applying the appropriate logic - In the example this would be:
EITHER
(The Owner Occupied field = 'Yes' AND (The Property State field equals 'GA' OR 'AL'))
OR
(The User has at least view rights to the biz_RequestTypeCategory_Environmental entity AND (Number of Stories field is Greater than 5 AND The Property State field equals 'AZ'))
In this way, very complex trigger conditions can be built to display or hide the appropriate Widgets.
Configuring BI Reporting Widgets
Report widgets require additional configuration - much as any part of a report can be used when creating a BI Dashboard, Any part of a report can now be added to a widget, including Charts.
To begin configuring a BI report widget, simply add one to your widget layout, and size it appropriately.
To complete the configuration, you will need to click the settings button to select the report and report part you would like displayed.
- Report - Select the report to be used in your widget here - these widgets respect report security as well as report filters such as #currentworkspace, so keep this in mind when selecting your report.
- Filter - Options include None, Current Record and Current Workspace. Any filters that are hardcoded on the report filter page will also be executed at runtime.
- Type - Select the report part you would like to include such as Chart, Summary or Detail
Once you have completed your configuration, click Save Settings.
Related articles
NOTICE: You are in the old ClientSpace Help system. Please link to the new ClientSpace Help here https://extranet.clientspace.net/helpdoc/home/ClientSpace.htm


