NOTICE: You are in the old ClientSpace Help system. Please link to the new ClientSpace Help here https://extranet.clientspace.net/helpdoc/home/ClientSpace.htm
Configuring Email Integration For Your Installation
Email integration is a component that provides automated dataform creation (Client Service Case) via email requests. It allows the creation of an email account from a Third-party email provider to be accessed and data forms created based on the email account or a specific email alias of that account. After the request has been processed, an email notification is generated from a configurable template and transmitted as a response back to the sender of the originating email.
Before you begin
Before you configure email integration with the application you will need to gather some necessary components for configuration:
- Email address of the mailbox to be integrated (cannot be an alias, must be the actual mailbox email address)
- Password to login to the mailbox
- Host URL of the email address (for example outlook.office.com, or payroll.gmail.com etc.)
- The port allowed for use by IMAP connections to the mailbox (the default for this is 993, but this may be changed at the firewall)
Step-by-step guide
Email Integration currently supports the following email providers that support the IMAP protocol:
- Aol.com
- Aim.com
- Gmail.com - Currently does not support SaslOAuth
- iCloud.com
- Outlook.com - Prior to configuring for Outlook see Configuring Distribution Groups for Email Integration With Office 365
- Hotmail.com
- Yahoo.com
Overview: Configuring Email Integration
The following steps provide an overview of the more detailed steps. Steps 5 through 8 are presented in more detail in separate sections.
To configure email integration:
- Create your email account.
- If using Gmail, enable the “access for less secure apps” option.
- If using Exchange, the mailbox will need to be IMAP enabled.
- Prior to configuring email integration, create the Email Template you would like to use as your response.
- Create an Email Integration Credential from System Admin
 > Email Integration > Add.
 - Add an Email Integration Alias for the email account and any associated mailbox aliases from the System Admin > Email Integration.
- Complete the Field Mapping for the dataform to be created by this Email Integration from the System Admin > Email Integration.
- Create the Email Integration Reply Template for the response email message from the System Admin
 > Email Templates.
 - Enable and schedule the “Process Email Integration” scheduled process from the System Admin
 > Advanced > Scheduled Processes.
Creating, Modifying, or Deleting API Credentials
The Email Integration login credentials are stored in the API Credentials table (tblAPICredentials) and can be maintained from System Admin > Email Integration > Add.
To create, delete, or modify a credential:
- Go to System Admin > Email Integration.
The Email Integration list is displayed. - Click Add.
The New Email Integration form opens. - Set the following fields:
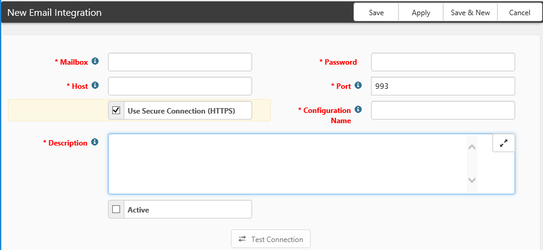
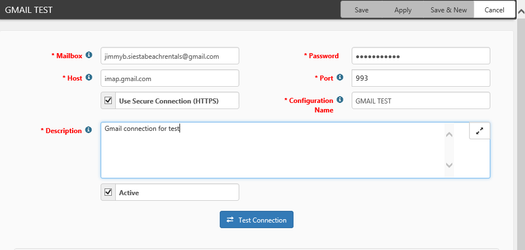
API Configuration
- Mailbox – Required field- the email address for the email account with which you would like to integrate. Email addresses are case-insensitive and must be in a valid format. This address must be attached to a supported email provider (i.e. Gmail, AOL, etc.). This account will be required to have an email alias created using this email and it will provide default values for the workspace, project type, and client.
- Password– Required field - the user account password. Depending on the email provider this field may be case-sensitive so ensure that you use the appropriate case when you enter the value.
- Host - Required field - The Imap mail host for the mail client. This setting will be used when connecting to the mailbox. For information on your Imap host settings contact your mail provider.
- Port - Required field - The secured firewall port used by your provider to allow access to the mailbox. Most IMAP providers use Port 993, so we default the field to this.
- Use Secure Connection (HTTPS) - Connect to mail provider over the internet via unsecured (HTTP) or secured (https) access, Defaults to checked (secured).
- Configuration Name– Required field - should contain the application name associated with the application code. This name will appear in Lists, so it should provide a hint at the Mailbox association
- Description– Required field - should contain a brief description of this credential.
- Test Connection - The test connection button is disabled until all required fields are completed at which point the button color will indicate it is ready for use. Clicking test connection will give you the ability to ensure the connection information will connect to the mailbox successfully before proceeding to the next step. A successful test will be presented with a success message: We were able to connect to your mailbox.
Unsuccessful tests will yield an error message. Some examples of common errors and their causes can be found below:
- xm001 NO [AUTHENTICATIONFAILED] Invalid credentials (Failure) - Bad username or password
- No such host is known - bad hostname
- Object reference not set to an instance of an object. - this message is more generic but is most commonly caused when a secure connection is required and the "Use Secure Connection" checkbox is unchecked.
Before deleting a credential, you must ensure that it is not associated with any email aliases or an error will be generated and logged.
Creating Email Integration Aliases
Email Integration aliases are used to link a credential to an email address and to identify and group several default values necessary for processing the email requests received. The Email Integration Aliases are stored in the Email Integration table (tblEmailIntegration).
To create email integration aliases:
- Go to System Admin
 > Email Integration.
The Email Integration list is displayed. - To create, delete, or modify an email template, access the Email Integration Alias web page dialog and set the following fields:
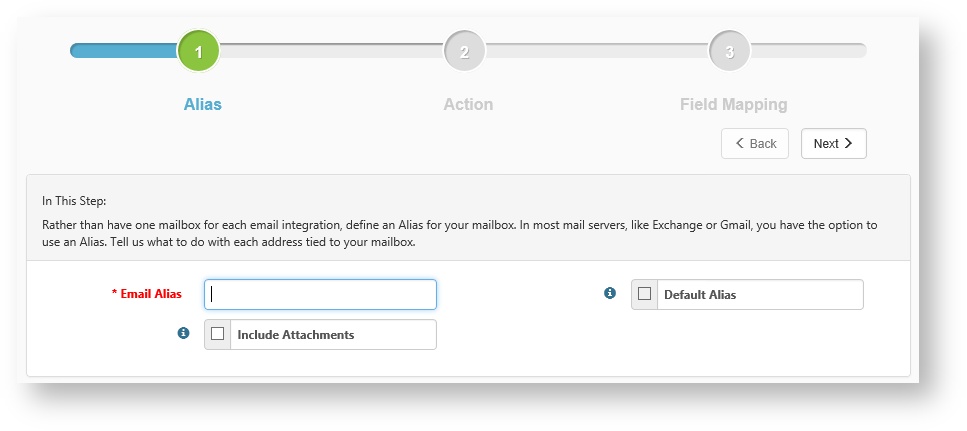
Email Alias – Required field- should contain the email address associated with this alias. The email to address will be used to match an email to its associated alias. Each credential should have at least one email alias associated with the account email address. Additional, email aliases can be created so that email accounts with multiple email aliases can be mapped to different Project Types. You may create as many email aliases as the provider allows. There may be differences in the “To address” format of email aliases between providers.
For example:
Credential Username: client@gmail.com
Email Account: client@gmail.com
Email Alias 1: client+clientservicecase@gmail.com
Email Alias 2: client+createemployee@gmail.com
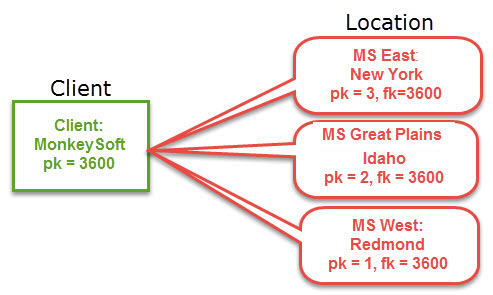
In this example, you would create 3 email aliases, the first using the Email Account as the email Alias value. This creates the default email alias to be used. The second would be created using email alias 1 and the project type set to the Project Type associated with creating a Create Client Service Case project type. The third would be created using email alias 2 and the project would be set to the Project Type associated with creating an employee (It should be noted that at this time the only supported dataform created via this method is the Client Service Case dataform).
Default Alias - If an alias cannot be located by the email address for the incoming email, this alias will be used to process the email for the API configuration mailbox. Only one default alias may be defined.
Include Attachments – This optional field when set will allow email attachments to be downloaded and attached to the dataform during processing. File attachments are checked against the list of Valid Email attachment types stored in the Lookup ValidAttachExt, unrecognized email attachments will be added to a .zip archive and attached with the message: "CAUTION! The original file is NOT AN ALLOWED FILE TYPE in ClientSpace and it has been converted to a Zip Archive"
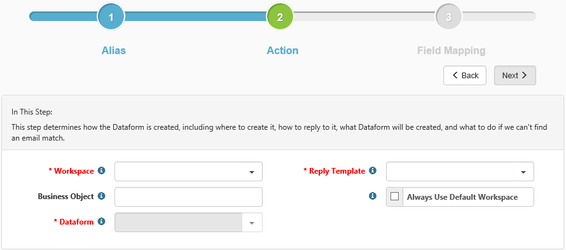

Workspace – Required field - contains the workspace that is associated with this email alias. This is the default workspace that will be used during the processing of the email. This value may be overridden by including the workspace in the body of the email. This override value must contain a valid workspace ID and be formatted as “WSID=#” with no spaces between the “WSID=” and the workspace ID. You will use the drop list containing all workspaces to select the workspace.
Reply Template – Required field - must contain the reply template to be used to send the process complete notification. You will use the drop list containing all Templates to select the Reply Template. This can be an existing triggered template or you can create one just for this reply. The following information details how to create a custom reply template.
Business Object - Not Required - this is the ClientSpace business object that stores any code to be run during the email integration process. This should either be left blank or filled in with the appropriate business object - in our PEO system this would be "ClientSpace.PEO.Business.EmailIntegrationBase" (quotes removed). This may be used to allow additional optimized functionality to look up the workspace via a “CLID” (ClientNumber) or "WSID" (ProjectID), to modify the data before the data form is created or to modify the data before the reply template is generated and sent. In this way, you can add layer specific data values to the form or layer specific replace code values to the reply email.
Always Use Default Workspace - Not Required - This optional field when checked will force the system to use the default workspace set in the "Workspace" field, regardless of the other methods of Workspace Selection (see below).
Dataform – Required field - contains the project type associated with this email alias. This determines what type of data form to create. You will use the drop list containing all Project Types to select the Project Type.
NEXT
Important
NOTE: For an email address to be processed, it must have an Alias specified in the alias table. If no alias is found an email integration error will be generated and logged as “Email Contains Missing or Invalid Key Information - Workspace ID: # Project Type ID: 0”. When this occurs the reply message will not be generated and transmitted.
++Adding Email aliases to the actual mailbox that you use should be coordinated with your email administrator and is not a function of PrismHR or ClientSpace.
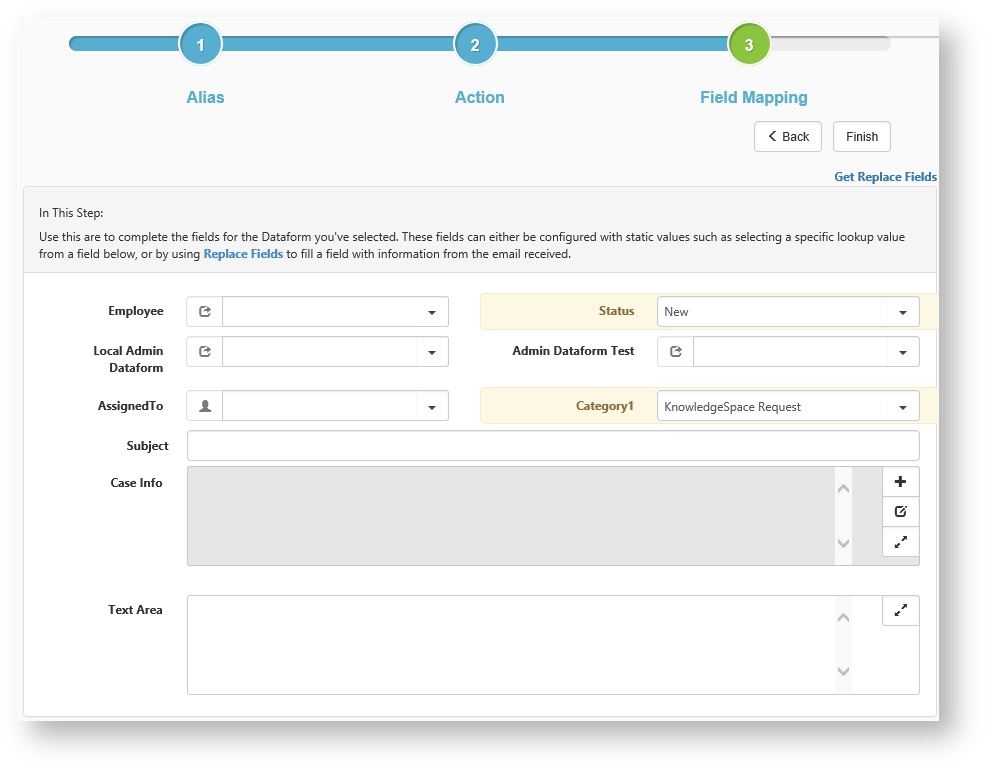
Field Mapping
About Field Replacement
You may have noticed a "Get Replace Fields" link on the page - this allows you to insert any field content from the email. These fields will be presented in a pdf when this link is clicked. Simply copy and paste the fields from the PDF that opens when this link is clicked - be sure to include the enclosing french brackets "{" ie: {gen_ClientServiceCase.Priority}. When the task or dataform is produced through the cloning process, these fields will be replaced with the appropriate field data.
Email Integration Email Field Replace Codes
The following field replacement codes are available for use in email template data map fields as well as, the email alias data map fields.
- {EmailBody} – This contains the entire email body
- {EmailSubject} – This contains the email subject
- {EmailToAddress} – This contains the email to address. In the event there are multiple email addresses, this will be the first email address.
- {EmailFromAddress} – This contains the email sent from address.
- {EmailHasAttachments} – This contains a True or False depending on if the email had attachments. This does not indicate that the attachment was downloaded and attached. It only indicates the email had an attachment.
- {EmailAttachmentCount} – This contains the number of attachments on the email.
- {EmailAttachmentsRefused}
- {EmailAttachmentsRefusedReason}
- {EmailAttachmentsUploaded}
- {EmailCCAddressAll} – Contains the copied recipient email addresses.
- {EmailEmailForwardedFromAddress} – Contains the forwarded from email address.
- {EmailToAddressAll} – Contains all the email recipient addresses.
- {EmailMessageID} – This contains the email message ID.
- {WSSource} - This contains information about which of the source selection methods (a - g above) was used to determine the workspace in which to create the case.
Creating the Email Integration Reply Template
When creating an email template for email integration response, you will use the system admin tile for Email Templates, but you will not need to complete all of the steps required for triggered email templates.
- Go to System Admin
 > Email Templates.
 - In the Email Templates area, click Add to add a new template.
You will be presented with a series of steps to start generating your new template.
STEP 1
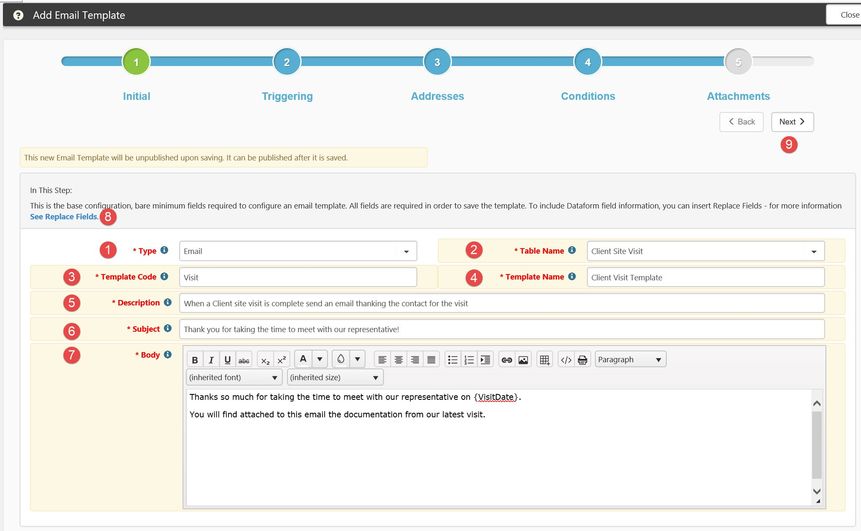
- Type - Select the template type here - this defaults to 'Email'
- Table Name - Select the triggering dataform for your new email template - this is the form from which the template will be triggered. The table name along with the Merge Procedure (optional) determine what fields are available to use in Field replacement
- Template Code - Must be unique and should be related to the purpose of the email template
- Template Name - This will display in the email template list
- Description - Provide a useful description of the email template.
- Subject - This will be the subject line of the email generated by this template.
- Body - This will be used to generate the body of the email. This Rich text control supports formatting such as font and background color. Field replacement can also be used to insert application data.
- Replace Fields - This hyperlink provides custom tags that can be added to the text of the email template and will be replaced by actual dataform field data when the email is generated.
- Next - Move to the next step in the process when all required fields are completed.
SKIP the triggering step (STEP 2) by clicking Next, because the email integration will trigger the response email
STEP 3
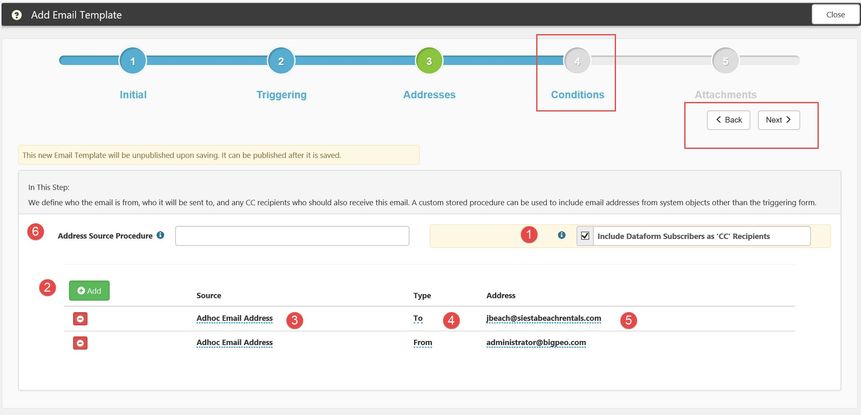
- Include Dataform Subscribers as 'CC' Recipients - Adds anyone who has subscribed to the dataform as CC recipients when this notification is sent in addition to any other recipients you configure here.
When enabled (selected), this option presents a list to notify internal, external, or both recipient types:- Internal: When the email template is triggered, only internal dataform subscribers are notified.
- External: When the email template is triggered, only external dataform subscribers are notified.
- Both: If you select Both or leave the field blank, all dataform subscribers are notified.
- Add - Click to add a new Recipient record to this notification
- Source - Recipient Source could be the triggering dataform selected in step one, an Ad-Hoc email address typed into the address field, or an email address selected from the Address Source Procedure (see below). This third option will only appear if an Address Source Procedure has been selected.
- Type - What kind of email recipient type are you setting? Options are From, To or CC
- Address - Complete a "From" Address. This email address will be used when responding to the read email - it is common to use a "NoReply" email address here as you do not want a response via email.
Click Next to proceed through the remaining steps until you are able to Finish the template. Steps 1 and 3 are the only required steps for the purposes of an email integration reply template.
Email Processing
The Email integration scheduled process is as follows:
- Credential is looked up from the API Credentials table using the Application Code which matches the mailbox being searched.
- A list of unread emails is downloaded and processed as follows:
- If "Always use Default Workspace" is checked the system will use the Default Workspace ID, if not then IF the Business Object is set in the email integration configuration then...
- The body is searched for the CLID token and if found the business object is called to interpret the CLID and return the appropriate workspace ID++++ , if not then...
- The body is searched for the WSID token and if found and the workspace was not set by the business object CLID request the workspace ID will be set to the WSID value, if the business object is not configured or it cannot find a match based on CLID OR WSID then...
- The email From address is compared to all employee email addresses (both Personal and Work email) in the system and tries to match the email. If a match is found, the workspace associated with that employee is used and if multiple instances of the employee email (Personal and Work) exist, the most recently changed instance is used. The email addresses are used for workspace lookup purposes to determine where to generate the case.
- If the workspace has not been determined, the contacts will be searched for a contact with the same email as the email "from" address. If found, the primary project ID for the contact will be used as the workspace ID, if not then...
- If the contact was not found then the Organization table will be searched for an organization with the same email domain. If found the default workspace for this organization will be used, if not then...
- If no workspace is found the default workspace from the alias will be used (based on the To, then CC, then BCC addresses on the original email) along with the project type to create the appropriate data form.
- If the dataform type and workspace are found the body is scanned for additional data value tokens that will be added to the form data xml document in addition to the email data items to set valid fields.
- If a business object is specified the EmailIntegrationCreateNewForm is called to allow the business layer to set data values before creating the form.
- If the Business Object does not cancel the save then the data form is saved.
- If the data form was successfully saved the attachments are downloaded and attached to the form based on the alias "Include Attachments" indicator.
- The saved data, in addition to the email fields, is placed into an xml document that is used to generate the reply message
- If a business object is specified the EmailIntegrationNotifySender is called to allow the business layer to set data values before generating and transmitting the notification.
- If the Business Object does not cancel the notify action then the notification is sent
- The email is then marked as read.
GO TO TOP
Setting the "allow less secure apps" setting on Gmail:
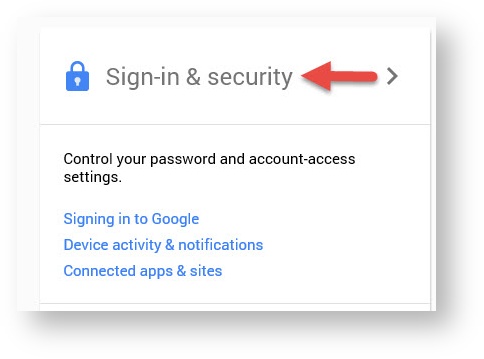
- Open the Gmail account and go to My Account.
- Click Sign-in & Security.
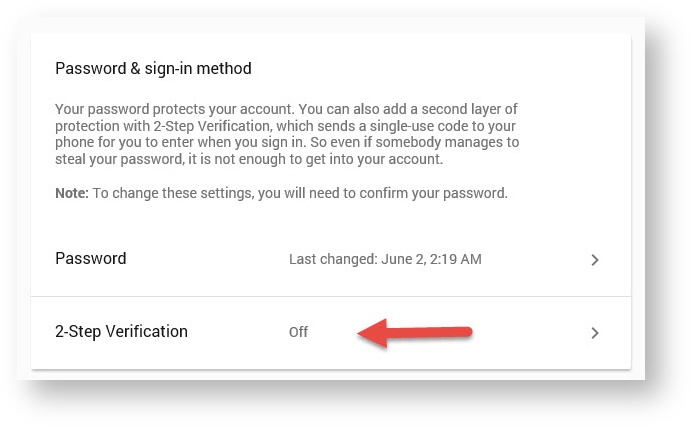
If enabled, Turn off "2-Step Verification"
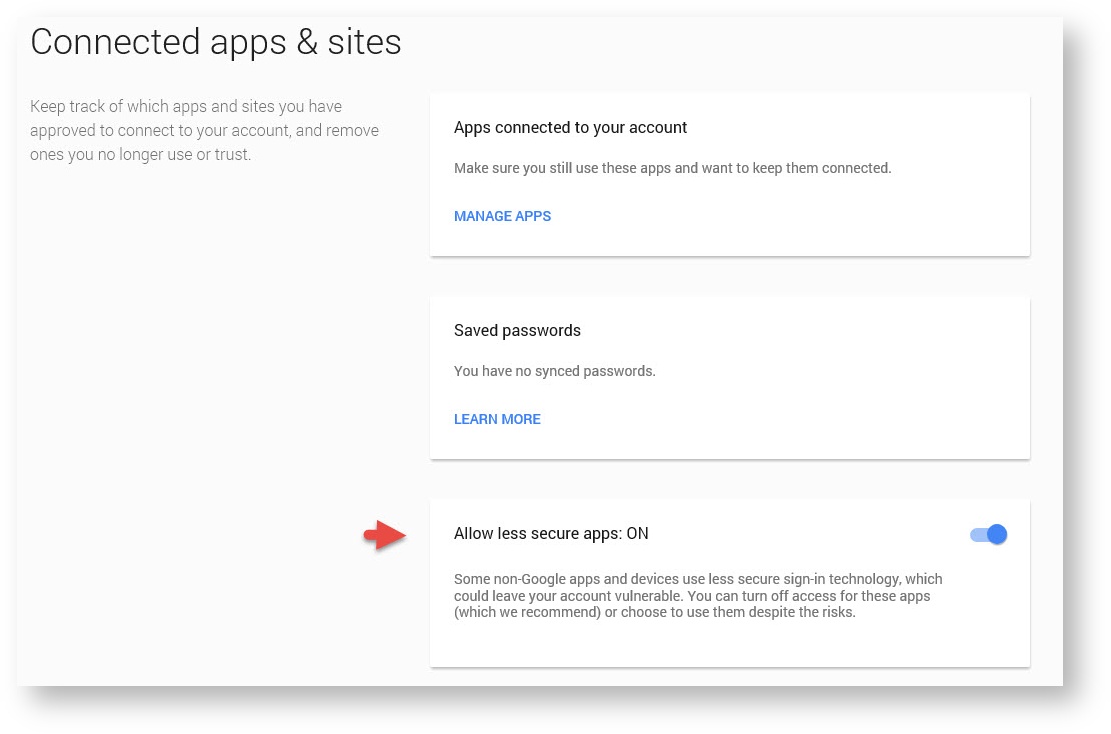
Turn on the "Allow less secure apps" option
Related articles
NOTICE: You are in the old ClientSpace Help system. Please link to the new ClientSpace Help here https://extranet.clientspace.net/helpdoc/home/ClientSpace.htm