NOTICE: You are in the old ClientSpace Help system. Please link to the new ClientSpace Help here https://extranet.clientspace.net/helpdoc/home/ClientSpace.htm
Cases: Adding case discussions
Case discussions allow you to communicate effectively with your clients in a conversational manner, directly from the case that is logged. When you use case discussions, you can keep much of the communication outside of the case but still connected should you need to reference the discussions.
The immediacy of case discussions allows you to submit your information to the client in email format, which is easier for them to receive and makes it more conversational.
To help you get started, this topic includes:
- How case discussions work
- The advantages of case discussions
- Best practices
Our example shows you how to create a case discussion, compose a message, add an attachment (if applicable), and select recipients. Additionally, for case discussions that include employees (not contacts or users), while viewing the recipient list, you can select the employee's work or personal email.
To create a case discussion:
- Open a client service case.
The Client Service Case form opens. - Select a Client Contact.
This action automatically fills Reported By and Email Address. A best practice is to always select a client contact when possible. - In the Action Center, expand Links > More, and click Discuss or Case Discussions.
The Discussion Thread form opens. Notice at the top is where a running history of your conversation with the client will be displayed. The discussion has two tabs: Message and Recipients.
To compose the message:
- Enter a Subject.
- In Comments, type your message.
The comments field supports advanced formatting options including font selection, size and color, as well as additional formatting, such as bold, italics, bullet points, and so on.
To add an attachment:
- To add an attachment to the discussion, click Choose File.
The Open dialog box opens. - Locate a file on your local computer and click Open.
- Click Save to save the attachment.
The next step is to select the recipient.
To select the recipient:
- Click the Recipients tab.
This is where you select who will be included in the discussion thread. You can choose from Contacts, Employees, and Users (your co-workers). Contacts for this client are readily available for you in the Contacts tab. You can also use Search Contacts associated with the Organization. - Select a contact by selecting the check box beside the entry.
As you select a contact, the recipients are listed in the adjacent panel, Currently Selected Recipients. - To remove recipients from the list, click
 (Remove).
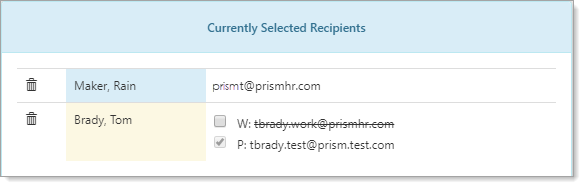
For Employees, you can also select their work or personal email account. By default, the employee's work email is selected.
To change the recipient's email (work to personal):
- In the Currently Selected Recipients list, locate the employee and click
 (this action exposes the employee's email account list).
The selected employee's work and personal email accounts are displayed. The work email is selected by default. - To switch to the employee's personal email, select the personal email check box.
Now you are ready to send the message.
To send the message:
- In the Message tab, review your comments, recipients, and any attached files.
- Click Send Reply.
What happens next
- When you click Send Reply, an email is sent to the recipients.
- When the recipients open their email, they will see a link. Clicking the link will take them to the discussion for the case, where the recipients can add comments and Send Reply.
- The original sender of the message also receives a response directly in the case discussion, which he or she can then review.
- At this point, the discussion thread starts to build, showing who has been notified, the subject of the discussion, and how many messages are currently attached.
- Additionally, you can create a new discussion when the subject is new.
NOTICE: You are in the old ClientSpace Help system. Please link to the new ClientSpace Help here https://extranet.clientspace.net/helpdoc/home/ClientSpace.htm