NOTICE: You are in the old ClientSpace Help system. Please link to the new ClientSpace Help here https://extranet.clientspace.net/helpdoc/home/ClientSpace.htm
Configuring Scheduled Workflows
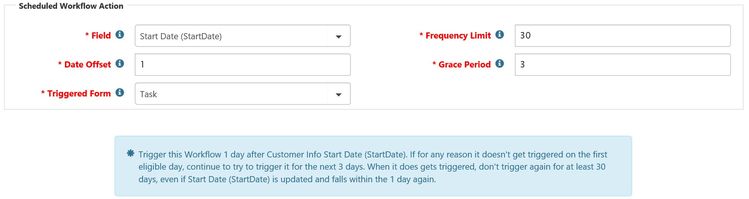
To begin configuring scheduled workflows: After you have configured the Scheduled Workflow Action, you will receive a brief synopsis of the Schedule: When the last field is completed, the wizard progresses to Step 2 Content. See the article Configuring Workflow Channels to continue the step-by-step procedures. After your configured workflow is saved, these conditions are evaluated by a scheduled process (Generate Scheduled Workflows) to determine if the date field combined with the other workflow schedule options as well as any additional Conditions added in Step 4 (Conditions) are met. It is important to note that since these workflow triggers are scheduled, the real time field analysis to determine if a field has changed (IsDirty) cannot happen. Because of this, you will notice that the IsDirty qualifier is not available when adding additional triggering conditions to scheduled tasks. If all of the triggering conditions are met, the dataform or task will be generated from the Workflow. These actions can then trigger other dependent workflow items (such as a second task spawned when the scheduled task is complete) or completely new workflow channels. In this way scheduled workflows can be used to drive your business processes based on milestone triggering dates stored in your system. > Workflow Channels.
The Workflow Channels list is displayed.
The Choose Workflow Triggering Type dialog opens with options to select Real Time or Scheduled.
The Select an Untriggered Form dialog opens. Table Name contains a list of all dataforms currently not marked as Triggerable.
The selected dataform is marked as triggerable and will now appear in the Table Name list.
NOTICE: You are in the old ClientSpace Help system. Please link to the new ClientSpace Help here https://extranet.clientspace.net/helpdoc/home/ClientSpace.htm