NOTICE: You are in the old ClientSpace Help system. Please link to the new ClientSpace Help here https://extranet.clientspace.net/helpdoc/home/ClientSpace.htm
*The Workspace Landing Page
The dynamic nature of the Workspace Landing page can be seen below. Depending on the status of the client workspace, a different Landing page is displayed, designed to streamline the process of putting the information you need at your fingertips.
| Prospect Landing Page | Client Landing Page |
|---|---|
|
|

The Prospect status is for clients currently in the sales pipeline. The landing page for these workspaces provides access to items appropriate for this stage. The Client landing page reflects those items you need to track after the client is onboard:
- User Modules
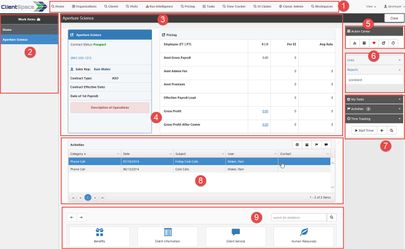
User modules are the individual dashboards and tools within ClientSpace that are configurable at the user level. These act as a "Frequently Used" modules list for the ClientSpace user. Clicking a user module will open it in the Left Nav Work items area. - Work Items - Left Nav
Work items are generally available throughout all stages of client development - this is your multi-task list of open items and will contain a series of collapsible work items that can consist of Modules, such as search and report dashboards, dataforms, tasks and so on. More information on work Items can be found in the article Navigating ClientSpace Next. - Header
The header consists of a dark bar across the top of the page where information can be displayed and a container below it for the WSL tiles (see below). - WSL Tiles
WSL (Workspace Landing) Tiles are Status dependent and designed to give you quick access to the information you need for this client. Most WSL Tiles can be drilled into using an icon to provide even further detail. - Action Center
Action center items are generally available throughout all stages of client development - see detail later in this document. - Links
Links are configurable and provide a method for accessing the dataforms and reports necessary to this stage of client development. Links commonly include the Pricing Console, Contacts, Collateral form, locations and more. - My Actions - Right Nav
The action items at the bottom of the right nav represent the tasks and activities used for client management - if your user account has time tracking enabled, a time tracking menu will also appear here. More information on My Actions can be found in the article Navigating ClientSpace Next. - Lists
List items at the prospect stage are primarily sales related activities - these are the calls, visits, and emails which are produced during the sales process.
Client Stage list items include Client Service Cases, as well as Workers' Compensation and Unemployment Claims. These lists act like pre-filtered dataform lists, allowing you to edit the visible list items, or drill into a full search window. - Dataform Search
Dataforms not directly accessible on the landing page through embedded lists, or linked to the landing page as Action items are available through the Workspace dataform search at the bottom of the Workspace Landing Page. Dataforms are classified into Groups, and these groups are available from a series of icons at the bottom of the Workspace Landing page. Clicking a dataform item will open it in your Left Nav as an active work item.
User modules are the selectable modules that can be configured by each user, allowing them to individually customize ClientSpace and putting the tools they need at their fingertips. When the width of the user modules exceeds the amount of available space, any leftover modules will overflow and be available from the View menu to the right of the module buttons.

To add modules to your user profile, perform the following steps:
Step-by-step guide
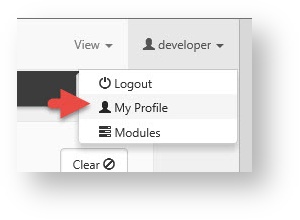
- On the modules bar, click <username> > My Profile.
The User Details form is displayed.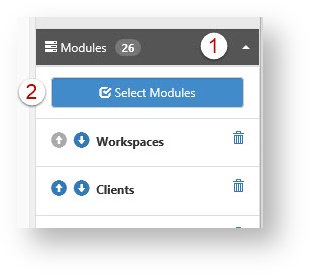
- In the Action Center, click Modules > Select Modules.
The Select Modules list is displayed. - To add a module to your user profile, locate a module and select the module check box.
- Click Ok.
You are returned to the User Details form. Your new module is listed in the Action Center pane, in the Modules group. - To see the new module in the modules bar, refresh your screen (Press F5).
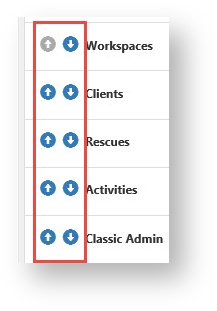
- To manage the order of modules, use the blue arrows to move up or down. Overflow modules that will not fit in the header will appear in the View list.
- Click Save.
- Refresh the workspace to (Press F5).
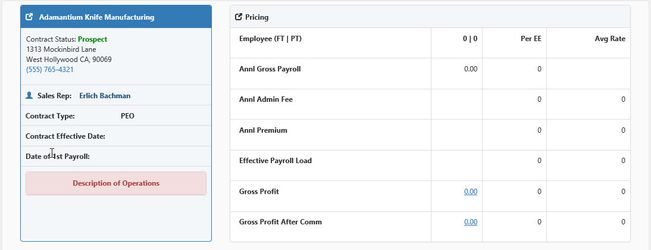
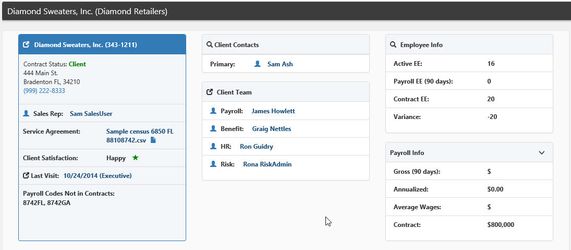
On the left, you see a typical set of landing page tiles or panels for a workspace in the Prospect stage, basic client information as well as pricing data. On the right is a set of tiles or panels for a workspace at the Client stage. More detailed information becomes available when you begin fleshing out the client workspace with payroll system imports and Client level records.
Landing page tiles are really a series of panels at the top of the Workspace Landing Page, some of which can expand to reveal more information as indicated by an inverse caret which can be clicked to further expand the panel.
Many of these tiles allow for drill down into a more detailed version of the information or underlying dataform. This is generally indicated by an icon in the header of the individual tiles. Currently, drilling into a single form or dashboard in the system such as the pricing console is indicated via the jump symbol  whereas drilling into a multiform record is indicated via the search symbol
  . Some of these Widgets are configurable see configuration instructions for the Client Team Widget.
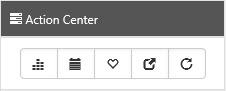
The workspace action center provides a series of common Actions that can be performed at the Workspace level, these actions are represented by icons and are as follows:
 Org Action
The org action acts as a quick jump to the Organization associated with the Workspace you are on.
 Calendar Action
The calendar action acts to open a ClientSpace calendar, pre-filtered for the workspace you are on.
 Favorite Action
The favorite action adds this workspace to your favorites list when clicked - this is the same as checking the "Favorite" checkbox from the homepage or Workspaces dashboard. Once selected as a favorite the heart indicator will turn red.
 Jump Action
The jump action works just like the workspace quick jump in our classic application, allowing you to quickly skip from one client workspace to another. Unlike our classic app, the jump action will open this new client as another item in your work items navigation, making multi-tasking easy.
 Refresh Action
Refreshes the current workspace landing page data.
 Copy Link to Clipboard
Available from the action center in many places in the application, this icon copies the current URL into your desktop clipboard and makes it available to paste elsewhere.
Admins Only
![]() Workspace Dataforms
Workspace Dataforms
Use this icon to control the dataforms in a workspace through an Add or Delete dialog.
 Workspace Settings
Use this icon to control various Workspace settings such as Workspace Name and related organization.
![]() Workspace Users
Workspace Users
Add or remove users from this specific workspace using this icon.
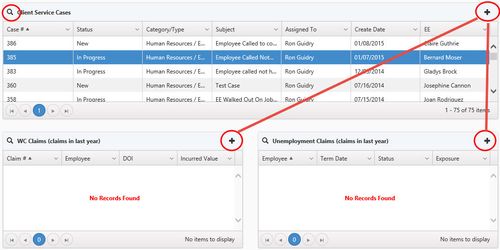
Landing Page Lists are also dependent on the workspace Stage, presenting pertinent multiform data for that stage - for Prospects this is the activities list, providing quick access to add and edit Organization activities. For Clients, these lists represent frequently used multiforms, such as Client Service Cases, Unemployment and Workers' Compensation claims.
Each multiform list will have an Add link represented by the plus sign ![]() in the upper right corner, as well as the ability to expand to a full page filterable list via the magnifying glass to the left of the dataform name. Drilling into individual records can be accomplished via double-clicking a selected list row, such as highlighted case number 385 in the image above. In mobile browsers, an edit button will be available.
in the upper right corner, as well as the ability to expand to a full page filterable list via the magnifying glass to the left of the dataform name. Drilling into individual records can be accomplished via double-clicking a selected list row, such as highlighted case number 385 in the image above. In mobile browsers, an edit button will be available.
These lists provide vertical scroll for large numbers of records, as well as paging should the record count exceed what is initially returned in the list when opened.
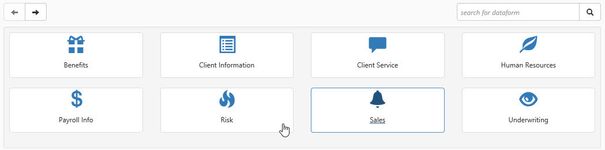
Each Client Workspace has associated dataforms. In classic, these were arranged in a table of contents (TOC) along the left side of the screen. This was extremely limiting in that you could only have one dataform at a time open, which caused issues with multi-tasking. Next contains a completely new dataform search function which allows you to access dataforms in multiple ways.
Dataforms are categorized, so if you are looking for certain classes of dataforms you can drill into the associated category and access the dataform, much as you did in the Classic TOC. After you have drilled into a dataform, you can navigate back to the starting point using the convenient navigation arrows in the upper left. You can also search for the dataform directly using the new "search for dataform" functionality - simply type in a part of the dataform name and click the magnifying glass and the system will find what you need.
Double-clicking or editing a record opens that dataform in the Work Items area at the left of the screen, allowing you to open multiple workspaces and multiple dataforms within those workspaces quickly and easily.
-
Workspace Search Issue (KnowledgeSpace)
-
Workspace / Organization Missing From Search (KnowledgeSpace)
-
Widget: Payroll Info (KnowledgeSpace)
-
Widget: Employee Info (KnowledgeSpace)
-
Synchronizing Template Workspaces (KnowledgeSpace)
-
-
Configuring the Client Contact Widget (KnowledgeSpace)
-
-
*The Workspace Landing Page (KnowledgeSpace)
NOTICE: You are in the old ClientSpace Help system. Please link to the new ClientSpace Help here https://extranet.clientspace.net/helpdoc/home/ClientSpace.htm