NOTICE: You are in the old ClientSpace Help system. Please link to the new ClientSpace Help here https://extranet.clientspace.net/helpdoc/home/ClientSpace.htm
Organization Detail Record
The organization detail record is designed like a rolodex contact card, allowing the sales rep to store detailed information about a prospect such as name, address, phone and fax, website and company data as well as several fields for tracking the prospects progress through the sales workflow.
Adding an Organization record: Primary Information fieldset
To add an organization:
- On the modules bar, click Organizations.
The Organization Search list is displayed. - Click Add.
The Organization Detail form opens. - Complete the fields in the Primary Information fieldset.
Several fields are outlined in red: Name, Phone, Assigned To, and Website. You must complete these fields before you can save the form. Fields marked with a red border are used to check for duplicate organizations.
| Field | Description |
|---|---|
| Do Not Call |
|
Locked |
|
Name | Name of the organization. |
Assigned To | The salesperson responsible for onboarding the prospective client. |
TeleSales Rep | |
Primary Contact | Name of the primary contact of the prospective organization. You can add more contacts from the Action Center. To add a new contact: 1. In Primary Contact, click Add Contact. 2. Complete the form. See Adding Contacts to the Organization on page 15. 3. Click Save. After you Save, the newly added contact is reflected in the Contacts panel in the Action Center. |
Phone | Provide a phone number for the primary contact. Click |
Fax | Provide a FAX phone number. Click |
Category | Category tracks the type of organization and includes such options as Client, Broker, Partner, Vendor, and so on. Category defaults to Lead. This is by design – the system is designed to act as a sales automation system, allowing you to track the progress of the prospect from the first contact to a signed contract when they become a client.
|
Business Type | Select a business type from the list. |
Status | Status is for tracking the workflow through the sales process, beginning at Cold and ending at Client. Statuses enable sales management to track and understand their sales pipeline and build sales forecast models. Status is configurable so that you can customize to the sales workflow of your company. Status of the new organization defaults to Cold. |
Source | Indicates how the lead originated. Select a source from the list: Chamber Event, InfoUSA, Referral, Broker, Call-In, Client Referral, Cold Call, Event, Internal Referral, Other, Personally Produced, Roll-up, and TeleServices. |
NAICS | North American Industry Classification System (NAICS) is the standard used by the Federal statistical agencies in classifying business establishments to collect, analyze, and publish statistical data related to the U.S. economy. To find your NAICS code, go to https://www.naics.com/search/ Note: The NAICS code is NOT the same as the NAIC number. |
Department, | Department, Created By, and Date Created are auto-filled. |
Adding an Organization record: Address fieldset
- Complete the fields in the Address fieldset.
| Field | Description |
|---|---|
| Address 1, Address 2 | Organization address. Use Address 2 for additional data such as Suite #. |
| City, State, Postal Code, County, Country | Organization city, state, postal code, county, and country. |
Adding an Organization record: Other Info fieldset
- Complete the fields in the Other Info fieldset.
- Click Save to save the record, which begins the duplicate checking process.
- The duplicate checking process uses a Soundex check (comparing values that are similar but not the same) to compare the Name, Phone, and Website recorded on the prospect to the same information on previously saved organizations. This helps to ensure that you do not approach the same potential client more than once.
| Field | Description |
|---|---|
| DBA | Name the organization is known as – doing business as. |
CEO/Owner | Name of the CEO or business owner. |
Website | The URL of the organization website. When you have entered a valid URL, you can click (Jump) to launch a browser and navigate to the website. |
EIN | EIN is the Federal Employer ID of the potential client. If the ID is not known, enter Applied as a valid system value. |
Secondary Phone | Secondary phone number for the organization. |
General Email | General email address for the organization. You can add email addresses for contacts in the Contact record. |
Import ID | The Import ID is automatically assigned if the Organization record was imported from another source such as Salesforce. |
General Notes | If the Organization record is imported, a "Created via" message appears here. |
Active | An Organization record can be Active or Inactive.
|
Allow CRM Import |
|
 Add Task
ClientSpace tasks are designed to be work items of limited scope, sort of like a checklist of To Do items. An example of a sales task may be "Check Credit" or "Send Thank You card." For sales organizations that utilize an internal sales coordinator, generating tasks for that person gives the Sales rep an easy way to make a service request and check to ensure it has been completed on time.
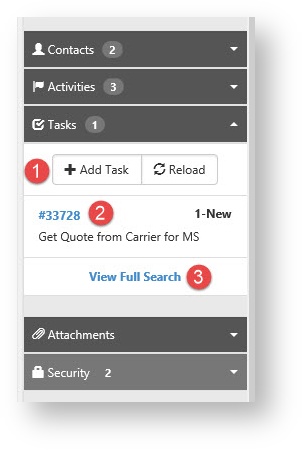
- When generated by clicking Add Task, the Owner of the task defaults to the task creator. Status and Workflow default to "New" and the Start Date defaults to today's date.
- Other required fields that are not automatically filled include Category, Priority and Subject.
- A Due Date can be set to show the expected delivery of the task completion. This can also be used in task management to filter for records due today, or this week, etc.
- If Time tracking is enabled, you can track time for a given task using the time tracking buttons in the task header. Time tracking helps in better understanding where your organization is spending its time.
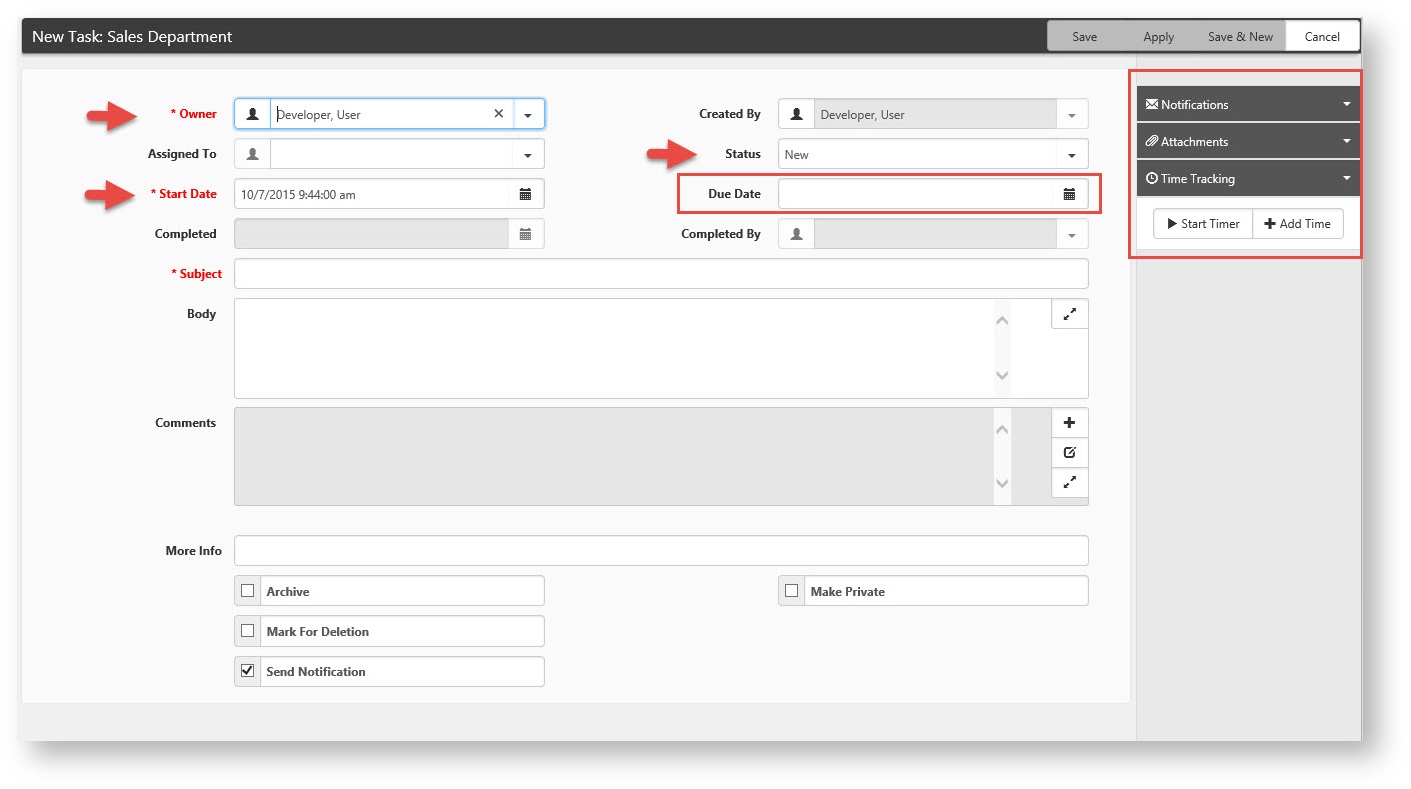
Some of the other tabs associated with tasks include:
- Notifications: Select a list of ClientSpace users you want to keep in the loop about this task and they will be automatically emailed when the task is updated (Owner and Assigned To will always receive notifications).
- Attachments: Attach important documents such as signed paperwork and images that are related to this task.
- Other Info: The recurrence feature allows you to create automated recurring tasks. More about the recurring task feature and how to configure a recurring task can be found in this short video.
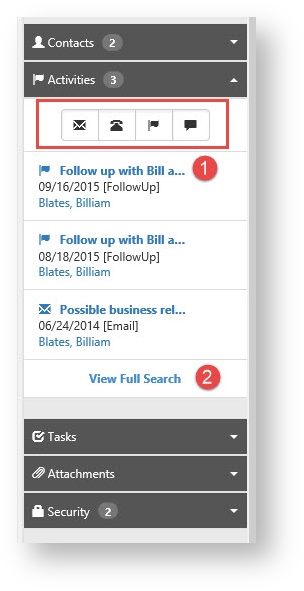
Activities
Sales activities are the records of the sales calls and actions you have taken as part of the sales process. Managing multiple prospects at once can be daunting unless you have the right tools in place to help you remember who did what and when. Being able to quickly and easily record these sales activities is what the Activities Icons are all about.
Activity Action Item
The activity Action Item gives you quick access to all Activities associated with this organization at a glance. The counter badge displays a count of the current active activities.
- Click the action item to expand it for a minified view with the date of the activity, Activity Type, associated contact, and the subject of the Activity.
 Add Email
Email is ubiquitous today and has become one of the primary methods of business communication. ClientSpace allows you to manage your email communications with prospective clients directly from the organization record, where you have any notes, calls and follow-up information at your fingertips.
- When you click Add Email, you are presented with a CRM Note, defaulted to the Activity Type of Email.

1. Activity Type: Defaults to Email when you choose Add Email.
2. Subject and message Body - these will be presented in the appropriate fields when you send the email. Combine these with the signature you can store on your user profile and you get a quick way of generating emails to your prospects without ever having to leave ClientSpace.
3. Save and Follow Up... Allows you to send your email and a CRM Note with an activity type of follow-up, sort of like a tickler file to help you keep the sale moving down the road towards signing the deal.

 Add Phone Call
Keeping track of what calls you made or what was said can be a daunting task, especially if you are using mass contact functions such as a marketing campaign to reach a large audience all at once.
- When you click Add Phone Call, you are presented with a CRM Note, defaulted to the Activity Type of Phone Call.

Options here are similar to email functionality:
1. Activity Type: This defaults to Phone Call when you click Add Phone Call.
2. Subject and Body: Use these areas to record what you spoke about on your call.
3. Save and Follow Up... As with email, Save and follow up creates a follow-up activity type.
Do Not Call
It is important to note that selecting the Do Not Call check box on the Org enables the option to indicate this client prefers not to receive phone calls.  Selecting the option does not, however, disable the button.
 Add Follow-up
Follow up records are specifically created to provide a reminder for you to contact the prospective client at a later date either in relation to a previous call or email or as a direct contact to keep you and your company top of mind for the prospect.
- Click Add Follow Up to create a CRM Note record with the Activity Type of Follow Up defaulted.
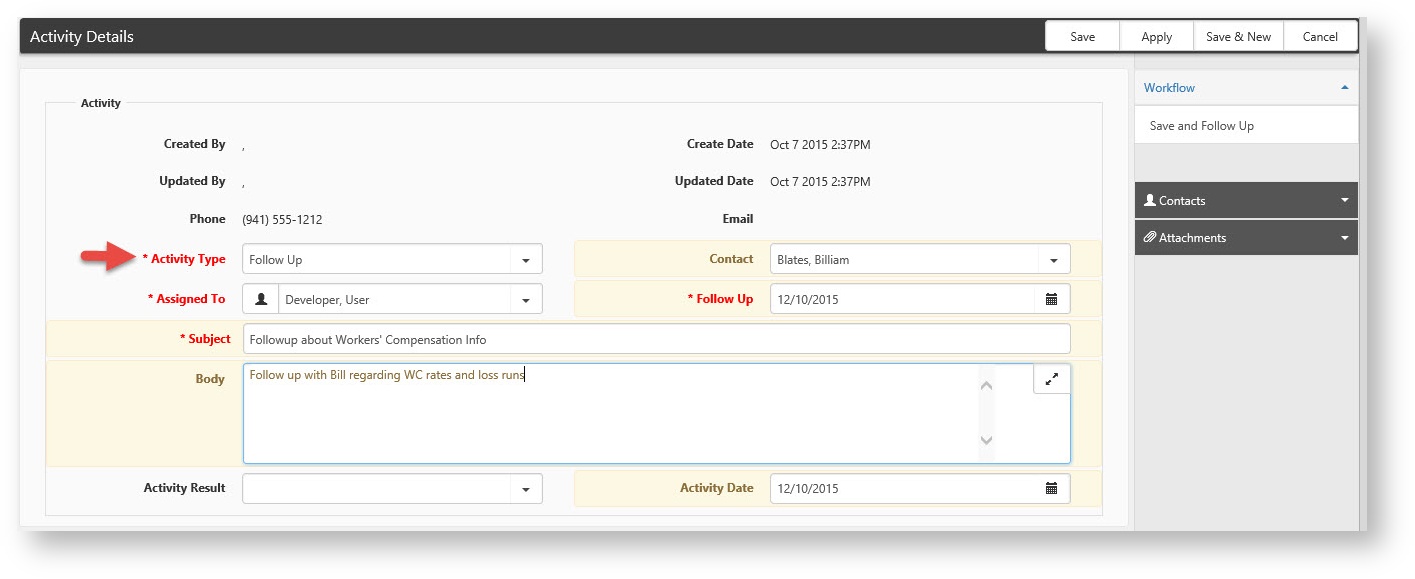
When saved, Follow Up records will display in the Activities list as follow ups, but when opened they will clear the Activity Type field to make it easier for you to convert the follow up to another type of record, such as call or email.
Follow up records integrate with the Organizations area of the home dashboard in ClientSpace.***
![]()
Follow Up Best Practice
*** It is important to note that the organization's area of the Home Dashboard in ClientSpace will only display follow ups from TODAY and earlier. If these follow ups are consistently assigned an appropriate activity, such as email or phone call, this section of the home dashboard can be used as a ToDo list of items that should be done by today or prior.
 Add Note
- Click Add Note to open a new CRM Note record and allow you to record detailed information about your prospective Client. Using CRM Notes in concert with Emails, Phone Calls, and Follow Ups ensures that you have all the information you gather about a prospective client at your fingertips.
Activity Summary:
Activity Summary provides a one-stop shop for managing activities:
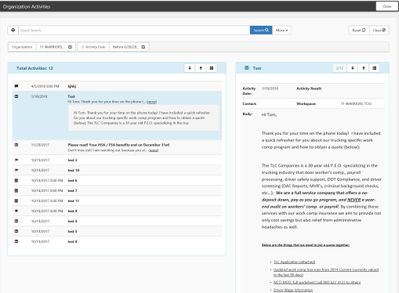
This list displays the activities associated with the organization. Selecting an activity in the left pane will provide a detail view of the activity on the right. These can be filtered using the Filtering at the top, allowing you a quick method of reviewing all activities.
The Org Other Info record appears as a tab on the Organization Detail, but it is in fact a configurable dataform tied to organization records. This configurable dataform makes it possible for your company to highly customize the Organization record in order to store information that is important to your business and sales process. As a dataform, the Organization Other Info tab also supports configurable business rules, field display conditions, and links. How your company uses Org Other Info depends in part on your sales prospecting process, but I have included a few examples of this form below:
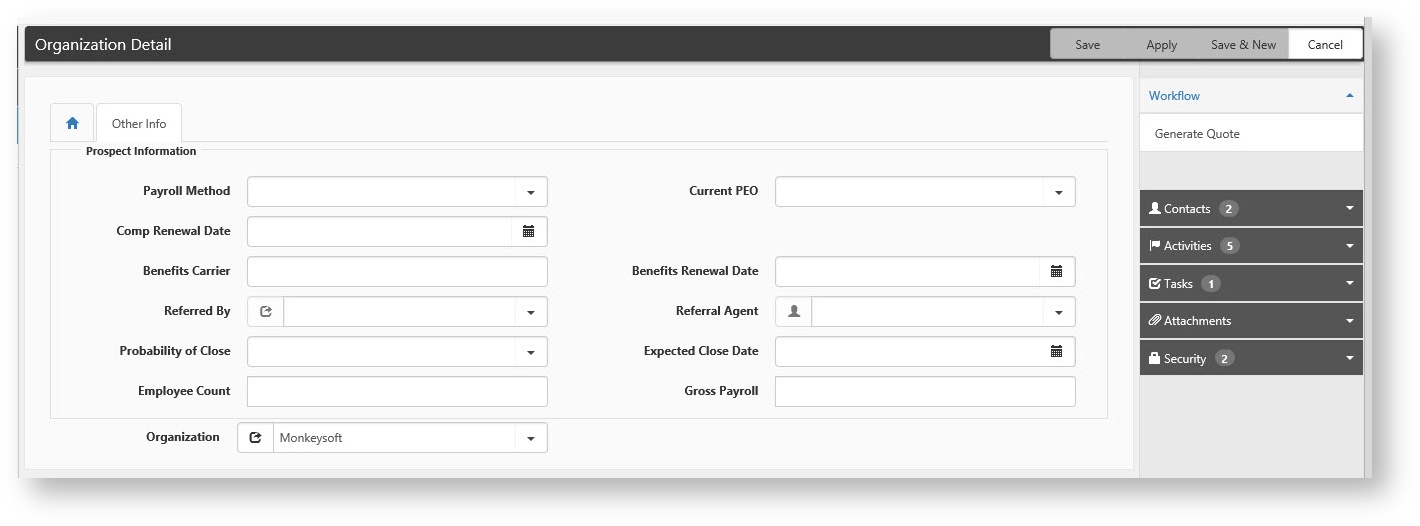
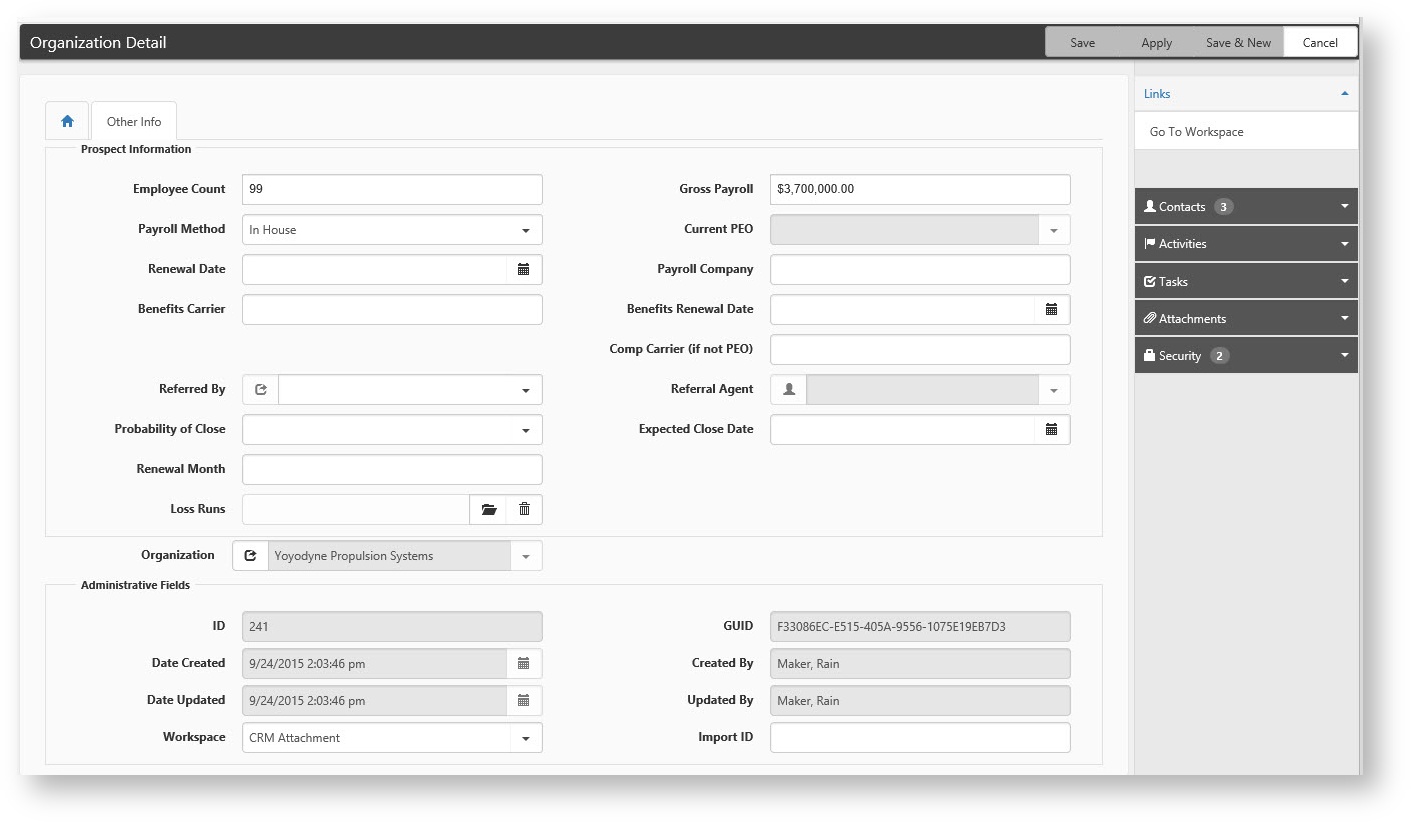
As you can see from the screenshots, the form can be configured any number of ways, depending on what type of information you need to capture throughout your sales process.
For Category, when Carrier is selected, the Carrier Details fieldset becomes available in the Other Info tab.
- The Carrier Details fieldset includes the NAIC field.
- The NAIC field is auto-filled from the related carrier's Org.IndustryCode.
What is the NAIC number?
The NAIC number is a number that the National Association of Insurance Commissioner's (NAIC) assigns to each individual underwriting company. The NAIC number is different from the NAICS code.
The Contacts Right Nav allows you to Add and Edit Contacts for a prospective client. These contacts are available throughout the associated organization and activities information, anywhere that you see a contact selector, such as on the CRM Notes page.
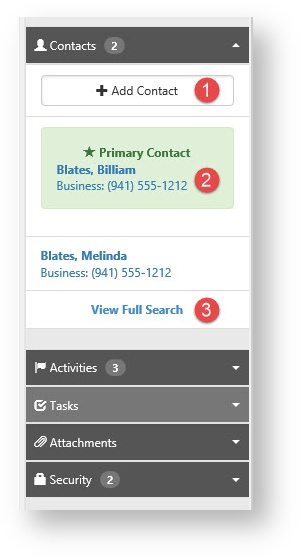
Editing a contact, either by selecting the contact in the list and clicking Edit or by double-clicking the item in the list opens the Contact Detail | General tab. This tab stores general demographic information about the contact, including Name, Address, Telephone and Fax numbers, Email address and so on.
Contact General
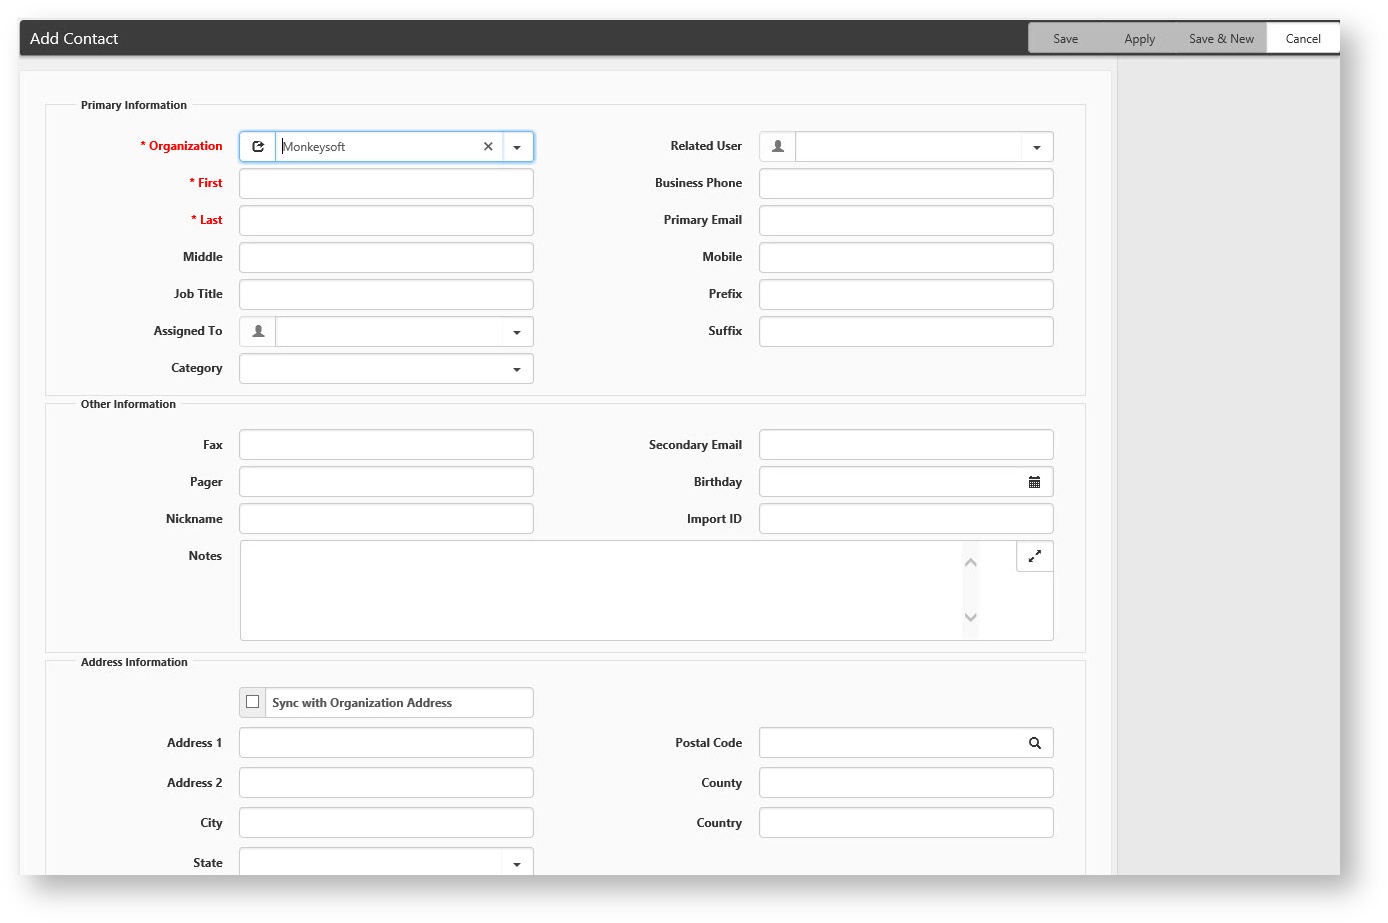
The General Tab also contains a profile image field. Attaching an appropriate image in this field will cause the image to be displayed in the header of the Contact.
Checking the "Sync with Organization" checkbox will allow the system to update the Address information on the contact with the address information of the related Organization.
Contact Activities
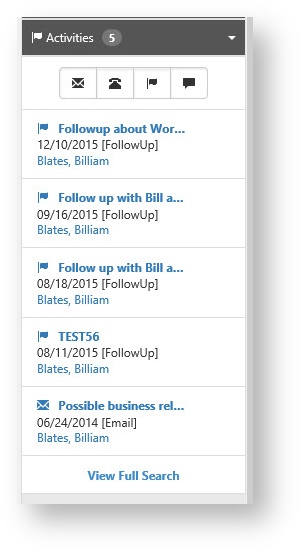
The Contact Activities Right Nav provides a quick method for searching for and maintaining any Organization activities related to this contact. Activities may be added using the Activities Icons as well as Edited or Deleted. A full list may be viewed by selecting 'View Full Search'
One of the best methods of integrating the Organization record in ClientSpace with the sales process at your company is via the ClientSpace Outlook Add-In Post and Send functionality. The ClientSpace Outlook Add-In allows you to connect emails that you send and receive in MS Outlook to the ClientSpace Contact and organization records that you use for Sales Prospecting. After you have installed and configured the Outlook add-in for use, attaching emails to a Contact record in ClientSpace is only a click away.
Simply create an email to your customer as you normally would in Outlook and when you are done, use the "Post and Send" function of the Outlook add-in to send your email and automatically attach the email to the related contact record in ClientSpace at the same time.
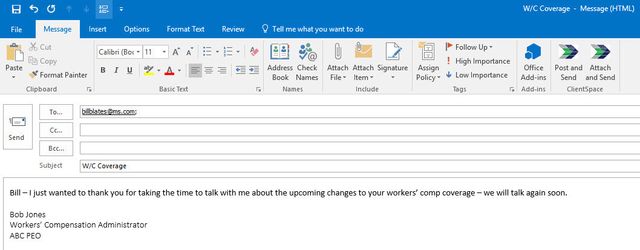
When you click "Post and Send" the ClientSpace Outlook add-in will automatically use the email addresses in the To: and Cc: fields of Outlook to look up contacts in your installation of ClientSpace and automatically tie the emails to the appropriate Contact record.
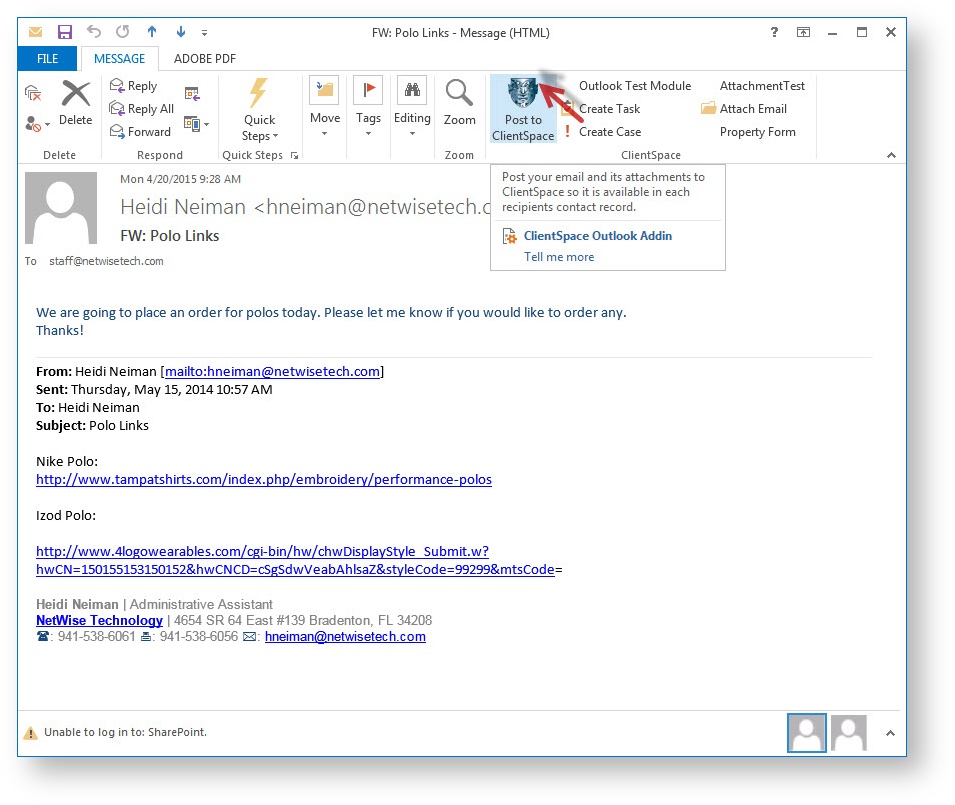
Emails received from Client contacts can be attached to ClientSpace contact records as email activities in a similar way using the "Post to ClientSpace" function in Outlook. This button, available on received emails in Outlook, allows you to attach received emails to ClientSpace contact records, making these emails available from the activities area of the Organization.
The Security Right Nav for the organization allows you to manage who has access to the organization and what level of Access they possess.
Users and roles are displayed on the Security tab of the Organization with checkboxes to control their available rights. The users on this list can be added in a number of ways, including manual inclusion by the salesperson, Departmental security, and Org Category security.
For a complete description of Organization security and how it works, see ClientSpace Organization and Workspace Security Configuration.
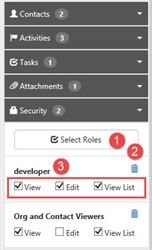
- Select Roles - Click here to begin adding additional users or roles to the security for this organization
- Delete - This trashcan icon allows you to delete the user/role from the list
- Rights List - Security rights for the selected user/role
- View - can open and view the record - View rights without View List rights will not make the record appear in the Search List.
- Edit - can make changes to the record
- View List - can see the record in Organization search, but cannot open or edit.
NOTICE: You are in the old ClientSpace Help system. Please link to the new ClientSpace Help here https://extranet.clientspace.net/helpdoc/home/ClientSpace.htm