NOTICE: You are in the old ClientSpace Help system. Please link to the new ClientSpace Help here https://extranet.clientspace.net/helpdoc/home/ClientSpace.htm
Using the System Calendar
 The Calendar Work Item
When you log into the application, you are presented with a list of work item icons in the upper left corner, one is the calendar. This icon opens the Calendar module, which by default, displays the calendar events for the week of which you are an attendee.

The calendar can be filtered and viewed in many different formats:
- Workspace - Select a workspace to filter events to only those attached to that workspace.
- User - Select user(s) who are invited to attend calendar events. With multiple users selected, hover over the Info bubble to see a list of users.
- Event indicator colors - Blue for application events, Green for events from external calendars.
- Date criteria - Select the date range and timezone for display
- Calendar format - Select how you want to view this calendar:
- Day - show only the events for today
- Work Week - based on configured work week in application settings, commonly M-F 7 am - 7 pm
- Month - show events for the current month
- Agenda - provides a 7-day synopsis of your meeting schedule

- Timeline - a different Daily view showing a horizontal timeline for a single day and the associated calendar events from start to finish

User Profile Integration: Adding external events
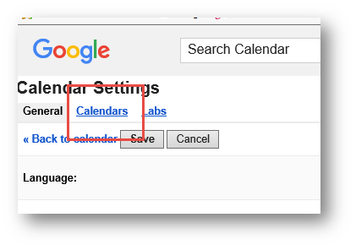
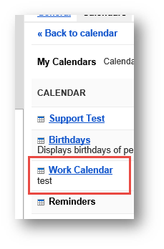
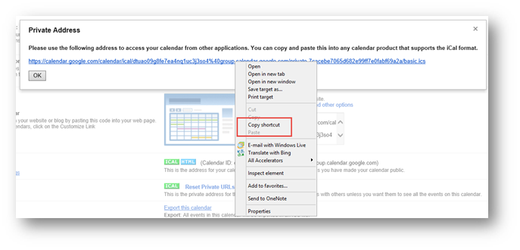
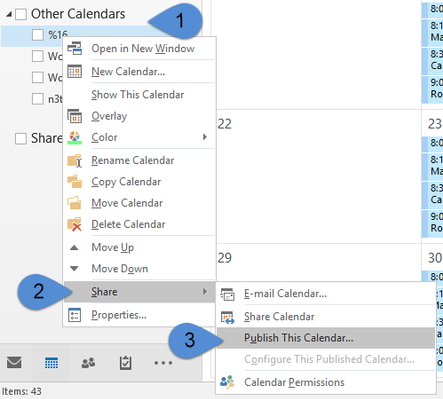
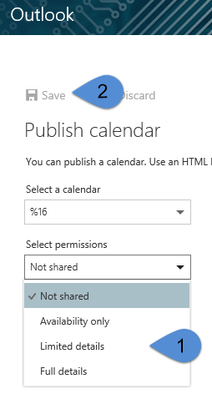
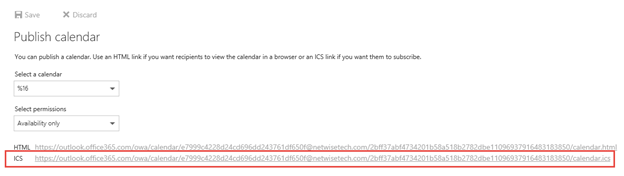
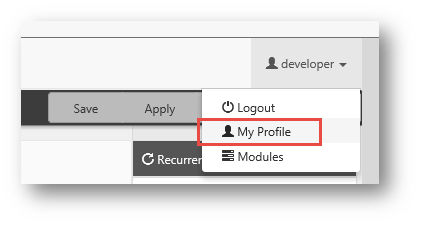
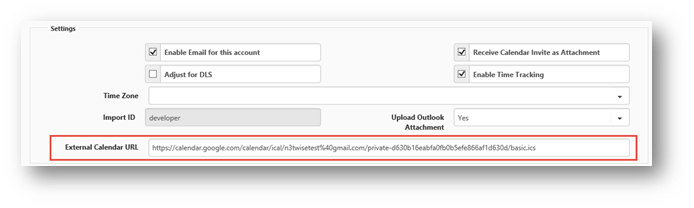
To add visibility into a Gmail calendar you will need to export the Private URL for the Gmail Calendar in question by performing the following steps: Open your Gmail calendar and go to Settings by clicking the gear in the upper right and selecting Settings. Click the Calendars link in the upper left. Select the Calendar you would like to access from ClientSpace. Use the ICAL button under Private Address to access the Private URL for your calendar. Right Click the provided URL and select Copy Shortcut In ClientSpace NEXT access your user profile by clicking the profile icon in the upper right and choosing My Profile Paste the Private URL you just copied into the External Calendar URL field at the bottom of the page and Save the profile. Selecting Attendee availability on a ClientSpace calendar event will now check to see the last time you refreshed your Gmail calendar and if it has been more than 30 minutes the system will retrieve all active calendar events for the next 3 months and display them in this Free / Busy area. To add visibility into an Outlook calendar you will need to export iCalendar ICS URL in question by performing the following steps: Open the calendar in Outlook and right click the calendar you would like to share then select Share | Publish This Calendar For Office 365 clients you will be asked to login and then presented with the option to select the calendar and the sharing permissions you would like to allow. Once you choose a sharing option select Save The page will then display both the HTML and ICS URLs for sharing – Right Click the ICS URL and select “Copy Shortcut” In ClientSpace NEXT access your user profile by clicking the profile icon in the upper right and choosing My Profile Paste the ICS URL you just copied into the External Calendar URL field at the bottom of the page and Save the profile. Selecting Attendee availability on a ClientSpace calendar event will now check to see the last time you refreshed your Outlook calendar and if it has been more than 30 minutes the system will retrieve all active calendar events for the next 3 months and display them in this Free / Busy area.


 Workspaces: The Calendar Action Icon
To use a calendar within a workspace, select the calendar action item from the action items on the top right. 
This opens the same calendar view as the Work item, but with a workspace filter already applied. Calendar items created in this way will automatically be created in the current workspace.
Calendar Details

The calendar detail dialog is where you create the new calendar event:
- Action buttons - Use these buttons to save a new calendar event or apply changes to an existing one.
- Recurrence - Calendar items provide the option to create recurring calendar events. These events can be scheduled to occur on a regular basis and are automatically generated by a scheduled process once configured and can be scheduled to occur daily, weekly, monthly or yearly. (see recurring events below)
- Time Zone - Control the default time zone of this calendar event using this control, 8 am meetings set up in the Pacific time zone will display as 11 am meetings for someone whose default time zone is eastern.
- All Day Event - Checking this box Sets the start time of the calendar item to 12 am and the end time to 12 pm.
- Private - When this box is checked the calendar event will only be visible to invited attendees
- Organization - Select an organization to be associated with this event. Contacts related to the selected Org will display in the Attendees list.
- Contact - Select a contact from the designated Org
- Attendee selector - Who would you like to invite to this calendar event? Select them here and view their availability. (see below)
Recurring Events
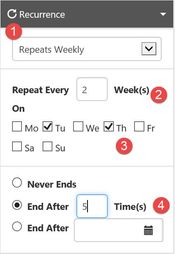
Use this control to set the frequency of recurring events:
- Recurrence cycle - Select from Daily, Weekly, Monthly or Yearly.
- Frequency - How often would you like this event to repeat?
- Repeating on - Select the days of the Week/Month/Year you would like this to repeat
- Ending on - Select how long you would like the event to repeat based on the number of occurrences or an end date. Or allow the event to repeat forever.
So for the example, the calendar event will repeat every 2 weeks on Tuesday and Thursday and continue for 5 of these recurrence cycles.
Attendees - Inviting people
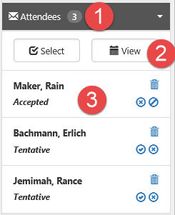
The Attendees selector is where you add invitees to the calendar, as well as track the status of their invite:
- Attendee Counter - Displays the number of current calendar event invitees
- Action buttons - Click Select to choose one or more attendees - click View to review attendee availability
- Attendee list - Displays the list of current attendees with their current status of Accepted, Tentative and Declined. You can also control attendee status here.
Selecting Attendees
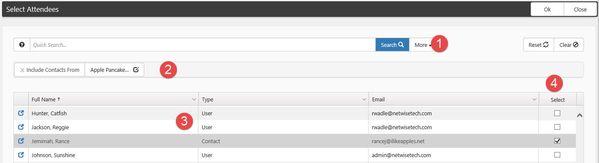
This interface allows you to find and select attendees using a standard list control:
- Filter - Use the Quick Search or More filters to filter the list
- Workspace - Available users in this list are filtered by the selected workspace
- Attendee List - Select users from the available list. The list can be sorted.
- Selector - Click this checkbox and click OPK to add the attendee(s) to the event.
Attendee Availability
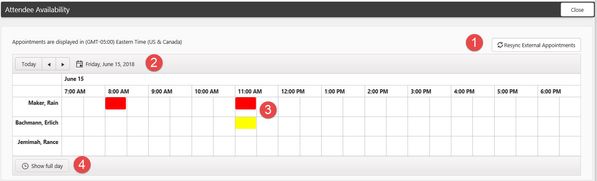
After you have selected your attendees, you can get a snapshot of their calendar availability using the View button in the attendee action item of the calendar detail.
- Resync External Appointments - If any of the attendees have integrated an external calendar with their user profile you can use this button to synchronize external events.
- Date - Displays the date of the calendar event.
- Availability List - Displays an overview of the attendee's other calendar events for that day. Events in RED are accepted events and these times should be avoided. Events in YELLOW are tentative to the attendee and could potentially be re-scheduled.
- Show Full/Work Day - Changes the availability view to include/exclude non-business day hours.
-
Using the System Calendar (KnowledgeSpace)
-
External Availability Calendar Sync (KnowledgeSpace)
-
-
Configuring External Calendar Availability (KnowledgeSpace)
-
Configuring Calendar Event Notification Template (KnowledgeSpace)
-
Adding External Calendar Events to your Pulse Calendar (Pulse KnowledgeBase)
NOTICE: You are in the old ClientSpace Help system. Please link to the new ClientSpace Help here https://extranet.clientspace.net/helpdoc/home/ClientSpace.htm