NOTICE: You are in the old ClientSpace Help system. Please link to the new ClientSpace Help here https://extranet.clientspace.net/helpdoc/home/ClientSpace.htm
Creating ClientSpace Modules From BI Objects
Business Intelligence allows you to create dynamic reports and dashboards which can include Charts and graphs to help you manage your time and clients. Getting to these reports and dashboards however can sometimes be onerous. The following step by step guide will help you add your BI reports and dashboards to ClientSpace as a module.
Step-by-step guide
Use the following information to help you Create ClientSpace modules from business intelligence objects such as reports and dashboards.
For a Module created from a BI Dashboard:
First Review the dashboard in Business Intelligence you should see the category of the Dashboard as the top level, expanding area under the Dashboards folder, clicking this to expand will reveal the Dashboards in that category.
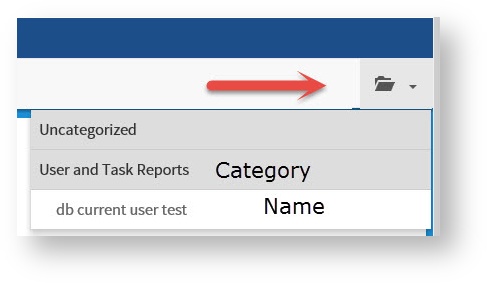
- Write down the category name and dashboard name exactly as they appear in the BI interface, you will be using this information later.
- Navigate to System Admin
 | Modules
  and click 'Add'.
 - The add module dialog will open - fill the following fields.
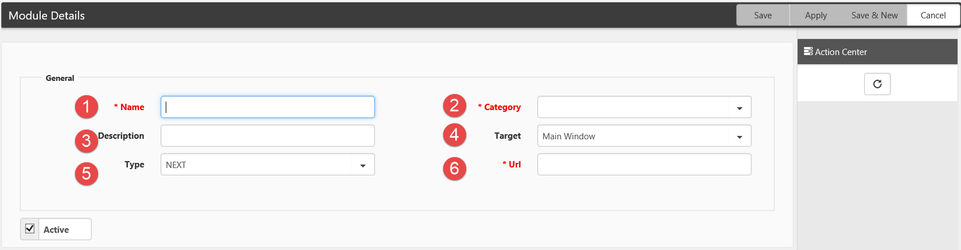
- Module Name (required) - Provide a meaningful name for your module, this will be displayed in the modules list in ClientSpace.
- Category (required) - Select a module category which fits with your modules purpose.
- Description - Type a brief description of your module - this will appear in the module select lists.
- Target - Type "new" to have the module open in a new tab of the browser. Proper formatting of BI modules require them to be opened in a new tab.
- Module Type - Business Intelligence | NEXT | Outlook - choose Business Intelligence
- Module URL (required) - Format the URL in the following manner - /BusinessIntelligence/Dash.aspx#/#DashboardCategory#\#DashboardName# replacing #DashboardCategory# and #DashboardName# with the actual category and name as it appears in business intelligence So for the example in the screenshot above the url is /BusinessIntelligence/Dash.aspx?rn=User and Task Reports\db current user test
5. Save your module.
For a module created from a BI Report:
Configuring a BI report as a module is much the same as configuring a dashboard.
- Follow steps 1 - 3 above for configuring a module from a BI Dashboard.
- When the Add dialog opens fill in the following fields:
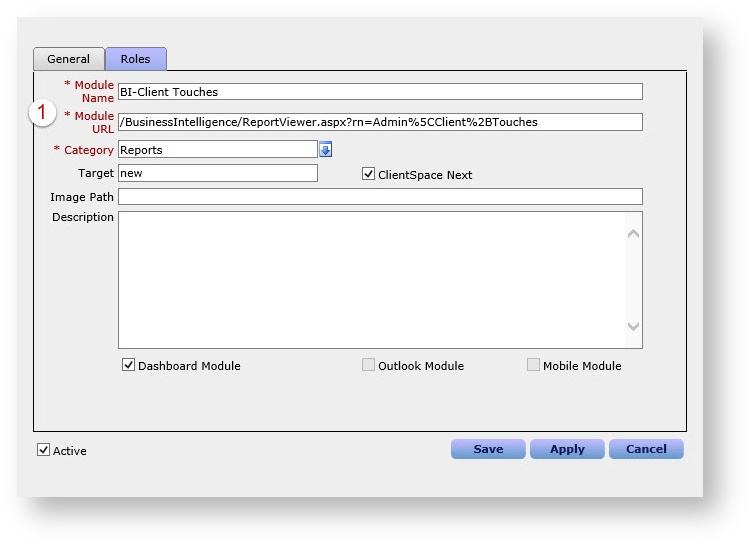
- Module Name(required) - Provide a meaningful name for your module, this will be displayed in the modules list in ClientSpace.
- Category(required) - Select a module category which fits with your modules purpose (Reports may be the most appropriate).
- Description - Type a brief description of your module - this will appear in the module select lists.
- Target - Type "new" to have the module open in a new tab of the browser. Proper formatting of BI modules require them to be opened in a new tab.
- Module Type - Business Intelligence | NEXT | Outlook - choose Business Intelligence
Module URL(required) - Format the URL in the following manner - /BusinessIntelligence/ReportViewer.aspx?rn=#ReportCategory#\#ReportName# replacing #ReportCategory# and #ReportName# with the actual category and name as it appears in business intelligence.The easiest way to insure proper formatting is to copy the important bits from the browser url when you run the report. Upon saving the module, any slashes that appear in the url will be replaced automatically with %5C.
- ClientSpace NEXT - Check this box if you would like the module to be available in NEXT.
- Save your module.
Once the module is saved it will be available from the Modules list, or to add to the list of modules associated with your user profile.
Related articles
NOTICE: You are in the old ClientSpace Help system. Please link to the new ClientSpace Help here https://extranet.clientspace.net/helpdoc/home/ClientSpace.htm