NOTICE: You are in the old ClientSpace Help system. Please link to the new ClientSpace Help here https://extranet.clientspace.net/helpdoc/home/ClientSpace.htm
Configuring Email Integration For Your ClientSpace Installation
Email integration is a ClientSpace component that provides automated dataform creation (Client Service Case) via email requests. It allows the creation of an email account from a Third-party email provider to be accessed and data forms created based on the email account or a specific email alias. Once the request has been processed, an email notification will be generated from a configurable template and transmitted.
Before you configure email integration with ClientSpace you will need to gather some necessary components for configuration:
- Email address of the mailbox to be integrated (cannot be an alias, must be the actual mailbox email address)
- Password to login to the mailbox
- Host url of the email address (for example outlook.office.com, or payroll.gmail.com etc...)
- The port allowed for use by imap connections to the mailbox (the default for this is 993, but this may be changed at the firewall)
Step-by-step guide
Email Integration currently supports the following email providers that support the IMAP protocol:
- Aol.com
- Aim.com
- Gmail.com - Currently does not support SaslOAuth
- iCloud.com
- Outlook.com - Prior to configuring for Outlook see Configuring Distribution Groups for Email Integration With Office 365
- Hotmail.com
- Yahoo.com
Configuring Email Integration
Configuring email integration is completed using the following steps:
- Create your email account
- If using Gmail, enable the “access for less secure apps” option - for Exchange the mailbox will need to be imap enabled.
- Create an Email Integration Credential from System Admin
 | Advanced | API Configuration
 - Create an Email Integration Reply Template for the response email message from the System Admin
 | Email Templates
 - Create an Email Integration Alias for the email account and any associated mailbox aliases from the System Admin
 | Advanced | Email Integration Alias
 - Enable and schedule the “Process Email Integration” scheduled process from the System Admin
 | Advanced | Scheduled Processes
Creating, Modifying or Deleting API Credentials
The Email Integration login credentials are stored in the API Credentials table (tblAPICredentials) and can be maintained from System Admin  | Advanced | API Configuration.
To create, delete or modify a credential, you access the Email Integration API Credentials web page dialog and set the following fields:
API Configuration
- API Type - Required field - Choose "Email Integration"
- Application Code– Required field-should contain the Email integration application code. This field is limited to 150 characters and is used to identify mailbox to the associated scheduled process. The application code must be unique and is associated with the scheduled process “Process email integration”
- Application Name– Required field - should contain the application name associated with the application code. This name will appear in Lists, so it should provide a hint at the Mailbox association
- Username – Required field- the user account login name for the email account. Email addresses are case-insensitive and must be in a valid format. This address must be attached to a supported email provider (i.e. Gmail, AOL, etc.). This account will be required to have an email alias created using this email and it will provide default values for the workspace, project type and client.
- Password– Required field - the user account password. Depending on the email provider this field may be case-sensitive so ensure that you use the appropriate case when you enter the value.
- Description– Required field - should contain the description of this credential.
Email Settings
- Host - The Imap mail host for the mail client. This setting will be used when connecting to the mailbox. For information on your Imap host settings contact your mail provider.
- Port - The secured firewall port used by your provider to allow access to the mailbox. Most imap provider use Port 993, so we default the field to this.
- Use Secure Connection (HTTPS) - Connect to mail provider over internet via unsecured (http) or secured (https) access, Defaults to checked (secured).
Before deleting a credential, you must ensure that it is not associated with any email aliases or an error will be generated and logged.
Creating Email Integration Templates
Email templates are easily configured to generate custom response emails. The same email template can be used on multiple Email Aliases. The mail templates are stored in the Email Templates table (tblEmailTemplate) and can be maintained from System Admin  | Email Integration Templates.
Create or modify an email template by setting the following fields:
- Template Code – Required field - should contain the template code for this email template. This field is limited to 10 characters and is used to identify the template. It is recommended that we implement a standard template code and naming convention to easily identify templates that are shared across aliases or that have a special purpose.
- Template Type - Optional - Choose "Not Triggered" for email integration
- Template Name – Required field - should contain the template name for this email template. It is recommended that we implement a standard template naming convention to easily identify templates that are shared across aliases or that have a special purpose.
- 'From' Email Override -Optional - Overrides the Email "From" Address**. **note; If the recipient stored procedure on the Email Alias is populated it will override this field.
- Description – Required field - should contain the description of this email template.
- Subject – Required field - contains the decodable template for the generated email subject. It can contain text and/or field replace codes. You may use any of the email integration field replace codes or any field replace code available from the data form created during the integration processing. For example, when creating a Customer Service Case you have access to the following replace codes:
- {pkClientServiceCaseID}
- {CaseNumber}
- {Subject}
- {Body}
- {luCategory}
- {DateCreated}
- {RowGUID}
- {EmailToAddress}
- {EmailFromAddress}
- {EmailAttachmentsUploaded}
- {EmailAttachmentsRefused}
- {EmailAttachmentsRefusedReason}
The following is an examples of a template
Subject : Customer Service Case #: {CaseNumber}
Body – This required field contains the decodable template for the generated email subject. It can contain text and/or field replace codes. You may use any of the email integration field replace codes or any field replace code available from the data form created during the integration processing. This template may contain html or text. The following is an example of an email body using replace codes:
Regarding your recent Customer Service Request.
Request Received From: {EmailFromAddress} Case Key: {pkClientServiceCaseID} Case Number: {CaseNumber} Case Category: {luCategory} Case Subject: {Subject} Case Body: {CaseInfo} Please do not reply to this email. This email was automatically generated and sent from an unmonitored mailbox. For additional information, please contact your customer service representative. |
Creating Email Integration Aliases
Email Integration aliases are used to link a credential to an email address and to identify and group several default values necessary for processing the email requests received. The Email Integration Aliases are stored in the Email Integration table (tblEmailIntegration) and can be maintained from System Admin  | Advanced | Email Integration Alias.
To create, delete or modify an email template you access the Email Integration Alias web page dialog and set the following fields:
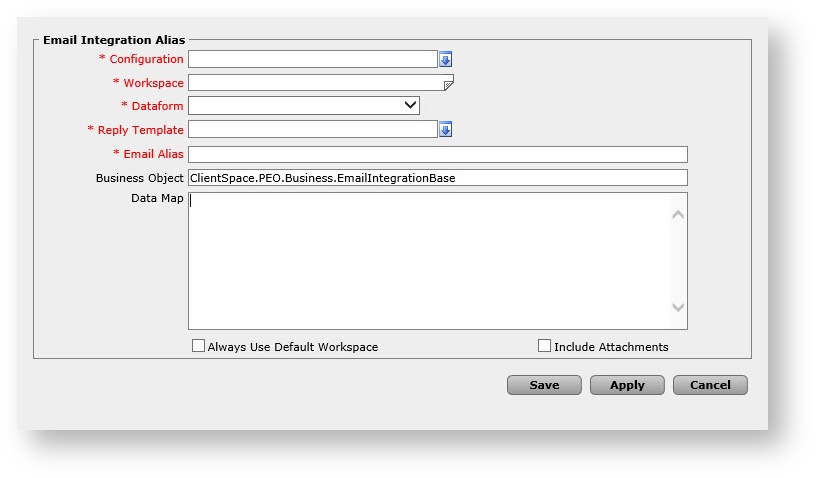
Configuration – Required field - contains the email API Credential that is associated with this email alias. You will use the drop list containing all of the credentials available to select the credential. And each credential should have at least one Alias associated with it. For example, if your credential user account is “netwiseclient@gmail.com”, you should have an email alias with the alias field set to this email address. This will be used as the default for this credential.
Workspace – Required field - contains the workspace that is associated with this email alias. This is the default workspace that will be used during the processing of the email. This value may be overridden by including the workspace in the body of the email. This override value must contain a valid workspace ID and be formatted as “WSID=#” with no spaces between the “WSID=” and the workspace ID. You will used the drop list containing all workspaces to select the workspace.
Dataform – Required field - contains the project type associated with this email alias. This determines what type of data form to create. You will used the drop list containing all Project Types to select the Project Type.
Reply Template – Required field - should contain the reply template to be used to send the process complete notification. You will used the drop list containing all Templates to select the Reply Template.
Email Alias – Required field- should contain the email address associated with this alias. The email to address will be used to match an email to its associated alias. Each credential should have at least one email alias associated with account email address. Additional, email aliases can be created so that email accounts with multiple email aliases can be mapped to different Project Types. You may create as many email aliases as the provider allows. There may be differences in the “To address” format of email aliases between providers.
For example:
Credential Username: client@gmail.com
Email Account: client@gmail.com
Email Alias 1: client+clientservicecase@gmail.com
Email Alias 2: client+createemployee@gmail.com
In this example, you would create 3 email aliases, the first using the Email Account as the email Alias value. This creates the default email alias to be used. The second would be created using email alias 1 and the project type set to the Project Type associated with creating a Create Client Service Case project type. The third would be created using email alias 2 and the project would be set to the Project Type associated with creating an employee (It should be noted that at this time the only supported dataform created via this method is the Client Service Case dataform).
Business Object - Not Required - this is the ClientSpace business object that stores any code to be run during the email integration process. This should either be left blank or filled in with the appropriate business object - in orur PEO system this would be "ClientSpace.PEO.Business.EmailIntegrationBase" (quotes removed). This may be used to allow additional optimized functionality to look up the workspace via a “CLID” (ClientNumber) or "WSID" (ProjectID), to modify the data before the data form is created or to modify the data before the reply template is generated and sent. In this way, you can add layer specific data values to the form or layer specific replace code values to the reply email.
Important
NOTE – in order for an email to be processed, it must have an Alias specified in the alias table. If no alias is found an email integration error will be generated and logged as “Email Contains Missing or Invalid Key Information - Workspace ID: # Project Type ID: 0”. When this occurs the reply message will not be generated and transmitted.
++Adding Email aliases to the actual mailbox that you use should be coordinated with your email administrator, and is not a function of NetWise or ClientSpace.
Data Map – This optional field contains the data map associated with this alias. Although, it is optional there will seldom be cases that this value is not set. It is used to set values for the fields associated with the data form being created. All required fields for a data form must have values mapped or the form create will fail. Automatically generated field replacement codes and email replacement codes may be included in the Data map. Multiple field value mappings may be included in this map separated by the "bang tag" character string !.!
For example to set the following Customer Service Case field values:
- Assigned To = 3663 (UserID - this can also be handled via configuration on the case type in which case you would not add this to the map)
- CaseNumber=1234 (Can also be set using business rules to set this to the pkClientServiceCaseID on Save in which case you would not add this to the map)
- luCategory=”ClientRequest”
- Case Type = "Client Help Request"
Your data map would look like:
AssignedTo = 3663!.! CaseNumber = 1234 !.! luCategory = ClientRequest!.!fkCaseTypeID=1275
Remember the field names are case sensitive when setting the values and must match a field name on the form or they will be ignored by the creation processing.
If you have a received from text field, text description or an additional information text field on a data form you can create a complex data map for that field.
For example to set the following field values:
- ReceivedFrom to the from address on the email
ReceivedFrom ={EmailFromAddress}
- Description to the subject of the email
Description ={EmailSubject}
- AdditionalText to a combination of hardcoded values and the email body
AdditionalText = The Email Body: {EmailBody} and it has {EmailAttachmentCount} attachments .
These may be combined into a single map like this:
AssignedTo = 3563 !.! CaseNumber = 1234 !.! luCategory = TEST !.! ReceivedFrom ={EmailFromAddress}!.! Description ={EmailSubject}!.! AdditionalText = The Email Body: {EmailBody} and it has {EmailAttachmentCount} attachments.
Always Use Default Workspace - This optional field when checked will force the system to always use the default workspace for the selected alias when creating the Client Service Case, regardless of the other methods available for Workspace selection.
Include Attachments – This optional field when set will allow email attachments to be downloaded and attached to the dataform during processing. File attachments are checked against the list of Valid Email attachment types stored in the Lookup ValidAttachExt, unrecognized email attachments will be added to a .zip archive and attached with the message: "CAUTION! The original file is NOT AN ALLOWED FILE TYPE in ClientSpace and it has been converted to a Zip Archive"
Email Processing
The Email integration scheduled process is as follows:
- Credential is looked up from the API Credentials table using the Application Code which matches the mailbox being searched.
- A list of unread emails is downloaded and processed as follows:
- If "Always use Default Workspace" is checked the system will use the Default Workspace ID, if not then...
- The Email Alias looked up based on the email TO address - if a match is found it uses this to determine the workspace, if not then...
- The body is searched for the CLID token and if found the business object is called to interpret the CLID and return the appropriate workspace ID++++ , if not then...
- The body is searched for the WSID token and if found and the workspace was not set by the business object CLID request the workspace ID will be set to the WSID value, if not then...
- If the workspace has not been determined, the contacts will be searched for a contact with the same email address as the email from address. If found, the primary project ID for the contact will be used as the workspace ID, if not then...
- If the contact was not found then the Organization table will be searched for an organization with the same email domain. If found the default workspace for this organization will be used, if not then...
- If no workspace is found the default workspace from the alias will be used along with the project type to create the appropriate data form.
- If the dataform type and workspace are found the body is scanned for additional data value tokens that will be added to the form data xml document in addition to the email data items to set valid fields.
- If a business object is specified the EmailIntegrationCreateNewForm is called to allow the business layer to set data values before creating the form.
- If the Business Object does not cancel the save then the data form is saved.
- If the data form was successfully saved the attachments are downloaded and attached to the form based on the alias "Include Attachments" indicator.
- The saved data, in addition to the email fields is placed into an xml document that is used to generate the reply message
- If a business object is specified the EmailIntegrationNotifySender is called to allow the business layer to set data values before generating and transmitting the notification.
- If the Business Object does not cancel the notify action then the notification is sent
- The email is then marked as read.
Email Integration Email Field Replace Codes
The following field replacement codes are available for use in email template data map fields as well as, the email alias data map fields.
- {EmailBody} – This contains the entire email body
- {EmailSubject} – This contains the email subject
- {EmailToAddress} – This contains the email to address. In the event there are multiple email addresses, this will be the first email address.
- {EmailFromAddress} – This contains the email sent from address.
- {EmailHasAttachments} – This contains a True or False depending on if the email had attachments. This does not indicate that the attachment was downloaded and attached. It only indicates the email had an attachment.
- {EmailAttachmentCount} – This contains the number of attachments on the email.
- {EmailMessageID} – This contains the email message ID.
- {WSSource} - This contains information about which of the source selection methods (a - g above) was used to determine the workspace in which to create the case.
GO TO TOP
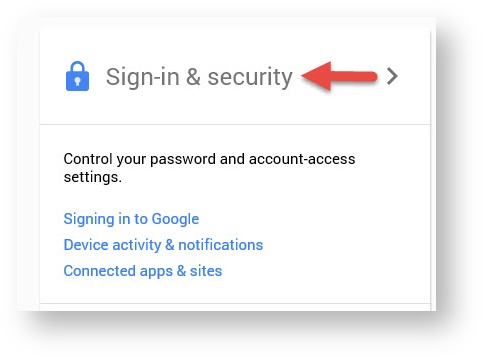
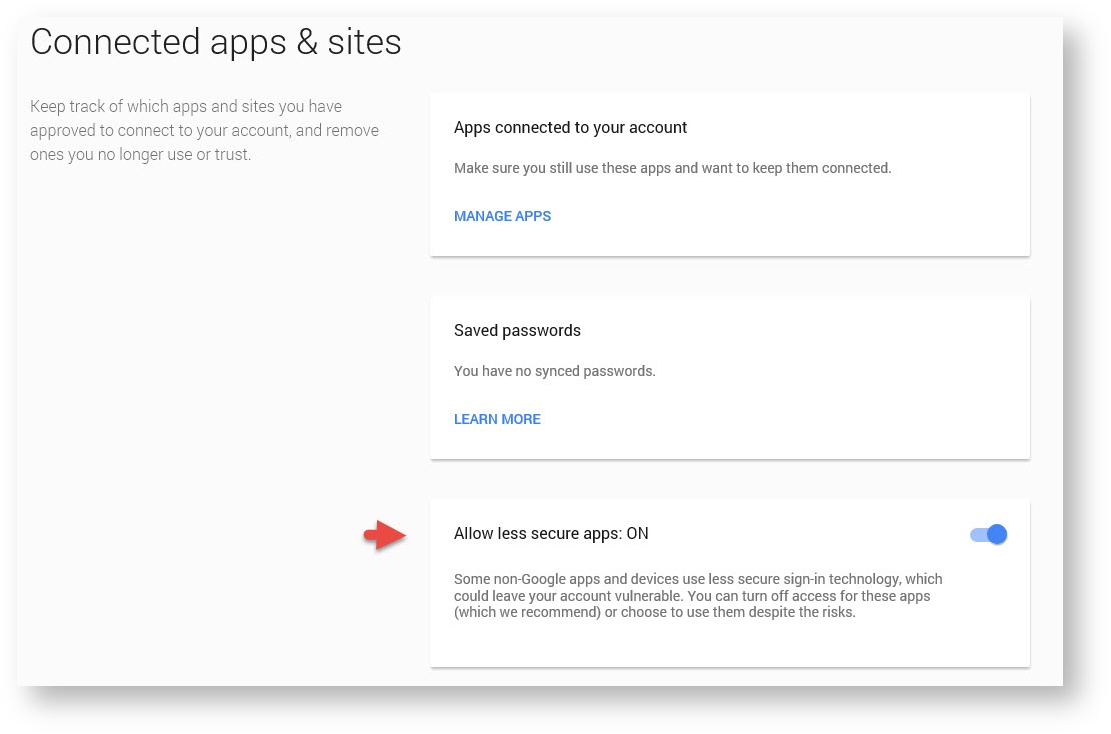
Setting the "allow less secure apps" setting on Gmail:
Open the gmail account and go to "My Account"
Click "Sign-in & Security"
If enabled, Turn off "2-Step Verification"
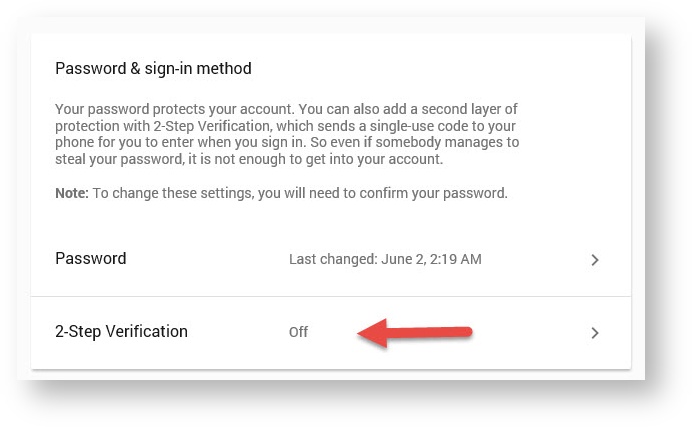
Turn on the "Allow less secure apps" option
Related articles
NOTICE: You are in the old ClientSpace Help system. Please link to the new ClientSpace Help here https://extranet.clientspace.net/helpdoc/home/ClientSpace.htm