NOTICE: You are in the old ClientSpace Help system. Please link to the new ClientSpace Help here https://extranet.clientspace.net/helpdoc/home/ClientSpace.htm
*Navigating ClientSpace
User modules are the selectable modules that can be configured by each user, allowing them to individually customize ClientSpace and putting the tools they need at their fingertips. When the width of the user modules exceeds the amount of available space, any leftover modules will overflow and be available from the View menu to the right of the module buttons.

To add modules to your user profile:
Step-by-step guide
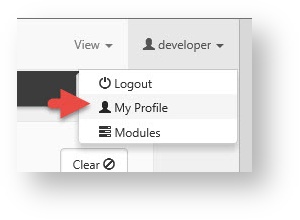
- On the modules bar, click <username> > My Profile.
The User Details form is displayed.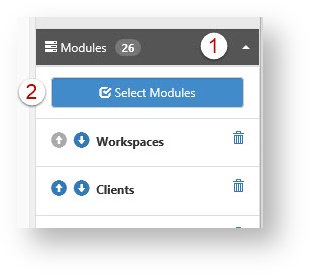
- In the Action Center, click Modules > Select Modules.
The Select Modules list is displayed. - To add a module to your user profile, locate a module and select the module check box.
- Click Ok.
You are returned to the User Details form. Your new module is listed in the Action Center pane, in the Modules group. - To see the new module in the modules bar, refresh your screen (Press F5).
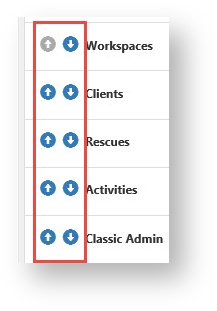
- To manage the order of modules, use the blue arrows to move up or down. Overflow modules that will not fit in the header will appear in the View list.
- Click Save.
- Refresh the workspace to (Press F5).
| The Work Center icons are in the upper left corner and represent the most commonly used work actions that need to be referenced across workspaces. |
| Home returns you to your default home page. |
| Notifications Inbox jumps you to an inbox where you can review and manage all of your system notifications. To find out more read Managing Notifications in ClientSpace. |
| Calendar: Click here to access and manage your system calendar events. |
| Help Center: This link provides access to our help center where you can browse a collection of focused articles, or search our Knowledge Base. For more information, watch our Help Center Overview video. |
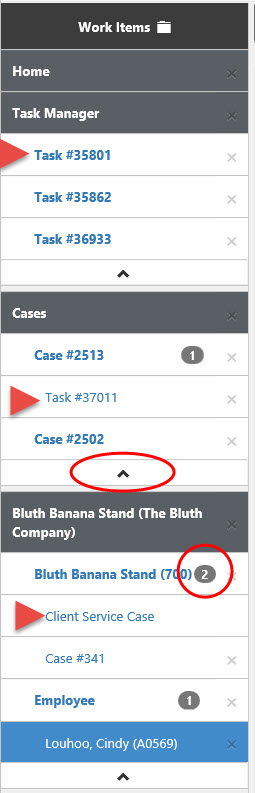
| The left navigation center or Work Center area provides the key to multitasking, allowing for the hierarchical display of multiple open Workspaces and Work Items at any given time. Work items are organized as separate levels, where the topmost level Sets allow multiple thread and sub-thread items to be opened below it. Thread items are indented below set items, and sub-thread items are further indented below threads.
Threads below these items would be the individual cases or tasks opened from their respective Set. Threads display a count of the associated open sub-thread items.
At the bottom of each Set is a caret symbol (^) that allows the entire set to be collapsed up, conserving space. On the right of each Set, active thread, and active sub-thread item is an X that closes that item and any associated items below it. To see the Work Center in action, watch our Work Center Overview video. |


The Action Center is located in the upper right.
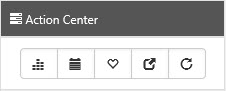
The workspace action center provides a series of common actions that can be performed from within a workspace. These actions are represented by icons and are as follows:
 Org Action
The org action acts as a quick jump to the Organization associated with the Workspace you are on.
 Calendar Action
The calendar action acts to open a ClientSpace calendar, pre-filtered for the workspace you are on.
 Favorite Action
The favorite action adds this workspace to your favorites list when clicked - this is the same as checking the "Favorite" checkbox from the homepage or Workspaces dashboard. Once selected as a favorite the heart indicator will turn red.
 Jump Action
The jump action allows you to quickly skip from one client workspace to another. The jump action will open this new client as another item in your work items navigation, making multi-tasking easy.
 Refresh Action
Refreshes the current workspace landing page data.
For more information about Workspaces and the Landing page that provides access to workspace level items read the article: The Workspace Landing Page
Navigation center for links, reports, CRM notes, attachments and time tracking items.
The contents of the Action Center change based on the current active work object in the Work Center. For example, an open Org will have a Right nav that contains Contacts, Activities, Appointments, Tasks, Attachments, and Security, while a Workspace Landing Page may only contain Links, Reports, Tasks, Activities, and Time Tracking.
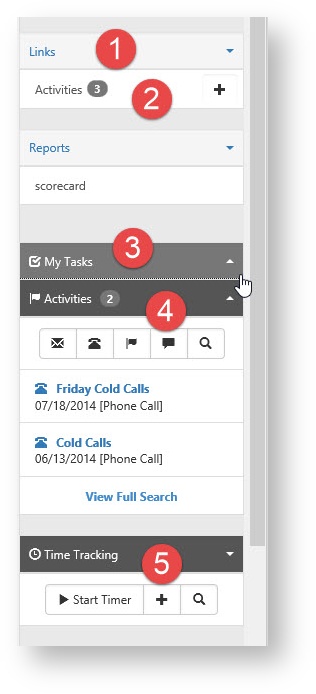
Regardless of the active content, items in the Action Center will always work in the same way. These items are a series of collapsible objects such as Links, Reports, Tasks, Activities, and so on.
- Action Items (links, reports, etc.) - Each Action Item displays a triangle to the right. Click this triangle to either expand or collapse the item. Links configured as "Pinned open" appear expanded by default when the pane is refreshed. Non-pinned links appear collapsed under More at the bottom of the links list. Action items can be configured to conditionally display by system administrators, so certain items may only display when the proper conditions are met.
- Item Count - Action Items, which can have multiples, such as activities or tasks, display the current count of active items (if greater than 0) or display 0* to denote that there are no active items, with the asterisk signaling inactive items are available in the list. If no active or inactive items are available, there will be no counter. To add an item, click
 to open an Add dialog.
 - My Tasks - Displays a top 10 list of tasks associated with the current Active Work item where the Assigned To user of the task is the assigned user on the task is the logged in user. Inactive records are available by opening the full task list either through the magnifying glass at the end of usable action buttons, or by selecting View Full Search at the bottom of the right nav task list.
- Activities - Generally associated with Organizations, activities are a list of Emails, Calls, Notes, or Calendar events associated with the client workspace. For more detailed information about Activities, read Organization Detail Record.
- Time Tracking - If time tracking is enabled for your user account, and the active Work Item (in the left nav) has Time tracking enabled, then the Time Tracking action bar will be available, allowing you to Start and Stop new Time records as well as view and edit existing time tracking items. This item displays the five most recent time tracking items. As with tasks, click the magnifying glass, or select View Full Search to open a full list of available records.
From the case search dashboard to task management, lists in ClientSpace all work in a similar fashion. This is by design so if you understand one list you understand them all. The following Client Service Case dashboard example gives you everything you need to know to be a ClientSpace list expert.

- Name - To keep the look and feel consistent, our lists all look kind of the same - the name in the upper left indicates the record type.
- Close - Done working with these records? Click here to close the window and remove this from your Work Items list.
- Quick Search - Everyone has their preferred way of searching, but some key areas are searched so often that we made them part of the default keyword search. Click quick search
 to get a list of these fields and some search hints.
 - More Search - If quick search does not return the results you need, you can add additional search parameters under the More Search area.
- Reset - Some lists such as the Client Service Case dashboard (pictured above) will open with a default set of search parameters. If you have added a number of additional filters and want to return to the default filtering, click Reset.
- Clear - Are you looking for something and the default filters are causing it to not be displayed? Click Clear to clear all of the currently applied filters and run an unfiltered search - WARNING! - For installations with large numbers of records unfiltered searches can sometimes too many records and cause poor performance.
- Filter Chiclets - The current set of filters applied to the records list is displayed in a series of chiclets found below the search bar. Some filters can be removed as indicated by an X on the left side.
- Save this search - Saved searches allow you to save filter and list configurations, including more searches, quick searches, and column configurations. Save a search using
 (Save This Search). To restore the list to the system default, click
  (Saved Search Options) and select Restore System Default.
 - Jump to record -
 (Jump) allows you to navigate directly to the selected record, essentially the same as clicking edit. This is useful when accessing ClientSpace from a mobile device.
 - Sort - Click the column header (
 ) of a list to sort the records by that column. The arrow indicates the direction of the sort, ascending or descending.
 - Expand List / Column management - The inverted carat (
 ) allows you to access a list of columns that may be added or subtracted to customize your list view, displaying only the columns you want. This customization is lost when you close the list.
 - Add - Opens the Add dialog to create a new record.
- Edit - Edit the selected record (highlighted in blue). If no record is selected, you will get an error message indicating you must select a record to continue.
- Paging - Did you pull back a lot of records? Need to see the ones that are not currently displayed in the list? Use paging to move to more records in the set.
- Record Count - Displays the total number of records that match your current filter set.
Quick Start - recognizing the icons of ClientSpace
To make navigation more straight forward in ClientSpace, we have a limited set of icons that you may use to navigate the application. Some of these have been covered previously in the article.
| Icon | Function |
|---|---|
 | Add - this icon is commonly seen on a dataform link - allows you to jump into the add dialog for that dataform. |
 | Count Badge - this icon is commonly seen on child object links for things such as tasks, attachments, dataforms and so forth. Displays a count of the Active records of that object type associated with the record. |
 | Expand - commonly seen on Widgets and is used to expand the widget to display more information. May also appear on collapsed work item or action item lists. |
 | Jump To - commonly used to jump to a single form in a workspace, this icon is also used for quickly jumping to another workspace from the Workspace Landing Page. |
 | Open List - commonly found on multi-form widgets such as the case search widget, this icon allows you to jump to the full dataform search for that workspace. |
| QuickSearch - on ClientSpace lists, this displays the fields which will be included when performing a Quick Search in ClientSpace |
 | More Search - Can't find what you are looking for with a Quick Search? More searches offer....well, more. Click here to add additional search parameters not found in Quick Search |
 | Sort Column - Click the header of a dataform list column to sort the records - the arrow indicates ascending or descending sort. |
Related articles
NOTICE: You are in the old ClientSpace Help system. Please link to the new ClientSpace Help here https://extranet.clientspace.net/helpdoc/home/ClientSpace.htm