NOTICE: You are in the old ClientSpace Help system. Please link to the new ClientSpace Help here https://extranet.clientspace.net/helpdoc/home/ClientSpace.htm
Distributing Dataforms - Making Dataforms Accessible
After a dataform is created and configured, you need to provide some way for it to be used, and this can be accomplished in a number of ways. A dataform might need to be workspace specific, so you would need to add it to the TOC of a single workspace, or it may need to be more widespread, so you would want it copied to each workspace as they are generated. You may also want to only expose access to the dataform from the header of another dataform - certain financial dataforms in the PEO system are exposed through header links from the dataforms for which they contain financial data. This document discusses each of these methods of Dataform Distribution.
To add a dataform to a workspace:
Navigate to the Workspace in question. This can be a single administrative workspace, or to have the dataform generated on Workspace creation. Go to System Admin
 > Workspace Templates.
The Workspace Template Search list is displayed.Locate and open the template in question.
In Action Center, click
 Dataforms.
Click Add.
The Add Dataforms dialog opens.Find and Select the dataform.**
Click Ok.
The dataform is added to all child workspaces of that template.
Dataforms can also be accessed via custom links in another dataform header. Configuring a header link is detailed in the document Configuring Links. This article discusses the link configuration items to create a Workspace Dataform link.
To add a new link to the dataform:
- Go to System Admin
 > Advanced > Custom Links.
The Configure Links list is displayed. - Click Add.
The Configure Links Detail form opens. - Use the following field descriptions to guide you through adding a new link.
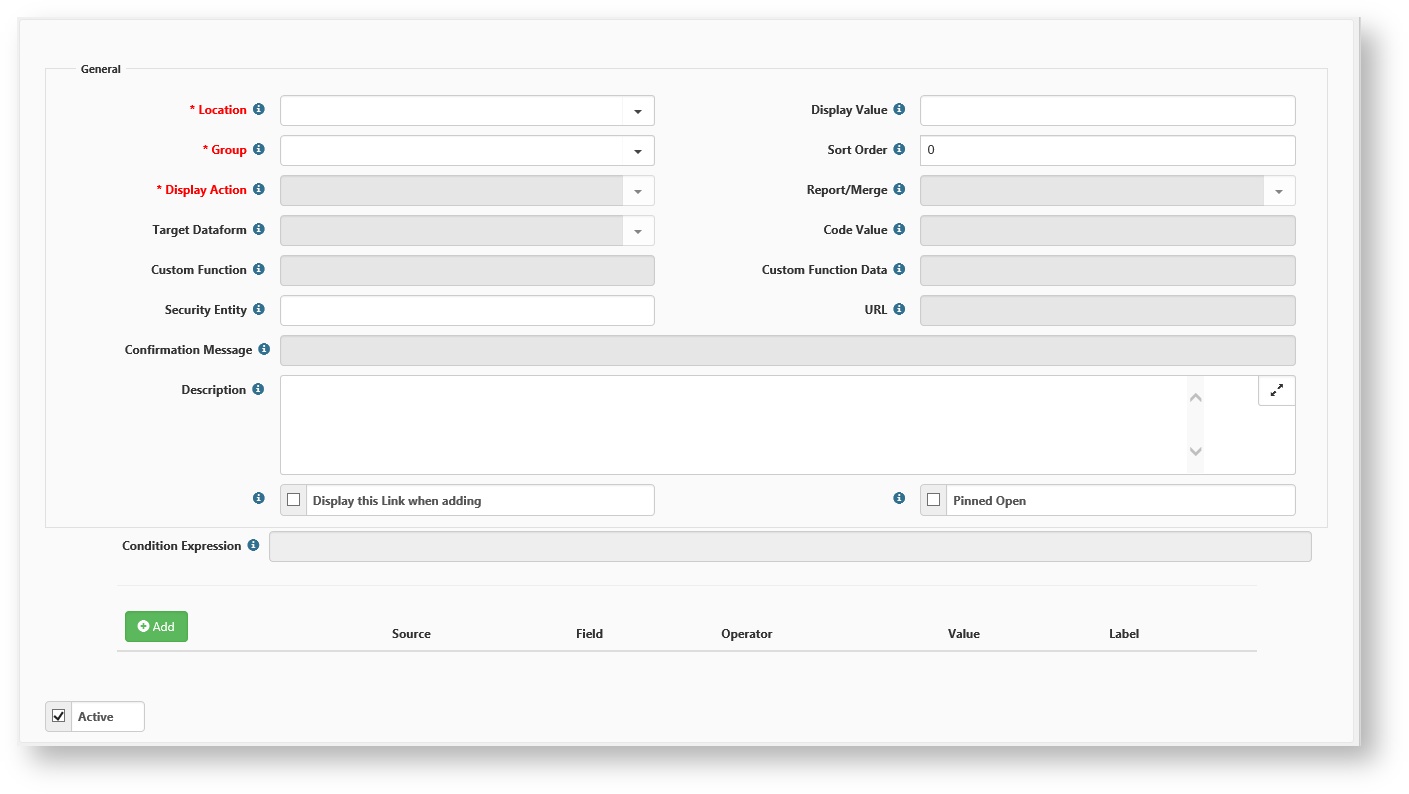
- Location: The name of the dataform on which you want to link to appear.
- Group: Where in the header the link will appear.
- Display Value: The text that is displayed in the Action Items area as a clickable link.
- Display Action: Lists the possible actions for the selected link group. The available actions are based on the selected Group and include items such as running a report or merge. This then creates a HdrAction to fire a business rule or open a system dataform. ***
- Sort Order: When multiple links are displayed in the header, this determines their order within the link group.
- Sort/Merge: Select the report or merge to run using the appropriate display action when a Report link is clicked.
- Target Dataform: The dataform you would like the user to access from this link.
- Code Value: This is the HrdAction produced when an Action link is clicked.
- Custom Function: This is the custom function that is called from an Action link.
- Custom Function Data: This is the data that is passed to a custom function if required.
- Security Entity: This can be used to hide the link from unauthorized access.
- URL: Use this field to configure the URL that opens on a URL Display Action. When defining an external URL, include the protocol (http:// or https://) as links. Without the protocol, the link is treated as internal to the application.
- Confirmation Message: Provide a confirmation message that displays an OK / Cancel dialog box before running the link action. This is most often used with Action Links.
- Description: A short description of the dataform and how it should be used. This text appears on mouseover of the link.
- Display this Link when adding: This section can be used to set parameters for when the link should display. For a complete discussion of configuring link display see the document Configuring Links.
- Pinned Open: When selected, this forces the link to always display in the Action Items area. The link will not collapse when the associated group is collapsed.
- Condition Expression: This field uses the Labels from any conditions that you added under Add. You can combine multiple triggers into more complex expressions and override the default OR behavior. Conditions that are not included in this field are ignored.
- Active: By default, configured links are active.
- After configuring the Dataform Link, remember to Save your changes.
** When adding a dataform, if the entry in the dataform search dialog is disabled, this means the dataform already exists in the workspace.
*** For questions about Admin Dataforms contact your application specialist.
Related articles
NOTICE: You are in the old ClientSpace Help system. Please link to the new ClientSpace Help here https://extranet.clientspace.net/helpdoc/home/ClientSpace.htm