NOTICE: You are in the old ClientSpace Help system. Please link to the new ClientSpace Help here https://extranet.clientspace.net/helpdoc/home/ClientSpace.htm
Configuring Parent Form Datatypes
Parent-Child relationships between dataforms allow you to build a fully relational structure to your ClientSpace Information, knitting dataforms together to create a data structure that mirrors the real world. An example of this in our PEO system is the Employee demographics and related forms. For clients, there are one or more employees, each with a singular record. If the employee moves or gets married, you want to update that record instead of creating a new one. The employee’s employment history, however, is a different story. There are many reasons to historically track employment information. Take for example a theme park that terminates employees at the end of the season, then re-hires them at the beginning of next season. By historically tracking this employment record, we can view an employee’s history, pay grade changes, reasons for termination, etc. The person is the same but the job changes. In database administration, this is known as a One to Many relationship: one employee record, with many employment records. To take this a step further, each Employment record will have multiple paycheck or voucher records associated with it and each voucher record can have multiple deduction records and so on. This ability to dynamically associate data together in a cohesive structure is one of the most powerful capabilities of the ClientSpace system.

Step-by-step guide
Parent form fields are always added from the Child form. So in our example, there would be an Employee field on the Employment record, an Employee Employment (Job) field on the Voucher record and so on. This is important to hold in your mind when completing the setup of this relational datatype.For the aforementioned Employee field, we would use the following dataform.
To configure the Employee field:
- Go to System Admin
 > Dataform Admin.
The Dataform Admin list is displayed. - Open Employment.
The Dataform Properties: Employment form opens. - In the Action Center, open Fields.
The Employment fields list is displayed. - Open Employee.
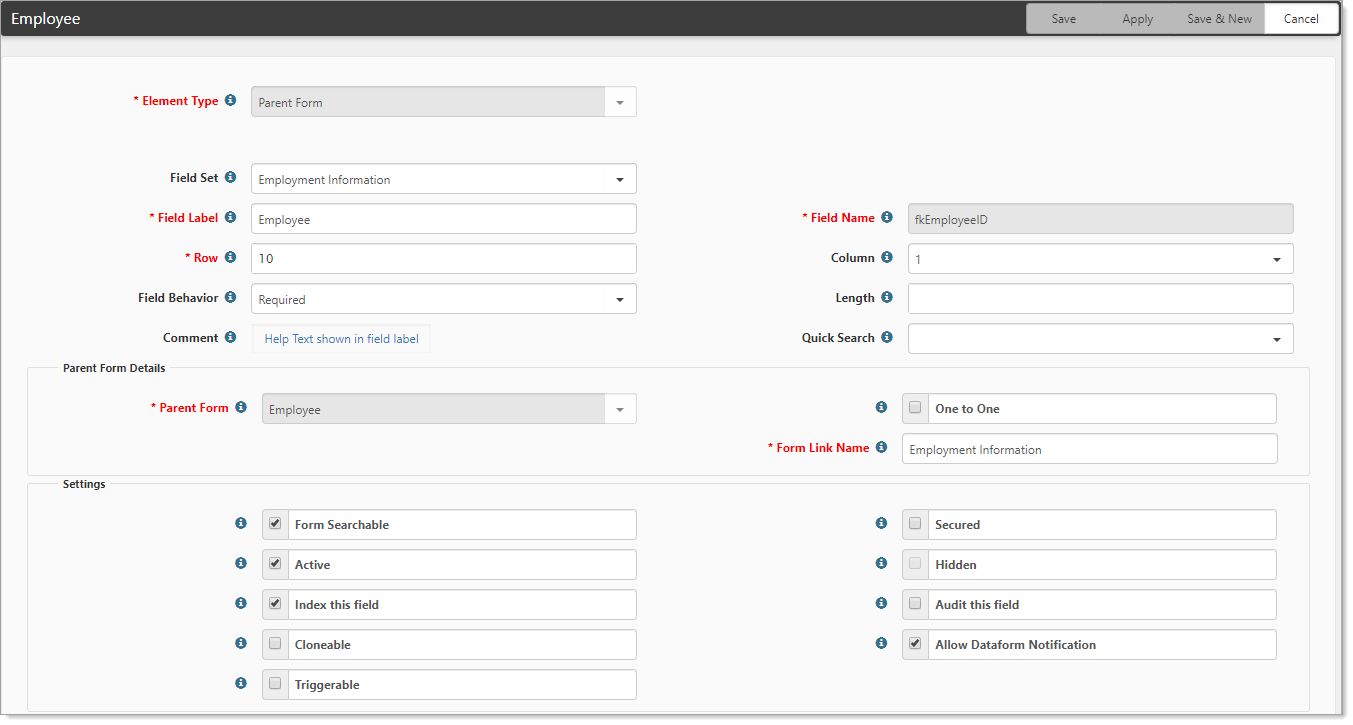
The Employee dataform opens.
| Field | Description |
|---|---|
| Element Type | Determines what type of data you will store in this field. Parent Form is the default. |
| Field Set | A field set is a group of fields delineated by a box. You use a field set to organize fields. |
| Field Label | This is what is displayed on the dataform so Employee would make sense. |
| Field Name | This is the column name for this field as it is stored in the database. On these parent form datatype fields, the system actually stores the ID of the parent form record. This is what is called a Foreign Key (when joining data tables together in these relationships, the primary ID of the record on another table is the foreign key of that record on the referencing table), so we would use a standard naming convention for this field of fk (foreign key) Employee (dataform name) ID or fkEmployeeID. As a best practice, use camel case for the Field name. Begin with lowercase to indicate datatype (such as fk for foreign key or lu for lookup). This is a best practice and makes the data easier to understand when you use this information in reports. |
| Row | Row property determines the vertical ordering of fields and fieldsets. Fields that are within a fieldset are ordered within that fieldset. A best practice is to set this in increments of ten, which allows for re-ordering fields or adding fields between rows without re-ordering the entire form. |
| Column | Column property is hard-coded to dictate a two-column format. |
| Field Behavior |
|
| Length | The maximum length of the field entry. This property is valid for text and integer data types. |
| Comment | Text entered into the comments provides online help for dataform users. When comments are added to any dataform field, the info bubble is enabled and on hover, the info bubble displays the comment text in a popup. |
| Quick Search | Select a value to add the field to the Quick Search on multiform searches:
|
| Parent Form | Dataforms can be related to each other in a parent-child relationship using the Parent Form data type. When this data type is selected, the related form fields are enabled (One to One and Form Link Name), allowing you to define the relationship. The Parent Form is selected from the list of all dataforms because the relational field is placed on the child form. Recursive relationships where a record is related to another record of the same dataform are supported. For example, a person dataform may be related to itself to represent the mother and father of the person. |
| One to One |
|
| Form Link Name | Employment Information. This is what appears in the form link in the upper left of the Parent dataform. |
| Form Searchable | When selected, the form is one of the Search parameters in a multiform list. |
| Secured | When selected, the field is secured and generates a security entity for the field in the format of gen_TableName_FieldName. |
| Active | Determines if the field displays on the dataform. Deactivating a field is preferential to deleting it because deleting the field removes it from the underlying SQL table and erases the data. When you deactivate or hide a field, you retain the data for later use. |
| Hidden | Determines if the field and its children are hidden when a dataform record is viewed. |
| Index this field | When selected, the field is added to the SQL table index. Index this field makes searches based on this field faster. |
| Audit this field | Determines if the field is auditable. |
| Cloneable | Determines if the field is configurable when this dataform is created by Workflow and Email Templates. |
| Allow Dataform Notification | When selected, this field will be included in a dataform notification when dataform subscribers are emailed. Updated fields appear in bold in this email. |
| Triggerable | Determines if this field is available for use as the Triggering Field or as one of the Triggering Conditions when configuring Workflow Channels and Email Templates. |
The remainder of the setup for this dataform field is open to configuration on your part, but notice that fkEmployeeID is a required field on this form. You cannot have an employment record without an attached employee, so the field is required. Careful planning before adding fields to a dataform will save a lot of cleanup of bad data down the road.
Datatype Morphing: By default, if there are less than 250 records when a Parent Form datatype presents on the page, it will display as a dropdown list. If there are more than this threshold, the field becomes a type ahead with a search pop up. The threshold can be changed in the Related Fields section of the field settings using the ROWCOUNT command. Records can also be brought in from a different workspace using the Related Fields section as well by adding the partial GUID of the workspace. For example, to have a threshold of 50 records and to bring in records from a workspace with the partial GUID 'ce3d5dee' as well as the current workspace, you would add 'ROWCOUNT=50;ce3d5dee;CURRENT' to the related fields section. For a more detailed explanation of this functionality, watch Parent Form Datatype Morphing ![]()
The ROWCOUNT command can alternatively be used to extend the threshold beyond 250 where the records can be filtered by other means. For example, there are several places in the application such as Client Service Cases where a parent form field is filtered by another field on the dataform. An example of this would be a Client Service heavy environment where you have 275 case types. The case type list on the dataform is filtered by the case category, but the Morphing aspect of the parent form datatype converts the field when the dataform loads, prior to the category filtering. In this instance you can add the ROWCOUNT=300; switch to the Related Fields property, the control will remain a dropdown, but is filtered client side by the Category field. Caution should be exercised when using this option, as too many rows will exceed the length of the standard dropdown list, making selecting from the bottom of the list impossible due the limits on scrolling in these controls.
Related articles
NOTICE: You are in the old ClientSpace Help system. Please link to the new ClientSpace Help here https://extranet.clientspace.net/helpdoc/home/ClientSpace.htm