NOTICE: You are in the old ClientSpace Help system. Please link to the new ClientSpace Help here https://extranet.clientspace.net/helpdoc/home/ClientSpace.htm
Dataforms: Workspace Building Blocks
Before you begin
Using dataforms, global administrators can create new forms, and add, delete, or modify fields on existing forms. Additionally, global administrators can relate forms in one-to-one or one-to-many relationships to each other. The configuration of these forms results in a relational data model with tables and properly typed (such as integer, decimal, varchar) data fields embedded within the ClientSpace database. During creation, a set of stored procedures (one set for each dataform) are generated to allow various parts of the application to interact with the tables and fields. All dataforms must exist within a workspace. The one exception to this rule is a special dataform that is associated with the Other Info tab on the Organization Detail page or the Contact Manager. Different types of workspaces may include various sets of relational dataforms with some forms overlapping from workspace to workspace. The dataforms that are related to a workspace are inherited from the template used to create the workspace.
Dataforms are a suite of tools that comprise the Dataforms Engine. The dataforms engine allows you to:
- Dynamically create and manage configurable data collection points
- Generate Web forms and fields for data collection
Allow for Workflow systemization
Allow for extremely granular security, down to the field level
Adding a dataform to the system will:
- Generate a new SQL table in the server
- Add your configured fields to this table as columns
- Automatically configure the data columns with appropriate values based on field selection options
- Automatically generate foreign key relationships between tables (Parent / Child forms, Lookups, and so on)
Before creating a dataform, consider:
- The type of data you need to track
- How that data will be used in ClientSpace and other systems
- The relationship between the new dataform and others in your system
Advanced planning can save time after you publish the dataform and start to collect data.
After you have determined how you would like to build out your new dataforms, you can begin the process. The first step is to add the dataform. This process creates a new table in the SQL database with the pre-determined system columns.
Adding a dataform
To add a new dataform:
- Go to System Admin
 > Advanced > Dataform Admin.
The Dataform Admin list is displayed.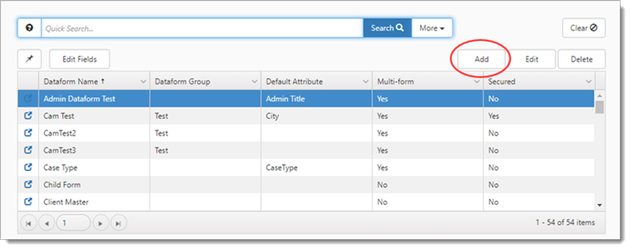
- Click Add.
The Dataform Admin list is displayed. - Proceed to the next section Adding a Dataform: Dataform Properties.
Dataform Properties
SQL Table Properties and Dataform Name
Form properties control the basic properties of the SQL table, such as Table Name. After saving the initial dataform, you cannot change the basic properties of the SQL table. Therefore, be sure to plan carefully before you save. Consider the name of a dataform carefully because the only way to change a table name is to delete the dataform and any data you may have stored in it and start over.
The field Dataform Name is simply a label and can be changed after the initial save to provide a more descriptive title of the dataform. However, the best practice is to make the table name as short as possible while still being descriptive. For example, you may want the title of the dataform to read as Family Medical and Leave Act Data. A better table name would be gen_zFMLA.
To accomplish this:
- Save the form initially with a dataform name of FMLA.
- Change the Dataform Name field to the more descriptive Family Medical and Leave Act Data.
Dataform Configuration
Generated Table Names
Naming convention
System table names (tables generated by PrismHR developers) are automatically generated based on Dataform Name preceded by gen_ Example: gen_DataFormName. Custom tables created by our clients in their individual installs are distinguished from normal gen tables with a leading z. Example: gen_zDataFormName.
The Dataform Properties form presents the fields in groups. The first step is to configure the general properties such as name, type, field, group, and description.
To customize your dataform:
- Use the following image and field descriptions as a guide.
- Dataform Name: The name of the dataform that is displayed within the application such as in lists where you select a dataform.
- Dataform Type: Select the type: Standard, Organization, or Contact.
- Dataform Group: Use grouping to organize dataforms into tiles on the Workspace Landing page. You can use the group as a search parameter when modifying a dataform or adding a new dataform to a workspace.
- Description: Provide a brief description of the dataform and its purpose.
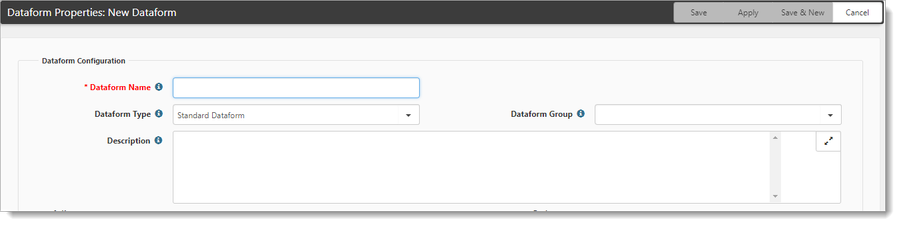
- After you configure this first section, click Apply.
After you Apply changes, then you will see the Table Name and Default Field fields.
- Table Name: Displays the generated table name that is stored in the database. This can be useful for reporting. You cannot edit this field.
- Default Field: When you associate one dataform with another through linked fields, the default attribute is displayed in the select list. It is a best practice to make the default attribute field of the form Required, so any linked forms will have something to display.
Action Center
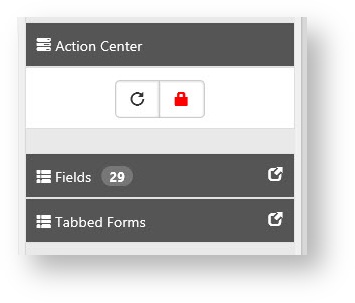
The next step is to secure the form, add and configure fields, and add and configure tabs. These actions are performed in the Action Center pane (on the right side of the screen).
To continue with the configuration:
- In the Action Center, select Secured, Fields, or Tabbed Forms.
- Use the following field descriptions to guide you through the configuration.
- Secured
 : Secures the form and generates a security entity for the field in the format of gen_TableName. For more details about using security entities in Role security, review Organization and Workspace Security Configuration.
 - Fields: This is where you add and configure fields for this dataform (see Fields Configuration).
- Tabbed Forms: This is where you add and configure tabs for any foreign key related child forms of this dataform. (Child forms have a Parent form field that uses this dataform as the Parent Form. See Adding Tabbed dataforms.)
- Secured
- Apply your changes as you navigate the various panels for Secured, Fields, and Tabbed Forms.
Actions and Developer Settings
The next step is to configure the actions for your dataform. The following fields are in the Actions and Developer Settings of Dataform Properties.
To further customize your dataform:
- On the Dataform Properties form, locate the Actions area, where you will find an array of checkboxes.
- Use the following field descriptions to guide you through the configuration.
- Can Have Multiple: Single vs. Multiform. Dataforms come in two basic flavors:
- The Single form (such as the Client Master) has a one-to-one relationship with the Workspace. This is great for recording specifics about an individual or client where there is only ever one item, and if it changes you need to update it.
- The Multiform (such as locations) has a one-to-many relationship with the workspace. This is great for recording multiple instances of something, such as physical locations for a client, or paycheck records for an employee.
- Search On Load: Multiforms present as a list of records, whether this list is populated automatically when you land on the dataform or have to click Search to populate the list is a function of search on load.
- Secure Attachments: Secures attachments for this dataform.
- Show on Landing Page: Indicates the dataform will be available at the bottom of the various types of Landing pages in our Next application under dataform search. Leave this unchecked if you only want to display the form in Next as a tabbed or linked dataform.
- Exclude from BI: Checking this box removes the dataform from the list of available tables in the Datasources section of Business Intelligence, effectively hiding the dataform from reporting.
- BI Name: If completed, the "friendly name" stored in this field will display in Business Intelligence reporting.
- Time Category: On creation of a time tracking record from this dataform, the category field of the record defaults to the selected value.
Developer Settings
- Time Category Function: This option requires custom development and allows you to override the default Time Tracking Category.
- Icon CSS Class: This field defines the type of icon that will be displayed for this form on the workspace landing page.
- Include Activities in Notifications: Specifies if Activities (CRM Notes) are included in dataform notifications.
Features
Next, customize the Features areas.
To further customize your dataform:
- On the Dataform Properties form, locate the Features area, where you will find an array of checkboxes.
- Use the following field descriptions to guide you through the configuration.
- Enable Tasks: Adds the My Tasks action item to the dataform
 . Tasks added from this dataform are linked to this dataform.
 - Enable Attachments: Adds the Attachment Action Item to the dataform, providing the ability to attach files to the dataform.
- Enable Subscribers: Adds the Subscribers Action Item to the dataform, which allows you to automatically notify system users via email of changes to the form.
- Enable Subscription Emails: This field sets which notification system is used when producing dataform subscription emails. If checked, a core system notification is produced when the record is changed. If checked and a published Email Template has been configured for this dataform, that template is used. If unchecked and no template exists, subscription emails are not sent.
- Enable Activities: Determines whether Activities may be attached to and displayed on this dataform.
- Enable Time Tracking: Adds the Time Tracker action item
 to the dataform. Time tracked from this icon is linked to this dataform.
 - Enable WFC Cloning: Used by Workflow Channels to determine whether dataforms are available as "Triggered Forms" during workflow dataform cloning.
- Enabled Triggering: Used by Workflow Channels to determine whether dataforms are available as "Triggering Forms" during the initial channel configuration.
Adding Dataform Tabs
Create the tabbed dataform(s) in Dataform Administration, ensuring that you include a Parent Form datatype field, configured to point at the Parent form where you would like the tab to appear.
To add dataform tabs:
- Go to System Admin
 > Advanced > Dataform Admin.
The Dataform Admin list is displayed. - Search for the Parent Dataform and click
 Form Properties.
The Dataform Properties form is displayed. - In the Action Center, click Tabbed Forms.
The Tabbed Forms list is displayed. - Click Add.
The Tabbed Form dialog opens.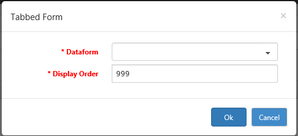
- In the Dataform list, select the tab dataform.
- Provide a Display Order (this is the order in which the tabs will appear at the top of the dataform). The display order is numeric.
- Click Ok.
Dataform Field Configuration / Maintenance
Now that you have the container for your data, it is time to start adding the fields that will store the individual pieces of information you want to track. Dataform fields can be as simple as a few fields together on a page or can be complex, dynamic groupings of fields that hide or display based on predetermined logic. This topic is discussed in more detail in the section about Dynamic Field display. Taking the time to map out your dataform layout will pay off in the overall amount of time you will invest in the final version of the dataform.
Best Practices for field configuration
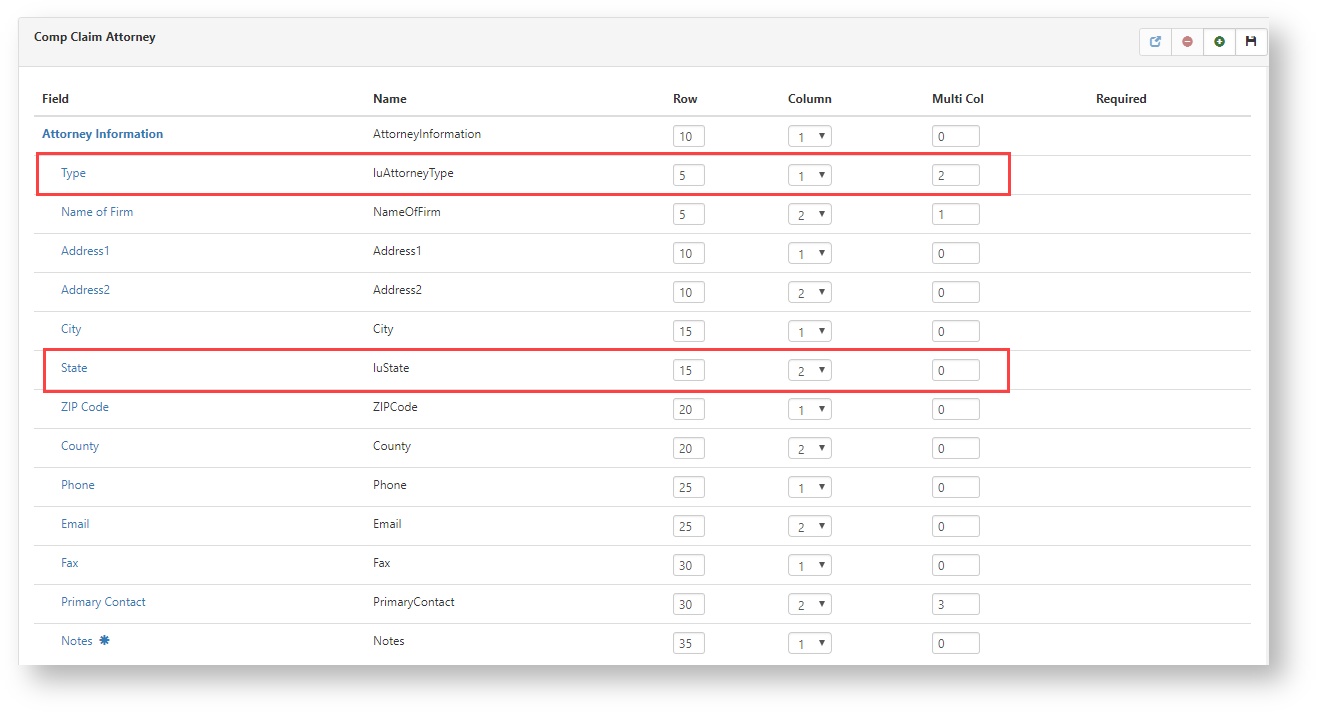
- Leave space between your field rows in the numbering scheme should you need to add more fields later (i.e., 10, 20, 30, etc.)
- Restart numbering sequences within each field set to visually group the data elements together
- Fieldsets should have their own numbering sequences independent of the numbering within the fieldsets. (See example image.)
- Multiforms require the additional step of configuring columns for the list display. If this is not configured, you will receive the error "Column headers have not been defined for this dataform.." when you attempt to use the dataform in a workspace.
To add fields for storing information that you want to track:
- Go to System Admin
 > Advanced > Dataform Admin.
The Dataform Admin list is displayed. - From the list, select an entry and click Edit or click (Jump).
The Dataform Properties form opens. - In the Action Center, click Fields.
The Fields list of the dataform is displayed. From here you can Open, Delete, and Add (New) fields. - Click
 (New).
The New Field form opens.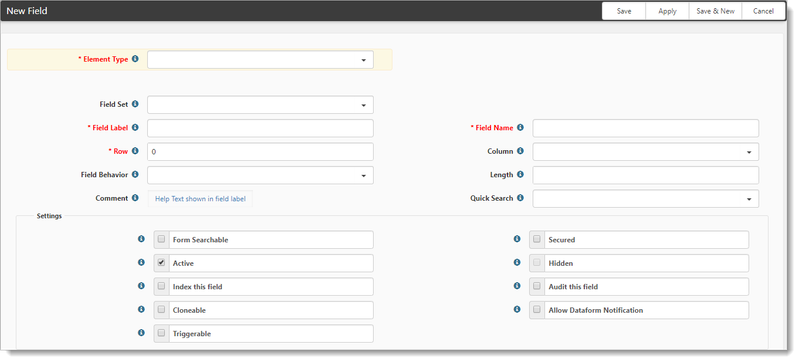
- Use the following field descriptions to continue the configuration.
- Click Apply when you are done.
- Element Type: Determines the type of data you will store in this field. In the example, we selected the Lookup (core) datatype, but ClientSpace has a full array of different datatypes. The most commonly used datatypes can be found in the section Configuring your Dataform - Datatypes. For an in-depth look at the Lookup datatype used in our example, see Adding Or Configuring Lookups.
- Field Set: Outlines that hold and organize other fields. No actual SQL field is created and no data can be stored in a fieldset.
- Field Label: The field label is displayed on the dataform. By default, the underlying field name is set to the field name with any spaces or special characters removed. Click on the field name to open the field properties page.
- Field Name: The name of the field that is created on the SQL table. By default, the field label is stripped of its spaces and special characters and used as the Field Name. The field name can be overridden as needed and can be set to anything that is accepted by SQL Server as a valid field name. Duplicate field names are not accepted. Field labels are often duplicated in developing large dataforms. As duplicate fields are created, you must modify the field name to make it unique in order to save the field. After the field is saved the first time, the field name CANNOT be changed. Carefully map out your field naming standards before creating dataforms. ClientSpace utilizes a standard naming convention when naming a field based on the datatype of the field. It is a recommended best practice to utilize these same conventions in your own field names. To discover the best practice for your field type read Dataform Field Naming Standards.
- Row: The row property determines the vertical ordering of fields and fieldsets. Fields that are within a fieldset are ordered within that field set. Though the sort uses a standard numeric order, it is recommended that rows are initially set in increments of ten. This allows for re-ordering fields or adding fields between rows without re-ordering the entire form.
- Column: The column property is hardcoded to dictate a two-column format. Technically, you are able to select the same row and column for more than one field and they will align alphabetically. This will generally cause problems in the presentation of the dataform to the user.
- Field Behavior
- ReadOnly: This field cannot be edited. Normally these fields are set automatically by business logic.
- Required: This property can only be set from within the field properties page. When selected, the field must be completed for the dataform to be saved. **This function is overridden if the field is contained in a hidden field set.**
- Length: Defines the maximum length of the field entry. This property is valid for text and integer data types.
- Comment: The text in Comment provides contextual help for dataform users. When comments are added to any dataform field, the info bubble next to the field label is enabled and on hover, the info bubble displays the comment text in a popup.
- Quick Search: Selecting a value in this dropdown adds the field to the Quick Search on multi from searches. Available options (quick search types) include Starts With, Equals, Contains (% search).
- Form Searchable: Is this one of the Search parameters available in a multiform list? This property can be set from the form list page or from within the field property page.
- Secured: Secures the field and generates a security entity for the field in the format of gen_TableName_FieldName. For more in-depth documentation about using security entities in Role security, review ClientSpace Organization and Workspace Security Configuration.
- Active: Determines if the field appears on the dataform. De-Activating a field is preferential to deleting it because deleting the field removes it from the underlying SQL table and erases the data. When you de-activate or hide a field, you retain the data for later use.
- Hidden: This property is only available for Field Sets. When selected, the field and its children are hidden when a dataform record is viewed.
- Index this field: Marks the field for addition to the SQL table index; you can make searches based on this field faster.
- Audit this field: Marks the field auditable and is configured in System Admin > Advanced > Tables.
- Cloneable: Marks the field as configurable when this dataform is created by Workflow and Email templates.
- Triggerable: Marks the field as available for use as a Triggering Field or as one of the Triggering Conditions when configuring Workflow Channels and Email Templates. When a field is marked as Triggerable, it displays in the field list on Email Templates and Workflow Channels.
- Allow Dataform Notification: If selected, this field is included in a dataform notification when dataform subscribers are emailed. Updated fields appear in bold in this email.
Available field actions
When viewing the list of dataform fields, note the available actions:
| Action | Action label | Description |
|---|---|---|
 | Open | Opens the field properties for the highlighted field. |
| Delete | Deletes the highlighted field. For system fields, the Delete action is not available and displays as disabled. System fields can be easily identified because their field names do not begin with z_. | |
| New | Adds a new field. | |
| Save | Saves changes to the dataform fields list. |
Deleting a dataform field
A few situations can exist that prevent a field from being deleted:
- The field is a system field.
- Other system configurations depend on the field.
For system fields, the Delete action is not available and displays as disabled. System fields can be easily identified since their field names do not begin with z_.
Dataform fields that are referenced by system functions, e.g., rules, links, or field display conditions, cannot be deleted until their dependencies are removed. If you try to delete a field that has a dependency, an error message is displayed in the delete dialog: "This field is used by the following System functions and cannot be deleted while these dependencies are in place: System Function". From the delete dialog, you can open the dependency.
After you Save the configuration, you can then view the form from Admin Workspace.
Go to System Admin
> Administrative Data > <groupname>.Where <groupname> matches the Dataform Group value you selected during the initial Dataform Properties add process.
Alternatively, click Admin Workspace from your modules bar (if you added to your modules bar).
In Admin Workspace, open the group, and within the group open the form.
Click Add.
The form is displayed.
The following images illustrate:
Dataform field mapping during the Add process
The completed form, viewable through Admin Workspace
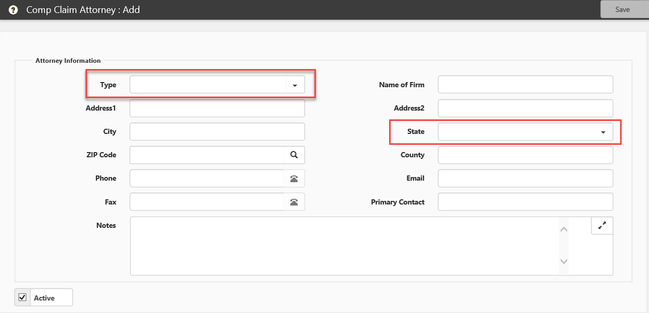
Configuring your Dataform - Datatypes
The following is a list of the most commonly used datatypes in the application accompanied by a brief explanation of how they work.
Business Logic and Rules
Dataform Business Logic and rules are powerful tools that are available for supporting dataform workflow and managing data integrity in ClientSpace. These configurable rules allow you to trigger field validation, clear field values at specific sections of a workflow and even automatically complete fields based on values from other source fields.
Dataform rules include Biz Logic, Hard Errors, and Soft Errors. These rules can trigger events, ensure that data does not become corrupt (i.e., no duplicate SSN and FEIN), and manage the requirements of a workflow, along with any number of custom functions.
- Business Logic Rules are rules that compare fields, perform calculations, change values of fields, validate values, etc.
- Hard Errors are hard and fast requirements that must be met before the action can be completed. These are most commonly used to require data be entered prior to a certain step in the process but without making it a hard requirement to save the current dataform.
- Soft Errors are used as reminders and warnings. These can be configured as custom and complex warnings or they can be simple warnings to remind someone to complete a specific field.
Click the Parameters label to get detailed explanations of how to configure parameters for many of the business rules, the Trigger Values label works in much the same way.
Clear Field Rules
You can automatically clear a field based on a specific trigger condition.
| Method | Description | Parameters |
|---|---|---|
| _ClearFieldValue | Clears the value in a specific field on save. |
|
| _ClearTabFieldValue | Clears a field on the sTabTableName dataform on save. |
|
Create Field Rules
| Method | Description | Parameters |
|---|---|---|
| _CreateCalendarEvent |
| |
| _CreateExportTransaction |
| |
| _CreateExportTransactionAndData |
| |
| _CreateExportTransactionAndDataByUser |
|
Required Field Rules
The Required Field business rules enable a dataform field to be completed under certain circumstances.
| Method | Description | Parameters |
|---|---|---|
| _RequireFieldOnThisForm | Checks for a value in a field on the current form. |
|
| _RequireTabField | Checks for a value in a field on a related tab. |
|
| _RequireAdHocField | Checks for a value in a field that resides in a node that is embedded in the dataform XML packet. For example, there could be an Org node (like on the PEO Client Master), and you want to require the Source field. In that case, the parameters would be:
|
|
Core rules
In addition to the standard required field rules, two CORE rules allow for multiple trigger conditions when requiring fields. Both rules add an additional Trigger field and Trigger value in the parameter area of HE/SE_RequiredFieldEngine rule. Essentially this allows you to have multiple triggers for a required field rule.
| Method | Description | Parameters |
|---|---|---|
_SE_RequireFieldOnFormOnTrigger _HE_RequireFieldOnFormOnTrigger | Soft Error Hard Error |
|
Set Field Rules
Sometimes you want to automatically set a field value based on a set of triggering parameters; for this reason, the _SetField rules were created.
The _SetField rules provide several non-specific trigger values:
- #IsEmpty - fires the rule if the trigger field on the trigger form has no value
- #IsNotEmpty - fires the rule if the trigger field on the trigger form has some value - anything but empty
- #IsDirty - fires the rule if the trigger field on the trigger form has any value other than empty and has been changed prior to save
- #IsDirtyAndIsEmpty - fires the rule if the trigger field on the trigger form has had its value cleared prior to save
- #IsDirtyAndNotEmpty - fires the rule if the trigger field on the trigger form has some value - anything but empty and has been changed prior to save
These options and descriptions have been added to the Context help (click the field label). The TriggerValues of this help are clickable links that fill the trigger field automatically.
| Method | Description | Parameters |
|---|---|---|
| _SetDateFieldValue | Sets a Date field on the TableName dataform. |
|
| _SetDateFieldValueFromSourceField |
| |
| _SetFieldFromKey | The Field Name of the field (on the Dataform Name dataform) into which the Record ID is inserted if the field is empty. Sets a Text or Integer field to that forms ID. If the field is already filled out, it does not replace the value. |
|
| _SetFieldFromForm*** | Sets a field on the TableName dataform from a field on another dataform. Sets a field on the current single dataform from a field on a different single dataform. Must be in the same workspace. The data types must match. For configuration purposes, TableName is the current (target) dataform. This is to be configured for single dataforms only. Leaving the TriggerField and TriggerValue blank when configuring this rule sets the value on save of trigger dataform. If improperly configured using multi-forms, the data is set from the most recently created form, even if it is inactivated. ***Can only be used on gen_ dataforms that are not Multiforms. |
|
| _SetFieldOnFormFromForm*** | Sets a field on another dataform ( gen_DataformName) from a field on the current dataform (#ThisForm) or from another dataform (gen_DataFormName). Sets a field on a single dataform from a different single dataform in the same workspace. This is triggered by a third, completely different single dataform in the same workspace. The source and target data types must be the same. This is to be configured for single dataforms only. Leaving the TriggerField and TriggerValue blank when configuring this rule sets the value on save of trigger dataform. If improperly configured, when the source dataform is a multi-form, the data is set from the most recent source multiform, even if it is inactive. If the target dataform is a multiform, the data is set on the most recent multiform, even if it is inactive. ***Can only be used on gen_ dataforms that are not Multiforms. |
|
| _SetFieldValue | Sets a field on the TableName dataform on save |
|
| _SetFieldValueFromPattern | This rule has the ability to extract the first instance of a value from within a text field using a valid .Net RegEx pattern and set the value of another text field on the same page to this extracted value. Some .Net regex patterns found online begin with the ^ character, which must be removed when configuring this rule. This business rule operates based on the following:
|
|
| _SetImportID | ||
| _SetTabDateFieldValue | Sets a Date field on the sTabTableName dataform (Tab dataform associated with the triggering dataform) |
|
| _SetTabFieldValue | Sets a field on the sTabTableName dataform on save. |
|
| _SetTabUserField | Sets a user field on the dataform tab that is a from a user field on the parent dataform of the tab. This only works from the Parent form to the Child form. |
|
| _SetUserField | Sets a user field on the same dataform. |
|
Primary and Secondary Trigger Fields
When configuring business rules, the Primary Trigger Field and Secondary Trigger Field lists include fields that are User datatypes.
Trigger value fields are text fields that support the following configurations:
- A single User ID
- #IsDirty
- #IsEmpty
- #IsDirtyAndEmpty
- #IsDirtyAndNotEmpty
Primary Trigger
- Primary Trigger Field: can specify HdrAction or a field on the current dataform
- Primary Trigger Value: the HdrAction value or the field value used for comparison
- Compares Primary Trigger Field HdrAction value or the dataform field value with Primary Trigger Value entered
- The Primary Trigger Value must have changed for the rule to fire, based on the following criteria:
- If comparing HdrAction value, the HdrAction is assumed changed
- If comparing dataform field values (e.g., luState=MA), the dataform field must have changed
- If #IsEmpty, #IsNotEmpty, dataform field is assumed changed
- If #IsDirty, #IsDirtyAndIsEmpty, #IsDirtyAndNotEmpty, dataform field must have changed
- Clicking the label brings up a list of # conditions, which are hyperlinked to set the condition in Primary Trigger Value
Secondary Trigger
Secondary trigger field and value fields are enabled when a primary trigger condition has been set and are optional.
Criteria for secondary trigger conditions are as follows:
- Primary Trigger condition must be met. Secondary Trigger acts as an AND with Primary Trigger.
- Secondary Trigger Field: can specify HdrAction, a field on the current dataform, or a field from ServerDataProc1 or ServerDataProc2
- Secondary Trigger Field: when using Server Data Procs, the format is SDP1.FieldName or SDP2.FieldName
- Secondary Trigger Value: the HdrAction value or the dataform/SPD1/SPD2 field value
- Compares Secondary Trigger Field HdrAction value or the dataform/ServerDataformProc field value with Secondary Trigger Value entered
- The Primary Trigger Value must have changed for the rule to fire, based on the following criteria:
- If comparing HdrAction value, the HdrAction is assumed changed
- If comparing SDP1/SDP2 value, the current value is assumed changed
- If comparing dataform field values (e.g., luState=MA), the current dataform field must have changed
- If #IsEmpty, #IsNotEmpty, current dataform/SPD1/SPD2 field is assumed changed
- If #IsDirty, #IsDirtyAndIsEmpty, #IsDirtyAndNotEmpty, dataform field must have changed
- If #IsDirty, #IsDirtyAndIsEmpty, #IsDirtyAndNotEmpty, previous value is assumed Empty, field must have changed (contains a value)
- Clicking the label brings up a list of # conditions, which are hyperlinked to set the condition in Secondary Trigger Value
Step-by-step guide
To provide an example of Business Rules configuration we will look at Configuring a SetField rule.
Business Rules can be configured on the Client Processing Team dataform so when a Service Team is selected it will auto-populate the Client Team's various roles. To do this a Global Admin needs to configure a rule for each role that needs to be auto-filled. See the following figure for an example of how to configure this rule. This rule will set the Implementation Specialist when the "Blue Jay" Service Team is selected.
- Go to System Admin
 > Advanced > Manage Rules.
The Custom Logic Rules list is displayed. - To add a business rule, click Add.
The Rule Details form opens.
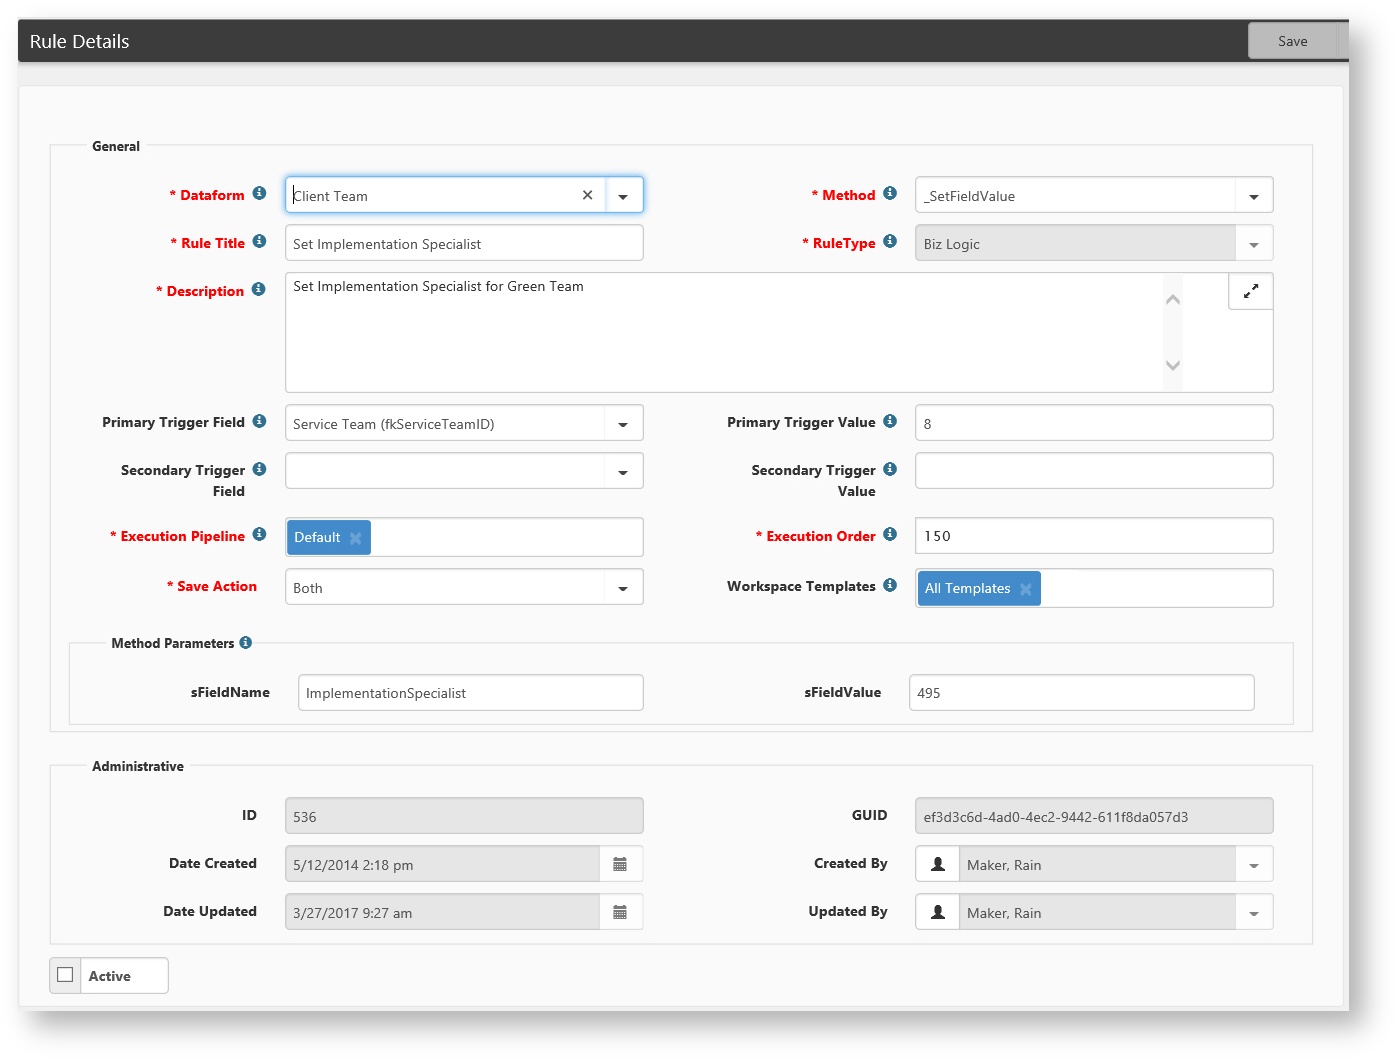
- Dataform: This is the dataform where this rule will be executed when the dataform is saved.
- Method: Choose '_SetFieldValue'
- Rule Title: Provide an abbreviated explanation of what this rule will due, for example, "Set Implementation Specialist For Blue Jay Team".
- RuleType: ClientSpace controls this field automatically.
- Description: Provide a more thorough explanation of what this rule is to accomplish.
- Primary Trigger Field: Select the field that is going to cause the change. In this example, 'Service Team (fkServiceTeamID)' represents the Service Team field on this dataform.Primary Trigger Value: Type the value of what is stored in the database for the Trigger Field. In this example '8' is the value that is stored in the system to represent the 'Green Team'.Secondary Trigger Field: Select an additional trigger condition that must be met if necessary.Secondary Trigger Value: Set the secondary trigger value.
Execution Pipeline: Leave this set to Default.
Execution Order of Precedence
Within the Rules system, there is a distinct order of precedence that occurs, that being HardError, SoftError, BizLogic. This means that setting a field to a specific value automatically with BizLogic, then validating that field with a Hard Error will never occur in the correct order, as the Hard Error will fire before the BizLogic fills the field. This order of precedence happens irrespective of the execution order placed on the configured rule, so Hard Errors will fire in Execution order least to greatest, then Soft Errors will fire in their order of execution, then the Biz Logic will happen, again in the order of execution set on each rule.
- Execution Order: This field controls the order in which rules will execute first. Rules execute from lowest to highest number. It may be necessary to look at other rules already configured on this dataform to determine the order of precedence for executing rules.
- Save Action: Will this rule be applied on Insert of a new dataform, or on the update of an existing dataform or on both?
- Workspace Template: Select the Workspace Template(s) to which this rule will apply.
- sFieldName: Type the technical database name for the field that needs to be set. In this example, 'ImplementationSpecialist' represents the Implementation Specialist field on the Client Team dataform.
- sFieldValue: Type the value of what should be stored in the database for the Trigger Field. In this example '415' is the value that is stored in the system to represent the 'Adam Harris', the Implementation Specialist.
Note: You must use a combination of Ad-hoc Reports, the Dataform Specifications Report, Lookup Admin, and or Dataform Admin to find the technical database names and the values stored in the database to represent the value that is seen by the user from the dataform. This rule would also work well in cases where you may want to set the Implementation Specialist to X when the Payroll Specialist is Y.
Dynamic Field Display
Configurable Field Display gives an administrator vast control over the general look and feel of a dataform. This is much more than just properly grouping fields into fieldsets or tabs but includes the ability to dynamically enable or disable fields and show or hide fields or fieldsets based on the other data on that dataform. In combination with custom header links, an administrator can virtually set up any workflow or process in ClientSpace utilizing Dynamic field display.
Note – Required dataform fields hidden through configurable field display will not present their Required attribute to the system’s dataform save logic, meaning these fields will only be required if visible. This allows you to structure complex dataform logic and workflow within a dataform. This flexibility should be tempered with advance planning to ensure that appropriate data is being captured when required. In short, make sure you are not hiding a field you would like completed.
To configure and manage dynamic field display:
Go to System Admin
> Advanced > Manage Field Display.- It is a good idea to filter the presented list for the dataform to which you will add field display so that you can better understand the existing field display logic and determine if this will affect the changes you wish to make.
The following example shows a filter using Form Test in the Search field.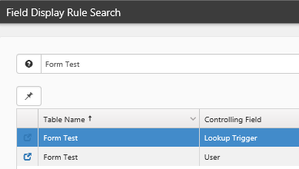
- When ready, click Add.
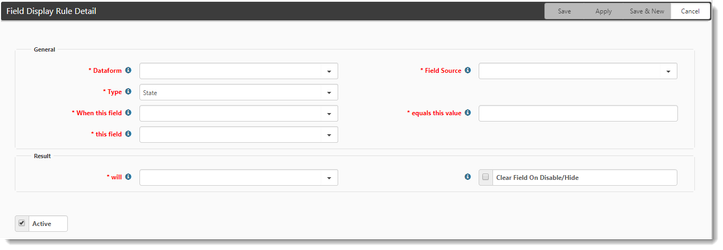
The Field Display Rule Detail form opens. This form provides a number of configuration options to customize how your field display will work. Complete the form.
 Form fields
- Dataform - (required) Select the dataform table for which you would like to configure field display - this selection will affect several other choices on this form.
- Field Source – (required) Choose a field from the dataform (This Table) as the trigger or a field from a Field Display Proc (Field Display Proc 1 or 2) that has been configured for your company by PrismHR development. A Field Display Proc is a custom SQL stored procedure that allows you to aggregate information from other dataforms in the system. This would allow you to say, disable all of the fields on a workspaces Employee and Employment forms if the Client Status on the Client Master page is ‘Terminated’.*
- Type – (required) Determines whether this will be a Field display change that affects State or Styling:
- State: Visibility / Read-Only attributes (default)
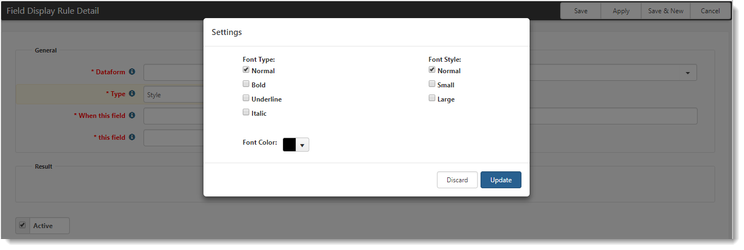
- Style: Sets CSS Styling changes to the field label based on specific triggering condition (see adjacent image). To set Style, click Settings. the Settings dialog opens.
- When this field – (required) Presents a series of fields based on your choice of Table Name and Field Source. Whatever is selected in this field will act as the trigger for your field display action.
- equals this value – (required) This is the triggering value and should be set to something appropriate for the triggering field selected to the left. For example, a checkbox selected as the triggering value should equal either True or 1 if you want to trigger your field display off the checked state. The value of a Lookup trigger field should equal the code value of either one of the lookup options, or a comma-separated list of such code values. OR statements can be built in this way using a comma-separated list of values in this field for distinct value fields such as lookups, text, or parent form fields. Say you have a lookup field to store the days of the week - you could trigger field display for weekend days by using equals this value: Saturday, Sunday (this equates to 'where value equals 'Saturday' OR 'Sunday').
Note
Hiding a fieldset hides all fields within the fieldset, masking any required field actions for those fields.
- This field - (required) This is the field (or fieldset) upon which you will perform the field display action.
- will – (required) Choose a field display action of either:
- Enable – Opens field for edits, allows changes to the field to be saved.
- Disable – Marks the field read-only and not editable.
- Hide – Hides the field from display
- Display – Shows the field on the dataform.
- The Clear Field on Disable/Hide does exactly that, it removes any information previously stored in this field when it is hidden or disabled. This is a hard delete from the system, so exercise careful planning when choosing this option.
- After you have configured all of the field display options, click Save.
Field display can be cascaded. Combine this with required field rules and it allows you to build incredibly complex workflow within a dataform. An example of this could be a form, where filling out a Pay Frequency field with a value of Weekly displays a Weekly payroll fieldset containing a required Pay Type field with values of Check or Direct Deposit. Selecting Direct Deposit displays a field for Bank Authorization, which is also required to save the form and so on.
Custom Links
Configured links give administrators the ability to dynamically control the accessibility of data in the system. Using Configurable Links can significantly improve the user experience by making related dataforms, reports, and workflow available from the dataform the user is currently on at specific points in the workflow. This will allow you link to custom reports, merges and dataforms within the current workspace or the admin workspace, or even configure your own workflow from scratch. An example of the creative use of configured links is to only make reports or workflow links available when certain data is filled in. For example, a salesperson can only submit an Order for approval once there is a Resolution in the order. The following document provides the tools you need to start configuring your own custom header links.
To configure and manage links:
Go to System Admin
 > Advanced > Custom Links.
The Configure Links list is displayed.Click Add.
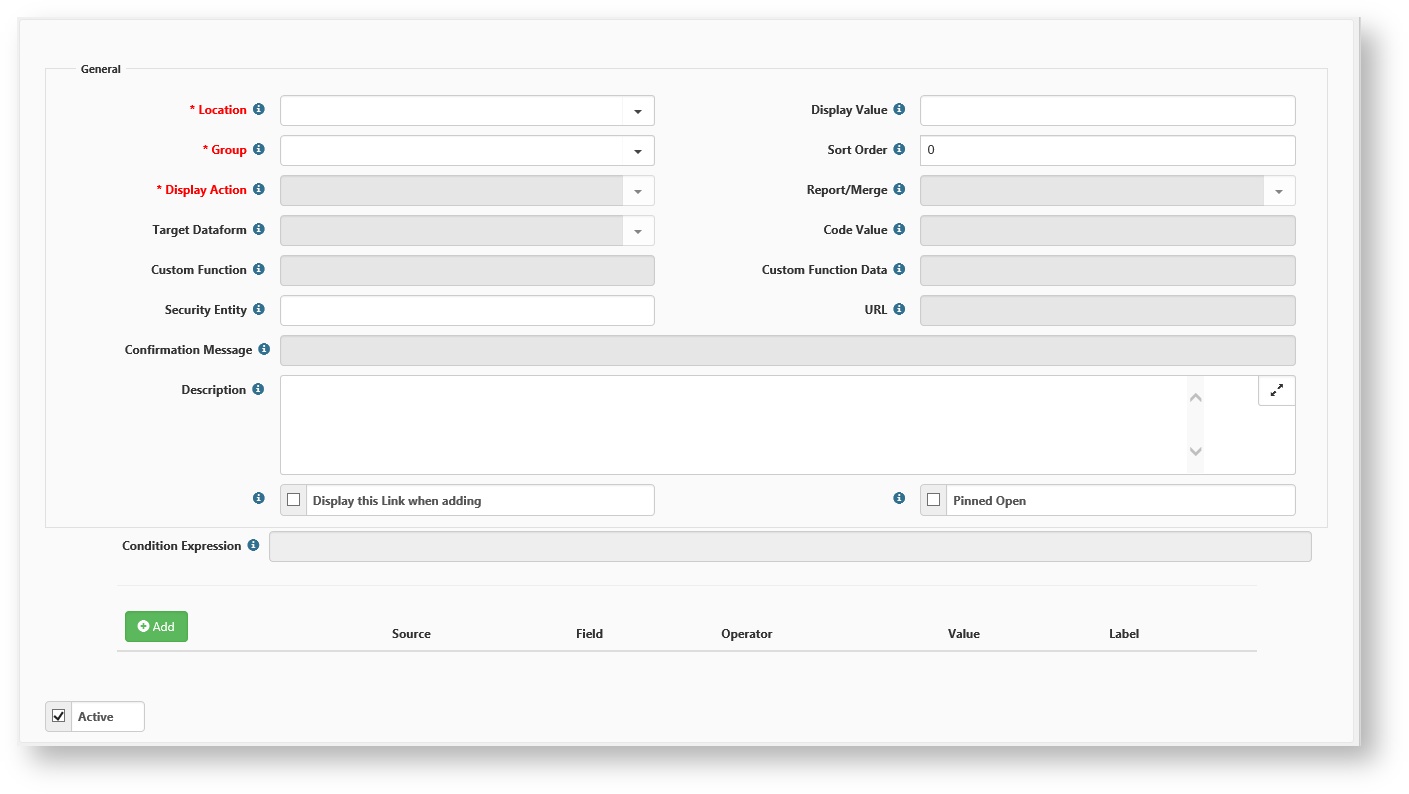
The Configure Links Detail form opens with a series of form fields to configure the link.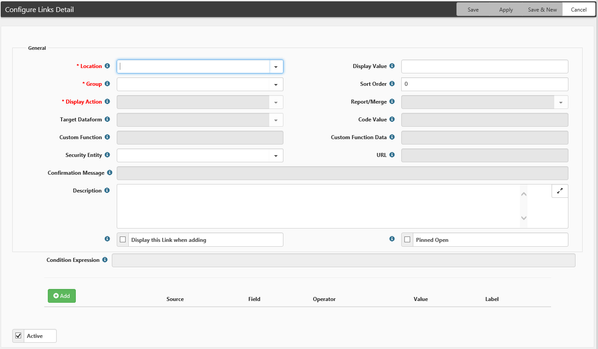
- Location - Name of the dataform or system object on which you want the link to appear.
- Group - Denotes what type of link you are creating and drives the other fields on the form that you will need to fill out to complete the configuration.
- Display Value - This is what will actually display in the action area of the dataform or system object as the clickable link.
- Display Action - The possible actions for the selected Link Group (see details below).
Sort Order: This orders the Links in the Action center Workflow Actions first, then Links (Link1 or Link 2) then Reports - the Sort Order determines how the individual items will be displayed within the groups.
- Target Dataform: This is the dataform to be opened from Configured dataform links (see Link1 or 2 above). This field is enabled when a Link Group is selected.
- Report / Merge: This is the Report or Merge to be run when the link is clicked (see Report above). This field is enabled when the Report Group is selected.
- Code Value: This is the HdrAction produced when the link is clicked (see Action above).
- Custom Function: This is the custom function to be called - (see above).
- URL: This is where you configure the URL that you wish to open on a URL Display Action (see above). When defining an external URL, be sure to include the protocol (http:// or https:// ) as links without this will be treated as internal to the application.
- Security Entity: This field allows you to secure the link for viewing by selecting a security entity from those available in the system. Unless the user is in a role containing the security entity stored here, they will not see the link.
- Confirmation Message: This allows you to display an OK / Cancel dialog box with a message before running the link action. Most often used with Action Links.
- Description: A text description of what action the link performs may be recorded here. This description displays when you hover over the link on the dataform or system object.
- Display this link when adding**: Dataforms prior to save do not normally display links, this checkbox allows you to display the link prior to the initial form save.
Condition Expression: Condition Expressions use Labels from Display Conditions along with AND, OR, and NOT operators to control precedence and sequence. This field allows you to create complicated Link Display Conditions by creating unique combinations of the configured display conditions configured below. This allows for AND, OR as well as NOT conditions utilizing the Condition Expression feature. Using the Label field on the Link Display Condition you can combine trigger conditions into more complex expressions, overriding the default OR behavior. For example: (Condition1 AND Condition2) OR (Condition3 AND Condition4) OR Condition5.*** For a detailed explanation, see Condition Expressions.
**Single dataforms with defaulted fields can appear as though they have been saved before the actual record exists in the database. If you configure a link and it does not appear when you are testing, try saving the dataform. If you would like the link to always appear, regardless of whether the dataform has been saved, select the Display this link when adding checkbox.
***Link Display Conditions that are not included in the Condition Expression are ignored.
Project Code may be set in Workspace Settings and link configurations will accept ProjectCode or TemplateCode as a Field trigger, allowing you to use Template Code to limit link display to all children of a given Template or Project Code to just limit display a single Client Workspace in NEXT. For more information about this configuration, see the Release Video.
Configuring Link Display Conditions
Display conditions are designed to ensure that your configured link displays only when and to whom you want it to. These Link Display Conditions can be triggered either from a field on the dataform, or from a trigger value returned in a Header proc (custom code developed by our development team).
By default, multiple Display Conditions are treated as OR statements when determining display behavior unless a Condition Expression is configured for this link. Adding a Condition Expression makes the triggering condition explicit, meaning that display conditions not included in the Condition Expression are ignored. For a detailed explanation, see Condition Expressions.
In the Add area of the form, you can define conditions using Source, Field, Operator, and Value. You assign the condition a name using Label. Label values are used in the Conditions Expression field located before the Add area.
You can use multi-lookup fields for triggering conditions (Field and Value columns in the Add section). Each value from the multi-lookup can be added as a separate "=" condition. This supports complex AND, OR, and NOT conditions.

- Source: This is where the system will look to find the Trigger Value that matches your condition. The options are:
- Form Data: System looks at the dataform to find the triggering field and value.
- Header Proc (1 or 2): System looks at a stored procedure that runs when the dataform opens. Can pull information from other dataforms in the system.
- Field: This is the field that will be interrogated for the trigger value. You can use multi-lookup fields as triggering conditions. Each value from the multi-lookup can be added as a separate "=" condition. This supports complex AND, OR, and NOT conditions.
- Value: This is the value in the Trigger Field that will evaluate to true. This must match the value stored in the database.
- For lookups, this would be the Code value.
- For parent form fields, such as Case Type, this would be the ID of the form.
- Value can also be blank (Empty) when triggering links from Form Data, enabling display conditions when a field is empty. Blank is only valid when the Source is Form Data.
- Label: The label is used when building a Condition Expression. In the Condition Expression discussion, Condition1, Condition2, Condition3, and so on are examples of Label values.
Example of conditions using the "=" operator and a Condition Expression (SYR and NY).

** Workspace dataform links respect the relationship to the dataform on which the link is configured, filtering the returned data appropriately. For example, configuring a Workspace Dataform link on the Employee Dataform to the WC Claims dataform will return only claims associated with the employee in question.
Distributing Your Dataform
After a dataform is created and configured, you need to provide some way for it to be used, and this can be accomplished in a number of ways. A dataform might need to be workspace specific, so you would need to add it to the TOC of a single workspace, or it may need to be more widespread, so you would want it copied to each workspace as they are generated. You may also want to only expose access to the dataform from the header of another dataform. Certain financial dataforms in the PEO system are exposed through header links from the dataforms for which they contain financial data. This document discusses each of these methods of Dataform Distribution.
To add a dataform to a workspace:
Navigate to the Workspace in question. This can be a single administrative workspace, or to have the dataform generated on Workspace creation. Go to System Admin
> Workspace Templates.
The Workspace Template Search list is displayed.Locate and open the template in question.
In Action Center, click
 Dataforms.
Click Add.
The Add Dataforms dialog opens.Find and Select the dataform.**
Click Ok.
The dataform is added to all child workspaces of that template.
Dataforms can also be accessed via custom links in another dataform header. Configuring a header link is detailed in the document Configuring Links. This article discusses the link configuration items to create a Workspace Dataform link.
To add a new link to the dataform:
- Go to System Admin
 > Advanced > Custom Links.
The Configure Links list is displayed. - Click Add.
The Configure Links Detail form opens. - Use the following field descriptions to guide you through adding a new link.
- Location: The name of the dataform on which you want to link to appear.
- Group: Where in the header the link will appear.
- Display Value: The text that is displayed in the Action Items area as a clickable link.
- Display Action: Lists the possible actions for the selected link group. The available actions are based on the selected Group and include items such as running a report or merge. This then creates a HdrAction to fire a business rule or open a system dataform. ***
- Sort Order: When multiple links are displayed in the header, this determines their order within the link group.
- Sort/Merge: Select the report or merge to run using the appropriate display action when a Report link is clicked.
- Target Dataform: The dataform you would like the user to access from this link.
- Code Value: This is the HrdAction produced when an Action link is clicked.
- Custom Function: This is the custom function that is called from an Action link.
- Custom Function Data: This is the data that is passed to a custom function if required.
- Security Entity: This can be used to hide the link from unauthorized access.
- URL: Use this field to configure the URL that opens on a URL Display Action. When defining an external URL, include the protocol (http:// or https://) as links. Without the protocol, the link is treated as internal to the application.
- Confirmation Message: Provide a confirmation message that displays an OK / Cancel dialog box before running the link action. This is most often used with Action Links.
- Description: A short description of the dataform and how it should be used. This text appears on mouseover of the link.
- Display this Link when adding: This section can be used to set parameters for when the link should display. For a complete discussion of configuring link display see the document Configuring Links.
- Pinned Open: When selected, this forces the link to always display in the Action Items area. The link will not collapse when the associated group is collapsed.
- Condition Expression: This field uses the Labels from any conditions that you added under Add. You can combine multiple triggers into more complex expressions and override the default OR behavior. Conditions that are not included in this field are ignored.
- Active: By default, configured links are active.
- After configuring the Dataform Link, remember to Save your changes.
** When adding a dataform, if the entry in the dataform search dialog is disabled, this means the dataform already exists in the workspace.
*** For questions about Admin Dataforms contact your application specialist.
NOTICE: You are in the old ClientSpace Help system. Please link to the new ClientSpace Help here https://extranet.clientspace.net/helpdoc/home/ClientSpace.htm