NOTICE: You are in the old ClientSpace Help system. Please link to the new ClientSpace Help here https://extranet.clientspace.net/helpdoc/home/ClientSpace.htm
Configuring Links
Configured links give administrators the ability to dynamically control the accessibility of data in the system. Configurable links can significantly improve the user experience by making related dataforms, reports, and workflow available from the dataform a user is currently on at specific points in the workflow. This allows you link to custom reports, merges and dataforms within the current workspace or the admin workspace, or even configure your own workflow from scratch. An example of the creative use of configured links is to only make reports or workflow links available when certain data is filled in. For example, a salesperson can only submit an Order for approval when there is a Resolution in the order. The following document provides the tools you need to start configuring your own custom header links.
To configure and manage links:
Go to System Admin
 > Advanced > Custom Links.
The Configure Links list is displayed.Click Add.
The Configure Links Detail form opens with a series of form fields to configure the link.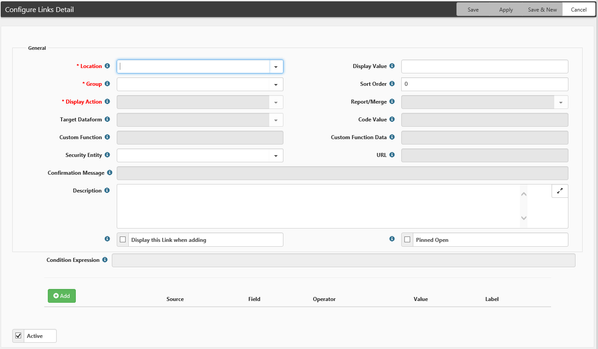
- Location - Name of the dataform or system object on which you want the link to appear.
- Group - Denotes what type of link you are creating and drives the other fields on the form that you will need to fill out to complete the configuration.
- Display Value - This is what will actually display in the action area of the dataform or system object as the clickable link.
- Display Action - The possible actions for the selected Link Group (see details below).
Sort Order: This orders the Links in the Action center Workflow Actions first, then Links (Link1 or Link 2) then Reports - the Sort Order determines how the individual items will be displayed within the groups.
- Target Dataform: This is the dataform to be opened from Configured dataform links (see Link1 or 2 above). This field is enabled when a Link Group is selected.
- Report / Merge: This is the Report or Merge to be run when the link is clicked (see Report above). This field is enabled when the Report Group is selected.
- Code Value: This is the HdrAction produced when the link is clicked (see Action above).
- Custom Function: This is the custom function to be called - (see above).
- URL: This is where you configure the URL that you wish to open on a URL Display Action (see above). When defining an external URL, be sure to include the protocol (http:// or https:// ) as links without this will be treated as internal to the application.
- Security Entity: This field allows you to secure the link for viewing by selecting a security entity from those available in the system. Unless the user is in a role containing the security entity stored here, they will not see the link.
- Confirmation Message: This allows you to display an OK / Cancel dialog box with a message before running the link action. Most often used with Action Links.
- Description: A text description of what action the link performs may be recorded here. This description displays when you hover over the link on the dataform or system object.
- Display this link when adding**: Dataforms prior to save do not normally display links, this checkbox allows you to display the link prior to the initial form save.
Condition Expression: Condition Expressions use Labels from Display Conditions along with AND, OR, and NOT operators to control precedence and sequence. This field allows you to create complicated Link Display Conditions by creating unique combinations of the configured display conditions configured below. This allows for AND, OR as well as NOT conditions utilizing the Condition Expression feature. Using the Label field on the Link Display Condition you can combine trigger conditions into more complex expressions, overriding the default OR behavior. For example: (Condition1 AND Condition2) OR (Condition3 AND Condition4) OR Condition5.*** For a detailed explanation, see Condition Expressions.
**Single dataforms with defaulted fields can appear as though they have been saved before the actual record exists in the database. If you configure a link and it does not appear when you are testing, try saving the dataform. If you would like the link to always appear, regardless of whether the dataform has been saved, select the Display this link when adding checkbox.
***Link Display Conditions that are not included in the Condition Expression are ignored.
Project Code may be set in Workspace Settings and link configurations will accept ProjectCode or TemplateCode as a Field trigger, allowing you to use Template Code to limit link display to all children of a given Template or Project Code to just limit display a single Client Workspace in NEXT. For more information about this configuration, see the Release Video.
Configuring Link Display Conditions
Display conditions are designed to ensure that your configured link displays only when and to whom you want it to. These Link Display Conditions can be triggered either from a field on the dataform, or from a trigger value returned in a Header proc (custom code developed by our development team).
By default, multiple Display Conditions are treated as OR statements when determining display behavior unless a Condition Expression is configured for this link. Adding a Condition Expression makes the triggering condition explicit, meaning that display conditions not included in the Condition Expression are ignored. For a detailed explanation, see Condition Expressions.
In the Add area of the form, you can define conditions using Source, Field, Operator, and Value. You assign the condition a name using Label. Label values are used in the Conditions Expression field located before the Add area.
You can use multi-lookup fields for triggering conditions (Field and Value columns in the Add section). Each value from the multi-lookup can be added as a separate "=" condition. This supports complex AND, OR, and NOT conditions.

- Source: This is where the system will look to find the Trigger Value that matches your condition. The options are:
- Form Data: System looks at the dataform to find the triggering field and value.
- Header Proc (1 or 2): System looks at a stored procedure that runs when the dataform opens. Can pull information from other dataforms in the system.
- Field: This is the field that will be interrogated for the trigger value. You can use multi-lookup fields as triggering conditions. Each value from the multi-lookup can be added as a separate "=" condition. This supports complex AND, OR, and NOT conditions.
- Value: This is the value in the Trigger Field that will evaluate to true. This must match the value stored in the database.
- For lookups, this would be the Code value.
- For parent form fields, such as Case Type, this would be the ID of the form.
- Value can also be blank (Empty) when triggering links from Form Data, enabling display conditions when a field is empty. Blank is only valid when the Source is Form Data.
- Label: The label is used when building a Condition Expression. In the Condition Expression discussion, Condition1, Condition2, Condition3, and so on are examples of Label values.
Example of conditions using the "=" operator and a Condition Expression (SYR and NY).

** Workspace dataform links respect the relationship to the dataform on which the link is configured, filtering the returned data appropriately. For example, configuring a Workspace Dataform link on the Employee Dataform to the WC Claims dataform will return only claims associated with the employee in question.
Related articles
NOTICE: You are in the old ClientSpace Help system. Please link to the new ClientSpace Help here https://extranet.clientspace.net/helpdoc/home/ClientSpace.htm