NOTICE: You are in the old ClientSpace Help system. Please link to the new ClientSpace Help here https://extranet.clientspace.net/helpdoc/home/ClientSpace.htm
Configuring the email add-in for Outlook
This topic provides step-by-step instructions for installing and configuring the email add-in for Outlook for:
Before you begin
- The first step is to install and configure the email add-in for Outlook.
- Select your preferred method of accessing Outlook (outlook.live.com, Office 365 Online, or Outlook in Windows).
- Follow the installation procedures in this topic.
- The second step is to select an email message and post it to ClientSpace.
- The steps for selecting the email and posting to ClientSpace are in a separate article: Creating activities, cases, and tasks from your Outlook email.
Why use the email add-in?
The email add-in connects your Outlook email inbox with ClientSpace to automate the process of creating an activity record when you send an email. The add-in eliminates the need to maintain activity records in multiple places. When you send an email from ClientSpace, the activity is captured for the client, prospective client, or lead. Additionally, the email add-in enables an easy way to create activities, cases, and tasks from received emails listed in the External Mailbox dashboard. All activity is performed from within ClientSpace.
The following instructions for distributing the Add-In through Exchange Admin should be used when publishing the Outlook Add-In. Any deviation from this procedure may produce unexpected results and falls outside the scope of support for this product.
Per Microsoft, Outlook add-in deployment requires:
- Office 365, Exchange Online, or Exchange Server 2013 or later
- Outlook 2013 or later
It is also highly recommended that you apply the latest service pack / patches for Exchange server to ensure you have Microsoft's latest deployment code. More details about this and the technology used for these add-ins can be found here: https://docs.microsoft.com/en-us/outlook/add-ins/
This section describes how to configure the add-in from outlook.live.com
Keep ClientSpace and Outlook open during the installation procedure
You will need to toggle between your ClientSpace site and Outlook session. The procedure requires that you keep the sessions open while gathering the various pieces of information.
To install the email add-in for Outlook:
- Sign in to your Outlook account.
- Open an existing email.
- At the top of the email message, on the right side, click . . . (More actions).
A list of options is displayed.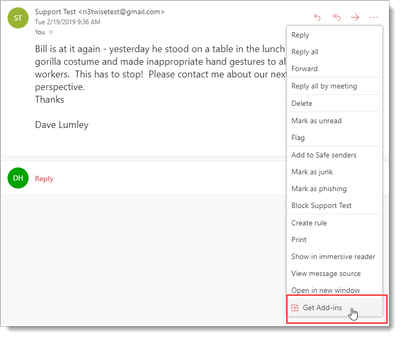
- Click Get Add-ins.
The Add-Ins for Outlook dialog opens. - Click My add-ins.
- Under Custom add-ins, click Add a custom add-in > add from URL.
The Add private add-in from a URL dialog opens. - In Enter the URL of the add-in's manifest file, paste the following URL: https://shared.clientspace.net/Content/Manifest/OfficeManifest2.xml
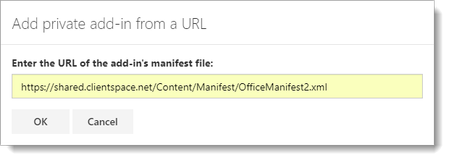
- Click OK.
A Warning message is displayed: "This custom add-in may access your personal data and send it to a third-party service. It hasn't been verified by Microsoft. Make sure you trust the source of the add-in." - Click Install.
The ClientSpace for Outlook add-in is added and displayed in the Custom add-ins area. - Click X to close the dialog.
The next few steps configure the settings: URL, Username, and Mail Key.
Next: Check your email address in ClientSpace
To ensure that your email address is added to your ClientSpace User Details:
- From ClientSpace, click
 <username> > My Profile.
The User Details form opens. - In Email, ensure that the appropriate email address is recorded. This email should be the same email address as the one you use for Outlook (for example jsmith@outlook.com).
- Update the information in ClientSpace if required and click Save.
Next: Obtain Mail Key from ClientSpace
To obtain the Mail Key:
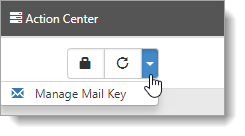
- In ClientSpace, from your User Details page, in the Action Center, select More Options > Manage Mail Key.
The Your Mail Key form opens.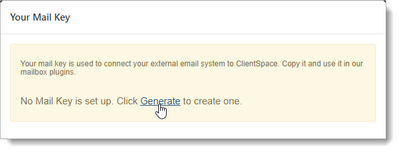
- If no Mail Key is set up, click Generate to create one.
Your Mail Key is displayed so that you can copy and use it for connecting to your external mail system to ClientSpace. - Click the key to copy it to your clipboard.
The Clipboard opens showing the key. - Click Ok.
- Click Close.
At this point, the key is copied to your clipboard and you are ready to paste the Mail Key in the Outlook configuration pane.
Next: Back to Outlook
To continue the configuration:
- In Outlook, from the previously opened email, click . . . (More actions).
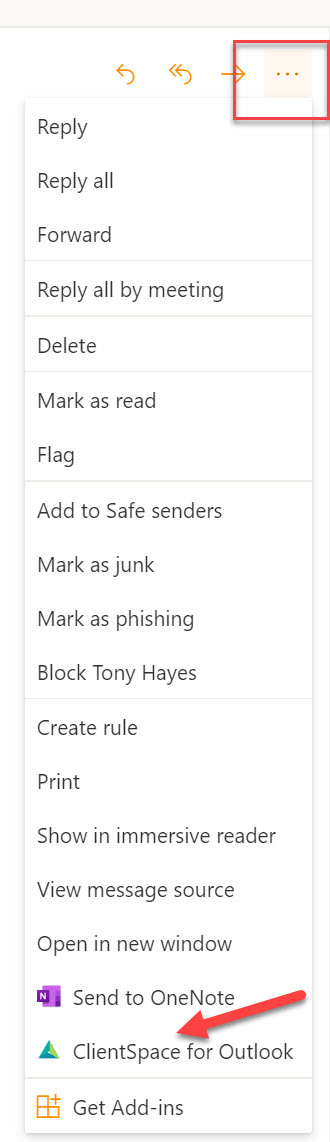
- From the list of options, click ClientSpace for Outlook.
The ClientSpace for Outlook pane opens beside the open email. You must open this pane for every Outlook email that you want to post to ClientSpace.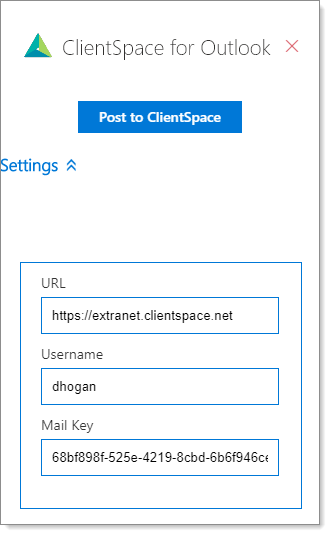
- In the ClientSpace for Outlook pane, if you do not see fields for URL, Username, and Mail Key, click Settings.
The fields are now displayed. - In Mail Key, paste the key that you just copied. Let's fill this field first so that you retain what you just copied to the clipboard.
- Go to your ClientSpace site and copy the ClientSpace URL (for example, https://yoursite.clientspace.net). Note: DO NOT append /next to the end of the URL.
- In URL, paste the URL of your ClientSpace site.
- In Username, type your ClientSpace username (for example, jsmith).
- Now you are ready to post the opened email message to ClientSpace.
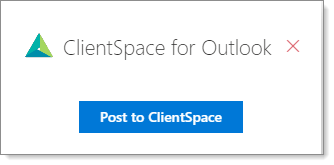
- Click Post to ClientSpace. This action logs you into ClientSpace displaying the email message from Outlook, which is now visible in ClientSpace.
- If pop-ups are blocked, click the Pop-up blocker and select Always allow pop-ups and redirects from https://outlook.live.com.
What's next?
When you click Post to ClientSpace, you are logged into ClientSpace. The Post To Pulse page appears.
From the Post To Pulse page, you can:
- Review Help
- Attach the email to a record (Dataform)
- Create an activity
- Create a case
- Create a task

You are now logged into ClientSpace, ready for the next action. Go the next Help article for the procedure on how to create activities, cases, and tasks from the Post To Pulse page.
This section describes how to configure the add-in from Office 365 Online
To install the email add-in for Outlook from Office 365:
- Log into your office 365 account online (portal.office.com) and access your Outlook mailbox.
- If your Administrator has installed the add-in as Optional - Enabled by default, or Mandatory, always enabled, when you select an email in the list you will see the add-in icon
 in the upper right.
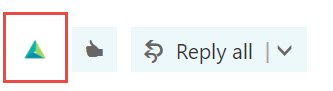
- If the add-in has been installed as Optional, disabled by default perform the following steps to enable it.
- Click the settings icon (gear).
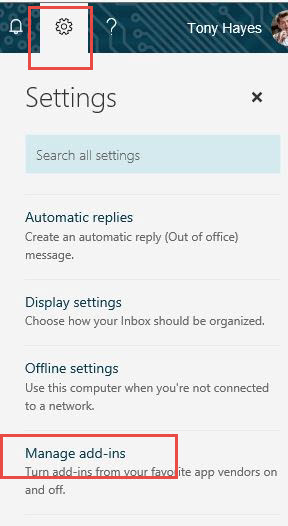
- Select Manage add-ins.
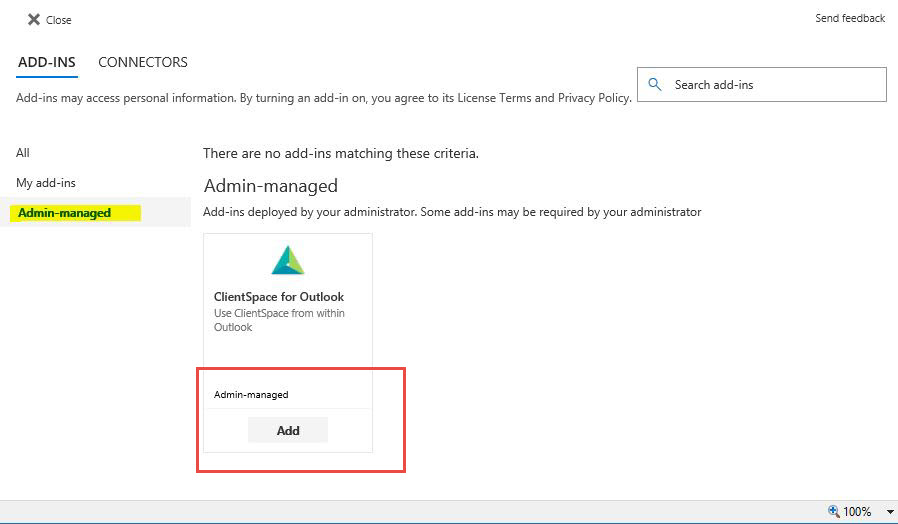
If the Manage Add-ins option is missing, it is likely that Outlook Web Access has been disabled in your environment. Speak with your Exchange administrator about enabling this functionality. - If your administrator has installed the add-in in Exchange and you have rights, you will see the option for Admin-managed add-ins.
- Click Admin-managed then click Add for the Outlook Add-in.
- When you return to your Outlook Mail and select an email you will see the add-in icon in the upper right.

- Go the next Help article for the procedure on how to create activities, cases, and tasks.
This section describes how to configure the add-in from Outlook in Windows
If your Administrator has installed the add-in as Optional - Enabled by default, or Mandatory, always enabled, and you have logged into Outlook via portal.office.com, the add-in should be present when you open your Windows install of Outlook (Office 2013 and newer). For environments where the admin has made this add-in Optional, disabled by default, or if you have not opened Outlook via portal.office.com, you must manually install the add-in using the following instructions.
To install the email add-in for Outlook in Windows:
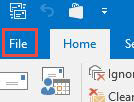
- Open the Outlook application (2013 and newer) on your Windows desktop.
- In the upper left, click File.
- Scroll down until you see Manage Add-ins.
If the Manage Add-ins tile is missing, it is likely that Outlook Web Access has been disabled in your environment. Speak with your Exchange administrator about enabling this functionality.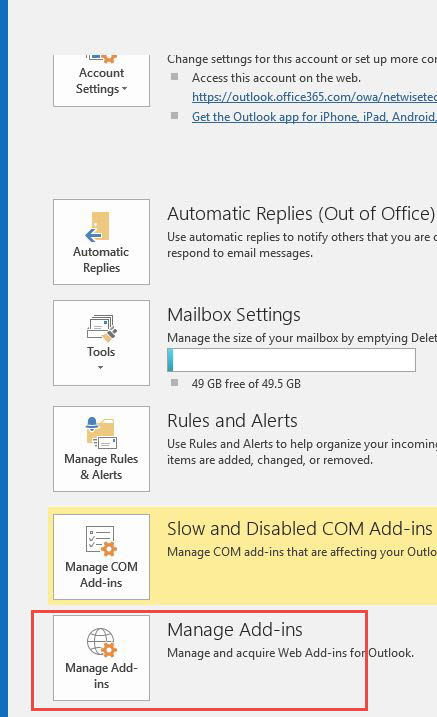
- Click Manage add-ins. It will take you to a login for Office 365.
- After you log in, if your administrator has installed the add-in in Exchange and you have rights, you will see the option Manage add-ins.
- Click Manage add-ins.

- Select the ClientSpace for Outlook add-in check box.
- When you return to Outlook and have an email selected you will see the icon for the add-in in your toolbar .
- Go the next Help article for the procedure on how to create activities, cases, and tasks.
What's next?
Now you are now ready to create activities, cases, and tasks from an open Outlook email message
- Review the next topic Creating activities, cases, and tasks from your Outlook email.
Related articles
NOTICE: You are in the old ClientSpace Help system. Please link to the new ClientSpace Help here https://extranet.clientspace.net/helpdoc/home/ClientSpace.htm