NOTICE: You are in the old ClientSpace Help system. Please link to the new ClientSpace Help here https://extranet.clientspace.net/helpdoc/home/ClientSpace.htm
Configuring Nightly Imports
The ability to import data into ClientSpace provides a powerful toolset to connect your ClientSpace data with external systems, but it can be tricky to configure. The following document is designed to provide a primer for On-Demand imports as well as some best practices to help make you a data imports expert. The ability to tie imported data to existing data in the system is critical but requires an understanding of your data and how the underlying tables relate. If you haven't already, check out the glossary and read about foreign key relationships as well as relational databases.
Before You Begin
When configuring imports, it is vital that you understand the data relationships within your ClientSpace installation. Each record to be imported must have a unique identifier (ImportID) as well as at least one column containing a method for relating that imported record to another record in the system, be it an Organization, Workspace, Contact, etc. or a combination of these. An incorrectly configured import can corrupt or overwrite existing data which can then be difficult or even impossible to fix or replace.
If you have not spent the time to completely map this out or have questions about how the imported records will tie to existing data STOP, contact your account manager and request either help in configuring your import or training about the import process. It is much easier (and frankly less expensive) to request help in getting an import set up right the first time than it is to incorrectly import records, and then request help cleaning up the associated fallout.
Step-by-step guide
To begin creating a custom Import, perform the following:
Go to System Admin
 > Advanced > Configure Import and click Add.
The Import Map Header Detail form opens.- Begin creating a new import configuration by completing the fields on the main page.
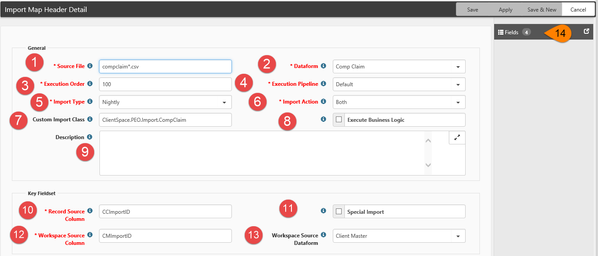
- Source File - This is the name of the document you will be uploading form import and should include the file extension (commonly CSV). A best practice is to include an asterisk before the file extension to account for variations in the file name.
- Dataform - What Primary dataform will the file information be imported to? The system does have the ability to import to dataforms associated with the primary dataform in Tabs, more about that later.
- Execution Order - If the import runs automatically in which order should the files be imported? It is important to set this appropriately if you have multiple dependent imports, such as an Employee Import which depends on the Client Import being run first.
- Execution Pipeline - When the Imported records are saved, which pipeline will be executed? This determines which rules will be applied when the data is saved. Selecting Default for example, runs the business rules when a dataform is saved.
- Import Type - Options include:
- Nightly - Imports are designed to be run from uploaded files created via reporting either manually through Admin Settings or automatically via a Windows schedule on the Server.
- API - Imports are designed to be run via direct connection to an external system by a scheduled process. Currently, the only import configured in this way is the PrismHR API - talk with your account manager for questions.
- Scheduled Process - Imports of this type are run via the "Process Scheduled Imports" scheduled process. Files in Ready for Import status of this type are automatically imported when the scheduled process kicks off.
- Import Action - Options Include:
- Insert - Only insert new files, will not update existing files.
- Update - Only update existing files, will not insert new files.
- Both - Insert new files and Update existing files.
- Custom Import Class - This field is only used if there has been a specialized import code written by ClientSpace. Contact an application specialist for questions.
- Execute Business Logic - Any Hard Errors or Business Rules configured in the Execution Pipeline configured above will fire on save of the data into ClientSpace. Soft Errors on the pipeline are ignored, Hard Errors will create Log Entries and the associated record will not be imported.
- Description - A short description of the import itself. It is useful to use this area to distinguish exactly what the purpose of the import is and where the data to be imported originates from here.
- Records Source Column - Should contain the column name on the Import file to be used to match the record in ClientSpace you intend to Update. This will always be compared to the ImportID on the record to be updated. Cannot be identical to the "Workspace Identifier".
- Special Import - Only used for NetWise technology custom import code
- Workspace Source Column- Should contain the column name on the import file to be used to match the Workspace record in ClientSpace. Information in this file column will be compared to the ImportID of the Workspace ID Table (see below). Cannot be identical to the "Records to Update" above.
- Workspace Source Dataform - The ImportID of this dataform will be matched against the Workspace Identifier column in the imported file to select the appropriate workspace in which to put the data.
- Fields - Use this to add dataform fields to your configuration (see next section for details).
Active - Inactive Imports are ignored.
The importance of ImportIDs
ImportIDs are used by the Import process to determine if a record already exists in ClientSpace for purposes of either Updating the existing record if it exists, or creating a new one if no match is found. Because of this, it is important to have a unique ImportID for each row of the import file that is distinct across the entire dataset. ImportIDs should never be re-used unless the intention is to update an existing record.
After you have configured your Import Map header on the General tab (to select the dataform you will be inserting/updating), you need to add the fields you will be populating using the Import Map Detail.
- Click the Fields tab to begin.
- Add each field from the import file you would like imported into ClientSpace, selecting the most appropriate values that match bot the data you are importing as well as the field you are importing the data into.
- Click Add to bring up the Import Map Detail dialog and begin adding fields.
- Complete the required fields from the list below:
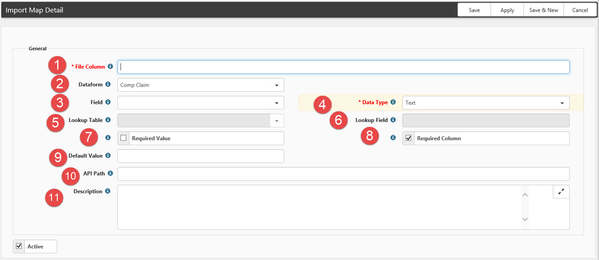
- File Column (required) - This will be the exact column header name from the data file you are importing. This is case sensitive so Clientname is different from ClientName.
- Dataform - Select a dataform, the system will then provide a list of fields from that dataform in the Field dropdown (see below)
- Field - Select the field you would like to populate. The dataform you selected needs to either be the dataform selected on the General tab, or another system dataform that is related to the primary dataform as a Tab. Tabbed dataforms always have a Parent form field linked to the primary dataform selected on the General tab and are associated with the primary form as a tab. For information about associating tabbed forms, contact one of our application specialists.
- Data Type (required) - Indicates the type of information you will insert into the field. The following list describes the types of data that your file should contain and can include:
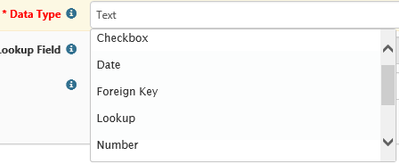
- Checkbox - Import file should contain a One for “True” and a Zero for “False”
- Date - Properly mm/dd/yyyy formatted date string (10/15/2016)
- Foreign Key - One of the more complicated datatypes. Foreign Keys use the provided value in the file to match the selected Table and Field in the configuration and set the foreign key that is stored in the field to the primary key of the selected record. (see below)
- Lookup - Lookups use the provided value from the file and match that to the ImportID of the configured Lookup field to select and store the appropriate associated Code value in the field.
- Number - Whole number or decimal.
- Phone - Formatted or Unformatted Phone number
- Text - Plain text value
- Time - Similar to date, but should contain the Time value, such as 11:15 PM that you would like to store in the field.
- Lookup Table - When the Foreign Key datatype is selected, use this required field to select the table (in conjunction with Field below) to match the foreign key passed from the file.
- Lookup Field - When the Foreign Key datatype is selected, use this required field to select the field(in conjunction with Table above) to match the foreign key passed from the file.
- Required Value - Checkbox -When checked the datarow value must be provided in the file (no blank cells) or the default value must be entered (see below). If neither of these are present a validation error will be thrown by the system.
- Required Column - Checkbox - When checked this column must be in the header and datarow of the imported file (blank values in the datarow will use the default value configured)
- Default Value - If the import file datarow contains no information, the import process will default the resulting field to this value.
- API Path - Specifies the mapping path used to connect to a third party API - this field is only used for imports configured to access directly from a third party system API.
- Description - A short description of the data being imported - preferably a note about where the data is from - ie "Payroll System, Client address one field"
Active - When checked, this field is actively included in the import and subject to associated validation. Inactive rows are ignored on import.
Continue adding field by field, saving each field until you have included each field in the import file you would like to insert into ClientSpace.
Save the Detail Record. (Or click Save and New to quickly add multiple records)
Related articles
NOTICE: You are in the old ClientSpace Help system. Please link to the new ClientSpace Help here https://extranet.clientspace.net/helpdoc/home/ClientSpace.htm