NOTICE: You are in the old ClientSpace Help system. Please link to the new ClientSpace Help here https://extranet.clientspace.net/helpdoc/home/ClientSpace.htm
Configuring Workflow Channels
Making sure things happen on time and in the proper order can be crucial to the success of your business. Workflow Channels were designed to help with this, affording you the ability to create automatically generated tasks and dataforms (and associated notifications, etc.) based on pre-defined triggering conditions. As always, before you begin it is a recommended best practice to diagram the workflow. Flowcharts can be very helpful in the design process, as long as you ensure that you include the starting point, ending point, steps in between, and the trigger conditions that lead from one step to another. The following diagram is a simple example of a workflow.
While this example is simplistic, it demonstrates the power of Workflow Channels to automate tasks so that they happen in a consistent and timely fashion, even allowing multiple workflow items to be triggered simultaneously from the same event. Understanding the process through diagramming, saves a lot of time and may help you to streamline processes. After you understand the process steps and triggering conditions that you will need, you are ready to start.
DATAFORM FIELDS | WORKFLOW | CHANNEL | CONTENT | NOTIFICATIONS | CONDITIONS | ACTION ITEMS | SCHEDULED WORKFLOWS | Configuring Workflow Channels#PUBLISH
DEFINE CLONE-CONFIGURABLE DATAFORM FIELDS
Before creating a Workflow Channel, determine if the channel will contain any dataform cloning. If so, you need to determine which fields on the Cloneable form will be available for configuration by the system.
To add fields for dataform cloning:
- Go to System Admin
 > Advanced > Dataform Admin.
The Dataform Admin list is displayed. - Select the dataform you would like to clone and click Edit.
The Dataform Properties form opens. - In Features, select Enable WFC Cloning.
- Click Save.
CONFIGURING YOUR WORKFLOW
To configure your workflow:
- Go to System Admin > Workflow Channels.
You are presented with a list of published Workflow Channels currently configured on your site. For more details about published and unpublished Workflow Channels, see Configuring Workflow Channels#Publishing and Unpublishing Workflows. - If you have a large number of workflows already configured, it is helpful to search for conflicting workflows to ensure that there is not already a workflow configured for your goal. Use the Quick Search and More Search options.
- To review an existing Workflow Channel, select it and click Details.
- When you are satisfied that there are no conflicts, from the Workflow Channels list, click Add to begin creating your new workflow.
The Choose Workflow Triggering Type dialog opens with "What type of triggering will the new Workflow use?". - Select Real Time or Scheduled.
The Add Workflow Channel form opens.
We will follow the Real Time workflow. For information about Scheduled Workflows, CLICK HERE to skip to the Scheduled workflow configuration.
You are presented with a four-step process wizard: Channel, Content, Notifications, and Conditions.
STEP 1: CHANNEL
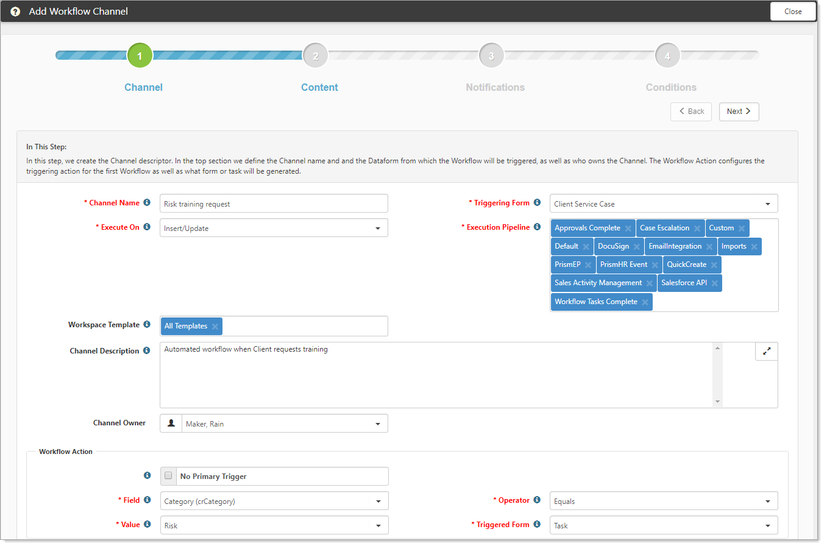
In this first step you will:
- Define your channel by giving it a name.
- Select the workspace template it will affect.
- Determine how it will be triggered.
- Fields marked in red are required.
- Complete the form using the following descriptions:
- Channel Name: Provide a unique Channel Name. This should be descriptive and short.
- Triggering Form: This is the form that will cause the workflow to trigger. You can add a triggering form that is not in the list.
- To add a dataform that is not in the list:
- In Triggering Form, go to the end of the list and select Add Untriggered Form.
The Select an Untriggered Form dialog opens. Table Name contains a list of all dataforms currently not marked as Triggerable. - In Table Name, select a dataform from the list.
- Click Ok.
The selected dataform is marked as triggerable and will now appear in the Table Name list.
- In Triggering Form, go to the end of the list and select Add Untriggered Form.
- To add a dataform that is not in the list:
- Execute On: Would you like this to happen on dataform save? During an import? Both? Select Update, Insert, or Insert/Update.
- Execution Pipeline: Choose a pipeline. It is important to ensure that anything that can be configured with a pipeline that is connected to the workflow (dataforms or imports) are configured to use one of the pipelines configured on the workflow. For questions or help with this configuration contact your staff consultant.
- Workspace Template: Select a template to apply to workspaces that will use this workflow. The Workspace Templates field is a multi-select, which allows you to apply a workflow channel across multiple workspace templates. If no specific template(s) are selected, the Workspace Templates field defaults to All Templates.
- Channel Description: Provide a brief description of this channel.
- Channel Owner: Defaults to the current user. Set it to the owner of this process.
- Complete the Workflow Action section. This section is dedicated to the primary triggering condition for the channel.
- No Primary Trigger: When selected, indicates no single condition must be met to trigger the Workflow. At least one condition must be provided on the Conditions step.
- Field: Which field on the triggering form (or HdrAction configured on a link) will fire this workflow? This field must have been changed to the triggering value for the trigger to fire. You can also add a trigger field.
- To add a trigger field:
- In Trigger Field, go to the end of the list and select Add Untriggered Field.
- The Select an Untriggered Field dialog opens. Field contains a list of fields currently not marked as Triggerable.
- In Field, select an entry.
- Click Ok.
The selected field is marked as triggerable and will now appear in the Trigger Field list.
- To add a trigger field:
- Operator: Comparison type used to determine if the trigger condition is met. (i.e., Contains, Equals, Does Not Equal, etc.)
- Value: The value evaluated to ensure the trigger condition is met. For system selectors such as lookups, or for Header actions, this is a select list.
- Triggered Form: Can be a dataform (with Workflow Cloneable fields) or a task.
- When done, click Next.
The Content form opens.
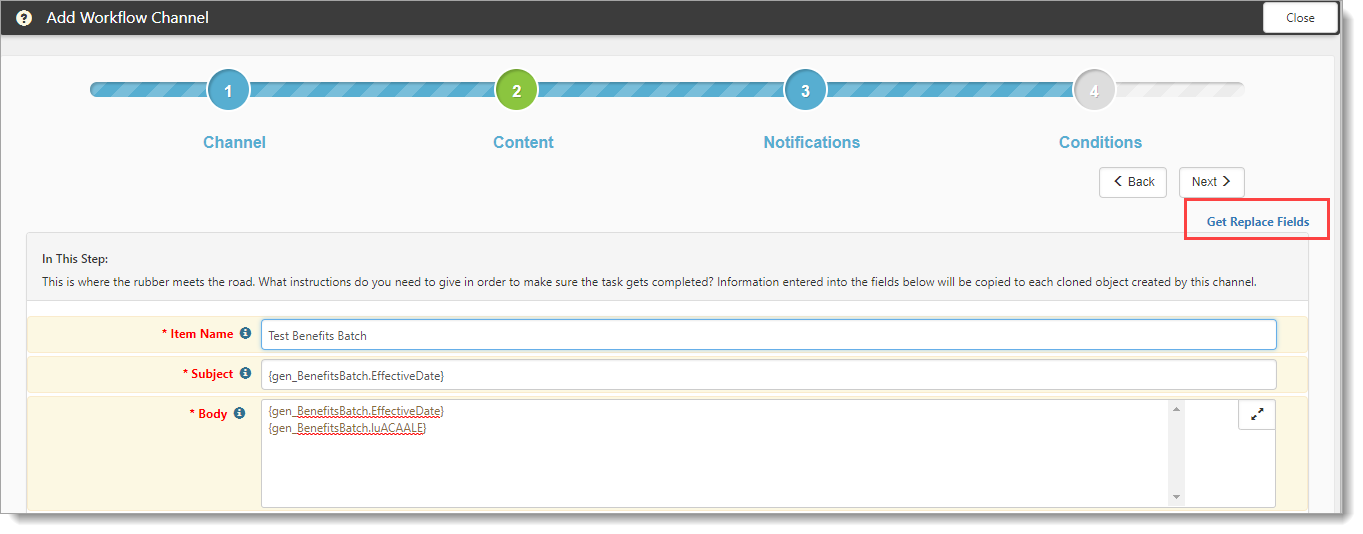
STEP 2: CONTENT
This is where the rubber meets the road. Information entered into these fields is copied to each cloned object created by this step.
About Field Replacement
You may have noticed a Get Replace Fields link on the page. The link allows you to insert any field content from the triggering dataform, its server data procs, and any associated tabbed dataforms as well as field content from the related Organization and Org Other Info. These fields are presented in a new window. See Replacement fields.
To use Get Replace Fields:
- Click Get Replace Fields.
The Replace Fields list opens - Select an item and click Copy. You can select multiple entries.
- Click Close to close the Replace Fields window.
- Paste the items in the appropriate fields on the form.
- When the task or dataform is produced through the cloning process, these fields are replaced with the appropriate field data. For detailed information, see Replacement fields.
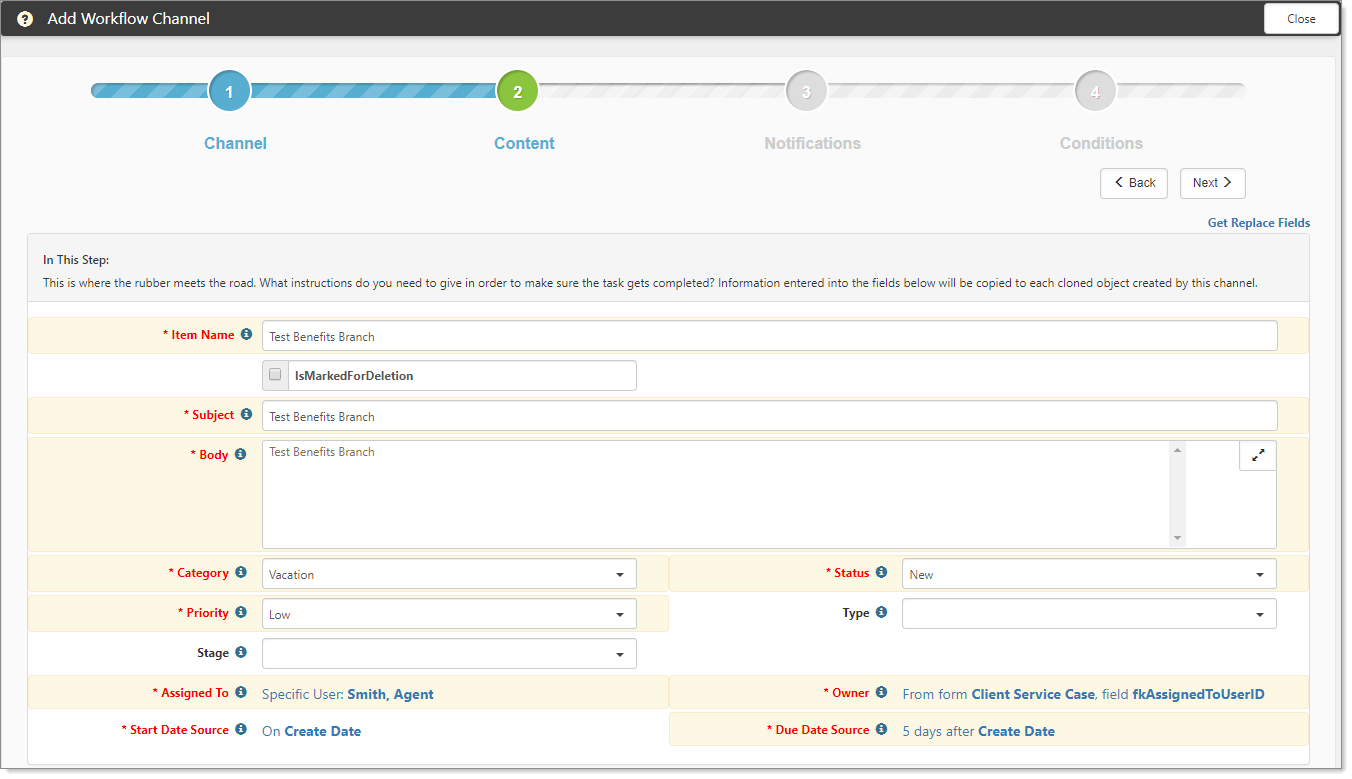
- For Task content, complete the following fields:
- Item Name: Provide a brief descriptive name for what this workflow object.
- Subject: Subject Line that will be stamped on the task. This field supports field replacement.
- Body: Include any instructions that you feel will be helpful. This field should contain information to provide steps necessary to complete the task.
- Category: Choose the appropriate Task Category.
- Status: Select the appropriate Task Status.
- Priority: What is the criticality of this task?
- Type: Within the category, what is the task type?
- Stage: Also called (just to make this more complicated) workflow. Where in the process does this task fall?
- Assigned To: Select the person responsible for accomplishing this task from the following options. When you select Current User, the Assigned To Options dialog opens:
- Current User: The logged in user who triggers the task.
- Specific User: A specific user in the Workspace. When you select Specific User, the User field is enabled.
- From a Field on a Form: Any user field on the triggering dataform is available.
- When you select From a Field on a Form, the Dataform field is enabled. Select the Dataform that has a field from which to select a User.
- The user type fields on workflow item tasks and dataforms include any child forms in a tab relationship with the available selected dataform when the user source option of From a Field on a Form is selected. These tab form fields appear in the Field list below the primary form in the tab relationship and are formatted in the following manner: *<ChildFormName> — <UserFieldName>. See Workflow Channels and tabbed dataforms.
- Click Ok when ready. You are returned to the Workflow Channel form.
- Owner: When you select Current User, the Owner Options dialog opens. Select the person who will own Tasks created by this workflow. This field can be set from a specific user, the current user, or a field on a form.
- Current User: The logged in user who triggers the task.
- Specific User: A specific user in the Workspace. When you select Specific User, the User field is enabled.
- From a Field on a Form: Any user field on the triggering dataform is available. When you select From a Field on a Form, the Dataform field is enabled. Select the Dataform that has a field from which to select a User.
- Click Ok when ready. You are returned to the Workflow Channel form.
- Start Date Source: Start Date Source options are Create Date, Specific Date, and From a Field on a Form. Additionally, you can select the Offset as Days, Weeks, Months, Years, Business Hours, Business Days, Beginning of Month, End of Month, Beginning of Year, or End of Year.
- When you select On Create Date, the Start Date Source Options dialog opens.
- Create Date: is the default value.
- Specific Date: enables the Date field where you can use the date picker.
- From a Field on a Form: includes the triggering form for that workflow, in addition to all single dataforms with Date fields. When you select From a Field on a Form, the Dataform field is enabled. Select the Dataform that has a Date field.
- Offset: default value is 0 Business Days.
- In Start Date Source Options, when ready click Ok.
You are returned to the Workflow Channel form, where the Start or Due Date Source fields will show (as applicable): nn Business Days after Create Date, nn Business Days after Specific Date, nn Business Days after Field Label (i.e., Contract Effective Date).
- When you select On Create Date, the Start Date Source Options dialog opens.
- Due Date Source: Tasks created by this channel can have their due date set by the task's create date, or to a specific data from a dataform field. Choose from the create date of the task or a Date type field on the triggering dataform. Due Date Source options are Create Date, Specific Date, and From a Field on a Form. Additionally, you can select the Offset as Days, Weeks, Months, Years, Business Hours, Business Days, Beginning of Month, End of Month, Beginning of Year, or End of Year.
- When you select On Create Date, the Due Date Source Options dialog opens.
- Create Date: is the default value.
- Specific Date: enables the Date field where you can use the date picker.
- From a Field on a Form: includes the triggering form for that workflow, in addition to all single dataforms with Date fields. When you select From a Field on a Form, the Dataform field is enabled. Select the Dataform that has a Date field.
- Offset: default value is 0 Business Days.
- In Due Date Source Options, when ready click Ok.
You are returned to the Workflow Channel form, where Start Date Source and Due Date Source will show (as applicable): nn Business Days after Create Date, nn Business Days after Specific Date, nn Business Days after Field Label (i.e., Contract Effective Date).
- When you select On Create Date, the Due Date Source Options dialog opens.
- For Form content, complete the following fields:
- Item Name: Provide a brief descriptive name for what this workflow item does.
- Field configuration: The fields that are available for cloning are based entirely on the work done when defining clone-configurable fields. Clone configurable fields follow the datatype of the field and act as those fields do on the dataform, so a lookup displays the appropriate values and so on.
- When ready, click Next.
STEP 3: NOTIFICATION (optional)
in this optional step, you can select the users that will be notified when the workflow is triggered.

- Click Add a User.
The Options dialog opens. - In User Source
- For Specific User, select a user and click Ok. Repeat this process as required.
- For From a Field on a Form, select the appropriate dataform and click Ok.
The notification list displays the users that will receive a notification.
- To remove users from the notification list, click
 (Remove).
 - When you are ready to move to Conditions, click Next.
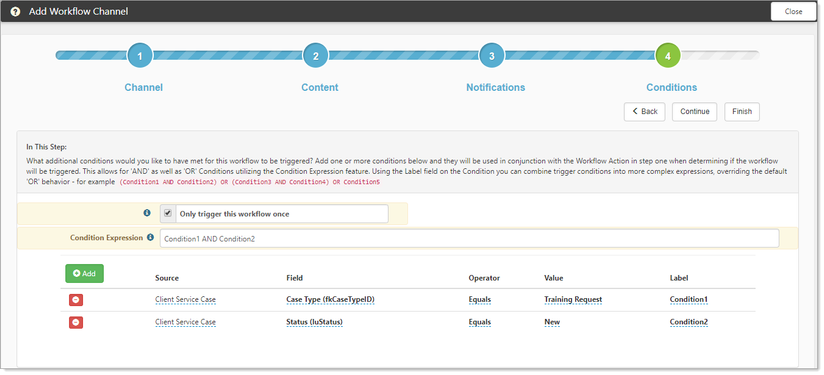
STEP 4: CONDITIONS (optional)
What additional conditions would you like to have met for this workflow to be triggered? In this step, you can add one or more conditions to use in conjunction with the Workflow Action in Step 1 when determining if the workflow will be triggered. Additionally, when you reach the end of the initial item of a Workflow Channel, you have the option to go back a step, continue, or finish. These options allow you to decide when you want to publish the newly added Workflow Channel.
- Complete the fields:
- Only trigger this workflow once: Sometimes you only want a workflow to happen once. For example, the first time an employee marital status changes you may want to have someone send notification about how this can affect their tax status and W4. You can use this option to ensure that this triggering condition is unique and only happens once.
- Condition Expression: The Workflow Action condition has been set in Step 1. This is the dataform or task field (or HdrAction) that needs to be changed to trigger the workflow to occur. In Step 4, you can also add more complex triggering conditions to this primary condition by choosing dataform/task field(s) and setting a value, Operator, and Label. These conditions are combined with the Workflow Action set in Step 1 using an implied AND. If the Condition Expression field is not filled, the additional conditions that are set in Step 4 are treated as OR conditions, i.e.: The Workflow Action AND Condition 1 OR Condition2 OR Condition3. The Condition Expression field allows for AND, OR, and NOT conditions utilizing the Condition Expression feature. Using the Label field on the Condition, you can combine trigger conditions into more complex expressions, overriding the default OR behavior combined with the implied AND for the Workflow Action. For example, the Workflow Action AND (Condition1 AND Condition2) OR (Condition3 AND Condition4) OR Condition5. For a deeper discussion about Condition Expressions, see Condition Expressions.
- Adding Conditions: To add conditions, click Add and complete the following fields:
Source: This is a list of triggering options based on the Workflow Action triggering form. The Source list includes all active tabbed forms included in the tabbed set when the triggering form is the home form of a tabbed set. For details about using tabbed dataforms, see Workflow Channels and tabbed dataforms.
For a workflow action based on a dataform, this includes the triggering form and any server data procs associated with this form. Additionally, all active, triggerable, single forms are available in the application.
For a workflow action based on a task, you can use fields from that Task or fields from any single dataform from the Workspace.
You can configure conditions for task workflow channel items from the most recent parent dataform if your tasks are multiple levels deep. This enables you to logically refer back to the child dataform. (for example, a Milestone triggers a Case and the Case triggers multiple layers of Tasks, all Tasks can reference the Case).
- Source includes the most recently referenced dataform that would trigger the initial task (single or multi).
- Condition Expressions operators (AND, OR, and NOT) work across multiple dataforms.
- IsDirty does not appear in the trigger operator list because the task can be separated from the dataform by several other tasks; the dataform may not be dirty.
- The Add Untriggered functionality is available when adding fields from this source.
- If the most recent dataform is the main triggering dataform for the workflow, the condition Source will be Channel Trigger: <NameOfTriggeringForm>.
- If the most recent dataform is a cloned dataform workflow item, the condition Source will be Workflow #<ItemNumber>: <ItemName>.
Field: If you selected either a dataform or task for Source, this will display an appropriate list of fields for the triggering task or form. Field also provides multi-lookup fields (Multi Lookup (MultiLookup)) as triggering conditions.
You can also add a triggered field.- To add a trigger field:
- In Field, go to the end of the list and select Add Untriggered Field.
The Select an Untriggered Field dialog opens. Field contains a list of fields currently not marked as triggerable. - In Field, select an entry and click Ok.
The selected field is marked as triggerable and will now appear in the Field list.
- In Field, go to the end of the list and select Add Untriggered Field.
- To add a trigger field:
Operator: Variable based on the type of Field selected but ranges from IsEmpty (nothing in a field) to a specified value. Each value from a Multi Lookup field can be added as a separate "=" condition. This supports complex AND, OR, and NOT conditions as well.
Value: This is the value you are comparing the field to when attempting to meet a triggering condition.
- Label: Label is used when combining conditions into a complex Condition Expression. NOTE: If a Label is not used in a Condition expression, then the condition is an implied OR. In the example, if the Condition Expression was blank, this workflow would be triggered in the following manner: Workflow Action Trigger (Step 1) AND Condition1 OR Condition2.
- When ready, you can click Back, Continue, or Finish:
- Click Back to return to the previous step of the Workflow item.
- Click Continue to respond to a prompt "This Workflow Channel is unpublished. Would you like to publish?" with the options Yes or No. Either selection takes you to the first step of the dependent Workflow item (the next item in the workflow). This allows you to add cascading steps that trigger from the workflow you just created.
- Click Finish and respond to "This Workflow Channel is unpublished. Would you like to publish?" with the options Yes or No.
- Yes returns you to the Workflow Channel search list with the new Workflow Channel in a published state.
- No returns you to the Workflow Channel search list with the new Workflow Channel in an unpublished state.
What's next? You can publish or unpublish from the Workflow Channels list.
Publishing and Unpublishing Workflows
When you return to the Workflow Channel search list, you can publish and unpublish items. The Workflow Channels list displays published Workflow Channels by default when opened initially.
Additionally, you can publish and unpublish sections of a workflow within a channel. You can publish and unpublish Workflow Channel items individually so that you can set up complex workflows without keeping the entire channel in the same published/unpublished state. Changing the publish/unpublish state for a workflow item does not affect any dependent workflow items. The dependent workflow items will remain in their respective state. If the parent item of a child is unpublished, a warning message is issued.
To view unpublished Workflow Channels:
- In More search, click Unpublished.
- Alternatively, you can toggle the Status chiclet to Unpublished.
This action also displays the More search dialog. in the dialog, the Status options are All, Published, and Unpublished. When you change the status in More, the Status chiclet also changes.
To view published and unpublished Workflow Channels:
- When viewing the Workflow Channels list, you can view both published and unpublished from More search > All.
- Alternatively, while viewing the Workflow Channels list, you can also remove the Status chiclet by clicking the X.
This action displays both published and unpublished workflow channels.
To unpublish a Workflow Channel:
- From the Workflow Channels list - while viewing published items, select the Published option.
The entry is now unpublished.
To publish a Workflow Channel:
- From the Workflow Channels list - while viewing unpublished items, select the Published option.
The entry is now published.
WORKFLOW CHANNELS ACTION ITEMS
Workflow Channel action items appear in the Action Center pane (right side of the screen).
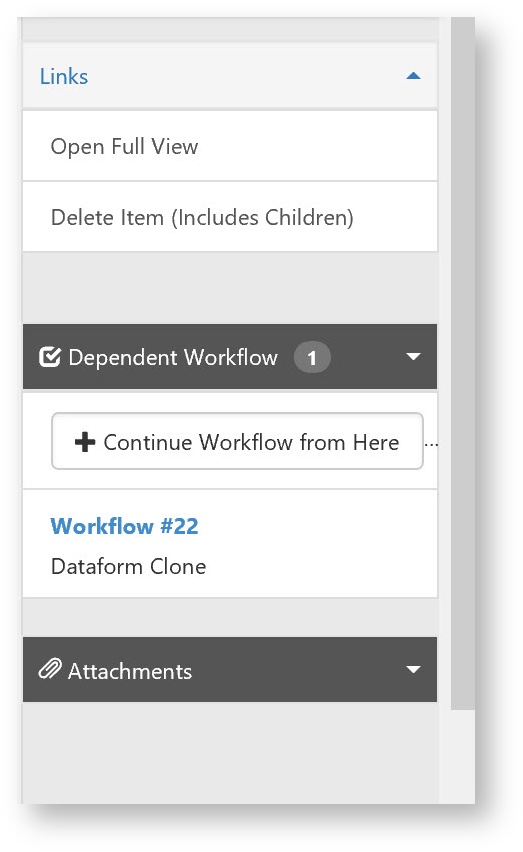
Open Full/Wizard View
Open Full View eschews the step-by-step wizard view for a page view showing the entire workflow object you are on. This can be helpful if you need to edit many workflows instead of jumping through the steps. This Action Item changes based on which view you currently inhabit - in Wizard view the item will say Open Full View and in full view, the item will read Open Wizard View.
Delete Item (includes children)
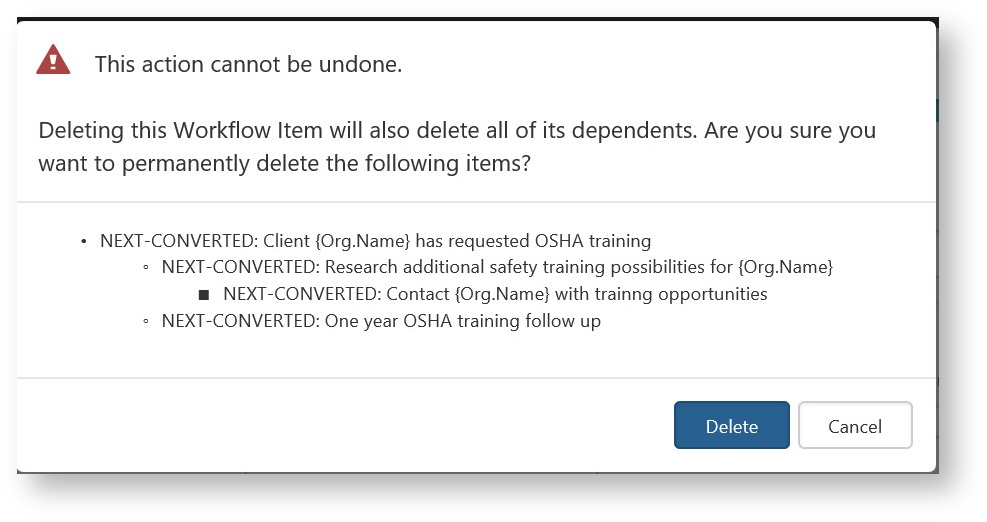
- Click Delete Item to delete a workflow item and any dependent items below that item in the workflow.
- Prior to deletion, you will receive a message that provides detail on what will be deleted in the form of a simplified flowchart using bullet points.
Dependent Workflow
The Dependent Workflow Action Item allows you to trigger additional steps based on the original workflow item that was triggered. You can trigger multiple items simultaneously from the same triggering condition as dependent workflows (as shown in the workflow diagram at the top). These items can then trigger additional workflow items, allowing for a cascading workflow. Triggering a Dataform workflow will always end the cascade.
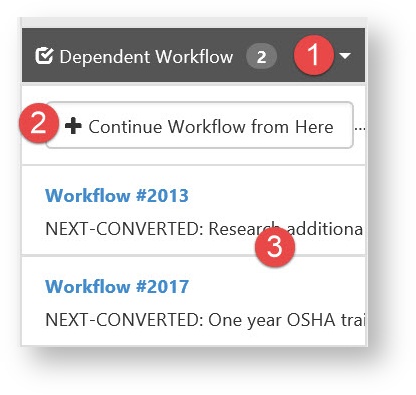
The Dependent Workflow Action Item consists of the following:
- Workflow Counter Badge: Displays a count of the dependent workflow items immediately below this item.
- Continue Workflow from Here: Allows you to add more dependent workflow items from this point in the workflow.
- Workflow List: Displays the individual workflow items that are dependent at this point.
For example:
System Event
- Workflow Task triggered by System Event
- Followup Task triggered when task one complete
- Research Task triggered when a followup task is complete
- Task to schedule call triggered from completion of Research Task.
- And so on...
- Task to schedule call triggered from completion of Research Task.
- Research Task triggered when a followup task is complete
- Secondary followup Task for different department Triggered by Original Workflow Task
- Dataform generated when a secondary followup is complete.
- Followup Task triggered when task one complete
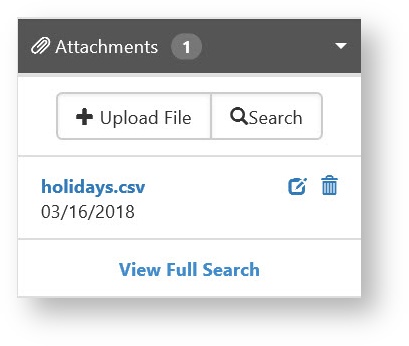
Workflow Attachments
Workflow attachments allow you to attach files to individual workflow items (tasks, dataforms, etc.) and when that workflow item is automatically generated, it will contain a link back to the original file that was linked to the workflow during configuration. This process does not clone the file, it merely provides a link to the original object. This is useful if you have workflows designed around standardized processes such as Employee onboarding where you need to use the same document every time.
Scheduled Workflows
To begin configuring scheduled workflows:
- Go to System Admin > Workflow Channels.
The Workflow Channels list is displayed. - Click Add.
The Choose Workflow Triggering Type dialog opens with options to select Real Time or Scheduled. - When you select Scheduled, the Add Workflow Channel wizard opens with Step 1 Channel. In this step, you will configure the date that will trigger the scheduled Workflow Action.
- Configure the following options:
- Channel Name: Provide a descriptive name of the workflow process.
- Triggering Form: Select the form that will trigger the workflow. You can add a triggering form that is not in the list.
- To add a dataform that is not in the list:
- In Triggering Form, go to the end of the list and select Add Untriggered Form.
The Select an Untriggered Form dialog opens. Table Name contains a list of all dataforms currently not marked as Triggerable. - In Table Name, select a dataform from the list.
- Click Ok.
The selected dataform is marked as triggerable and will now appear in the Table Name list.
- In Triggering Form, go to the end of the list and select Add Untriggered Form.
- To add a dataform that is not in the list:
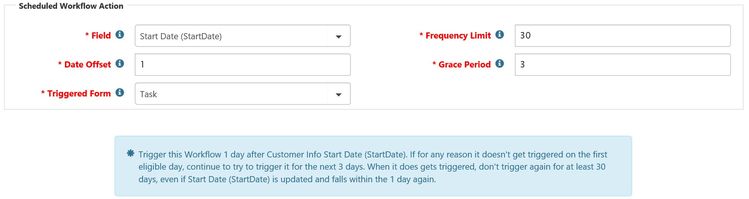
- Field: Presents a list of available Date fields from the Triggering Form selected.
- Frequency Limit: The Workflow task or dataform will be triggered once every X days based on the value of this field.
- Date Offset: The number of days (before or after the date stored in the triggering field) this workflow item will trigger. For example, -5 equals five days before the triggering date field.
- Grace Period: The number of days, starting with the offset date that the workflow will attempt to trigger. When this grace period has ended, the workflow will not trigger again until the frequency limit has passed and the triggering conditions are again met.
- Triggered Form: The task or dataform to be generated when the triggering conditions are met.

After you have configured the Scheduled Workflow Action, you will receive a brief synopsis of the Schedule:
When the last field is completed, the wizard progresses to Step 2 Content. See the article Configuring Workflow Channels to continue the step-by-step procedures.
After your configured workflow is saved, these conditions are evaluated by a scheduled process (Generate Scheduled Workflows) to determine if the date field combined with the other workflow schedule options as well as any additional Conditions added in Step 4 (Conditions) are met.
It is important to note that since these workflow triggers are scheduled, the real time field analysis to determine if a field has changed (IsDirty) cannot happen. Because of this, you will notice that the IsDirty qualifier is not available when adding additional triggering conditions to scheduled tasks.
If all of the triggering conditions are met, the dataform or task will be generated from the Workflow. These actions can then trigger other dependent workflow items (such as a second task spawned when the scheduled task is complete) or completely new workflow channels. In this way scheduled workflows can be used to drive your business processes based on milestone triggering dates stored in your system.
The Channel
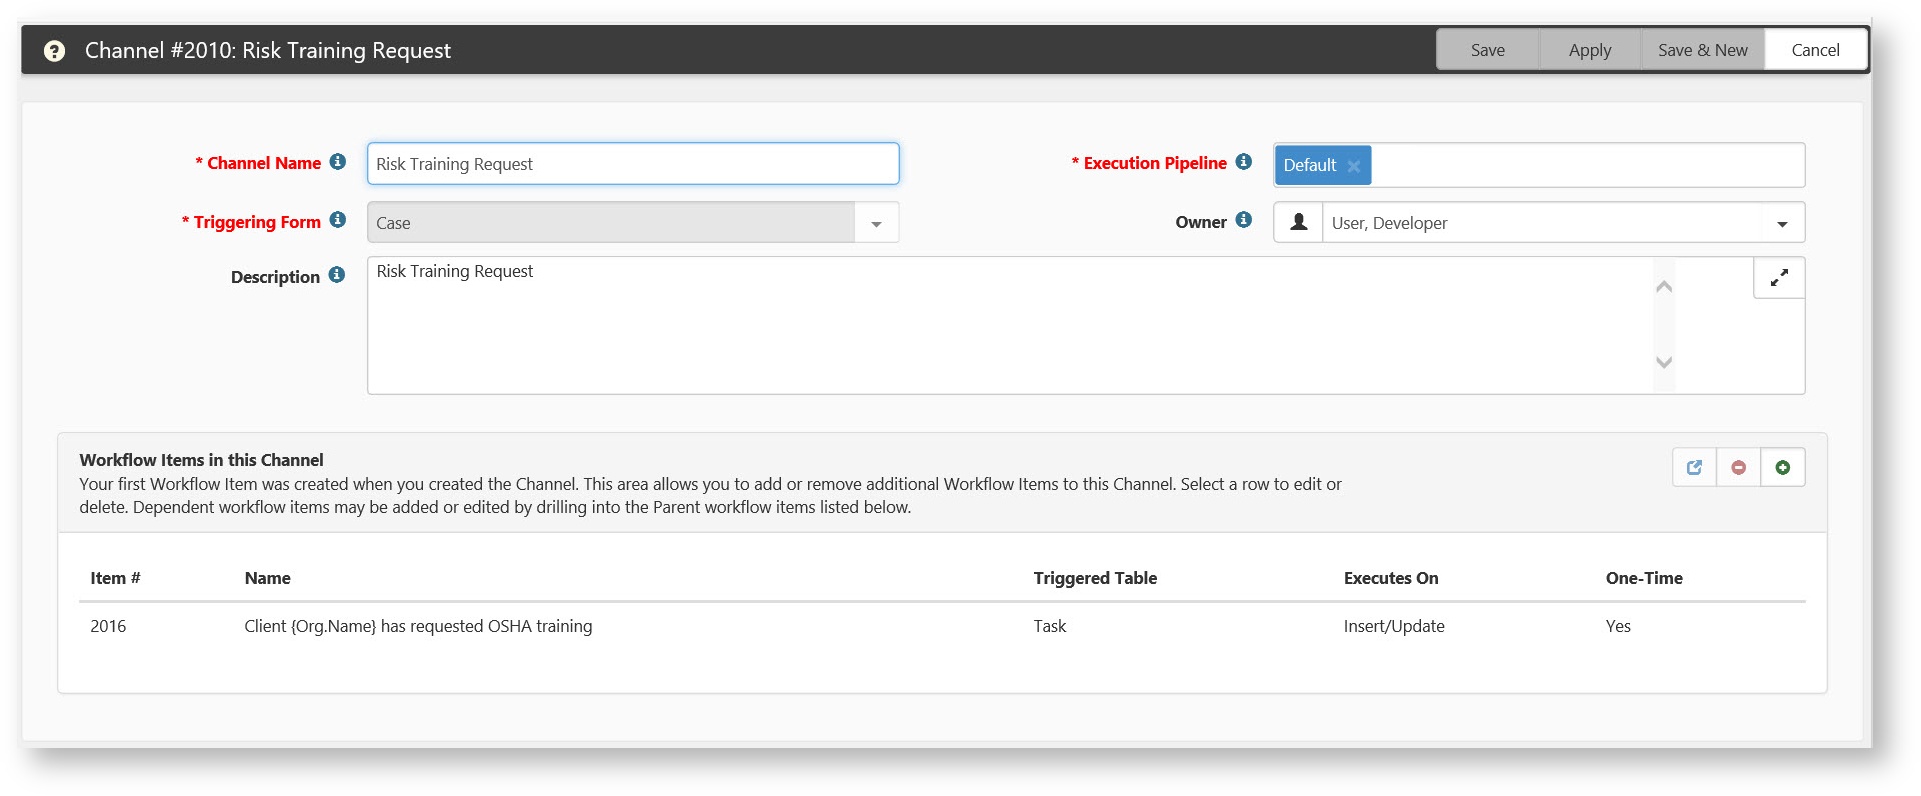
Workflow Items in this Channel
When you have completed this four-step process, you will be returned to the Channel. This channel is the top-level item that can have multiple workflow items, all potentially triggered by unique conditions. In our example, a Risk case in the Southeast region could generate a different workflow than the same case in the Northwest region and so on. All these top-level Workflow items are attached to the Workflow Channel.
Workflow Actions 
Workflow Channels can contain many workflow items and each item may have dependent workflow items. You can add, edit, and remove workflow items from the channel using this interface.
From the Workflow Channels list:
- Edit: Select an existing workflow item and click
 (Jump) to begin editing an existing workflow.
 - Delete: Delete the selected Workflow Item and any dependent items.
- Add: Add a new Workflow Item for this channel.
Visualizing your Workflow
You can use the Visualize function to see a graphical representation of your workflows. Workflow channel configuration provides the ability to move dependent workflow items through a simple drag and drop interface. The intelligent drag and drop functionality is aware of the parent item type for the child workflow object that you are attempting to move and only allows this item to be moved to a workflow parent of the same type – because of this, triggering conditions of the parent will always match that of the child that is being moved.To visualize your workflow:
- Go to System Admin
 > Workflow Channels.
The Workflow Channels list is displayed. - Select an entry and click Visualize.
The visualize window opens showing the parent and any child items graphically. Additionally, you can see the item number and name.
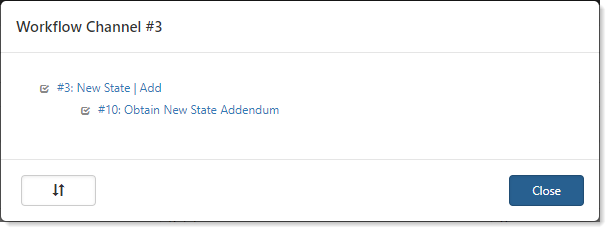
- Click Close.
To move or insert a task at another level:
- From the Workflow Channels list, select an entry.
- Click Visualize.
The visualize window opens showing the items graphically, with parent and any child items. - Click
 (Move Workflow Items).
The function is activated, showing a shaded background. - Hover on an entry to view the description.
- When ready, click an entry and drag to a new location.
The new location turns a darker shade within the block to which you are moving the entry.
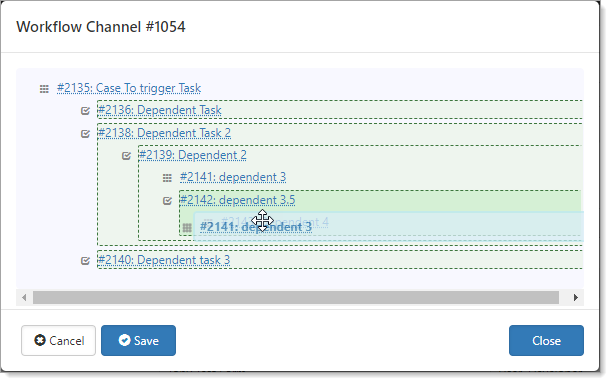
- When ready, click Save.
To visualize your workflow:
- Go to System Admin > Workflow Channels.
The Workflow Channels list is displayed. - Select an entry and click Visualize.
The visualize window opens showing the parent and any child items graphically. Additionally, you can see the item number and name. - Click Close.
To move or insert a task at another level:
- From the Workflow Channels list, select an entry.
- Click Visualize.
The visualize window opens showing the items graphically, with parent and any child items. - Click (Move Workflow Items).
The function is activated, showing a shaded background. - Hover on an entry to view the description.
- When ready, click an entry and drag to a new location.
The new location turns a darker shade within the block to which you are moving the entry. - When ready, click Save.
Related articles
NOTICE: You are in the old ClientSpace Help system. Please link to the new ClientSpace Help here https://extranet.clientspace.net/helpdoc/home/ClientSpace.htm