NOTICE: You are in the old ClientSpace Help system. Please link to the new ClientSpace Help here https://extranet.clientspace.net/helpdoc/home/ClientSpace.htm
Administering Email Templates
Configuring email templates is easy with the Email Templates admin control. The process guides you through a five-step procedure: Initial, Content, Addresses, Conditions, and Attachments.
Step-by-step guide
To add an email template:
- Go to System Admin
 > Email Templates.
The Email Templates list is displayed showing a list of published Email Templates.
For more information about viewing published and unpublished templates, see Viewing and Publishing Email Templates. - Click Add.
The Add Email Template workflow is presented, with a series of steps to start generating your new template.
STEP 1 Initial
The Add Email Template workflow opens. Use the corresponding numbered items in the following image along with the numbered descriptions to complete the form.
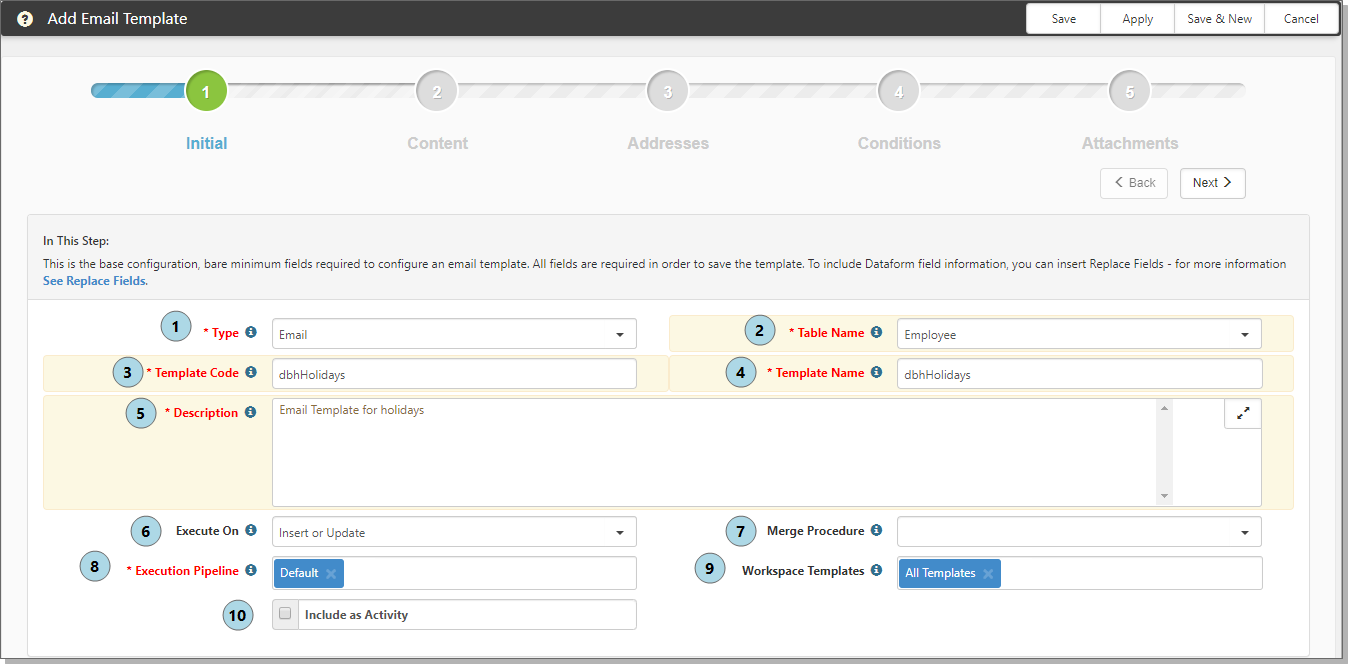
- Type: Select the template type. Required.
- Defaults to Email. This is for automated email responses.
- System makes this a system-level template that will be available when selecting discussion replies. This type is designed for dataform and system notifications.
When System is selected, additional fields are enabled and the workflow steps are not displayed.- Subject: Subject line of the email generated by this template.
- Body: Used to generate the body of the email. Use the rich text controls for formatting items such as font and background color.
- DocuSign is for automating agreements. When selected, API Configuration is enabled.
- Table Name: Select the triggering dataform for your new email template. At this point, you can also add a dataform that is not in the list.
- This is the form from which the template will be triggered. Table Name and the Merge Procedure (optional) determine the fields that are available to use in field replacement (in Step 2 Content).
- To add a dataform that is not in the list:
- In Table Name, go to the end of the list and select Add Untriggered Form.
The Select an Untriggered Form dialog opens. Table Name contains a list of all dataforms currently not marked as Triggerable. - In Table Name, select a dataform from the list.
- Click Ok.
The selected dataform is marked as triggerable and will now appear in the Table Name list.
- In Table Name, go to the end of the list and select Add Untriggered Form.
- Template Code: Must be unique and should be related to the purpose of the email template. Required.
- Template Name: Displays in the email template list. Required.
- Description: Provide a useful description of the email template. Required.
- Execute On: Will this email be sent when the form is saved (Insert), only when the form is changed (Update), or every time (Insert or Update)?
- Merge Procedure: Optional. When selected, it generates the data that will be merged into the Email Subject and Body Replace Fields. Select an optional Merge procedure here to provide additional system information for Field Replacement. Stored Procedure can be selected from any stored proc in the system with a name containing emailtemplate_merge_proc.
- Execution Pipeline: Email templates can support multiple pipelines using a multi-select. This allows you to create a single email template that can apply to multiple execution pipelines. Select the pipeline(s) on which the email triggering will occur. Required. The default pipeline is Default.
- Workspace Templates: Select the Workspace Templates that will receive this email. The default is All Templates.
- Include as Activity: Select the option to attach the email as an Activity. When the email is triggered, the email message is attached to the triggering record. This action preserves the communication of the sent email. Default: Option is cleared, do not include as an activity.
When all required fields are completed, click Next to move to the next step in the process.
STEP 2 Content
In Step 2, you configure the subject and body of the email.
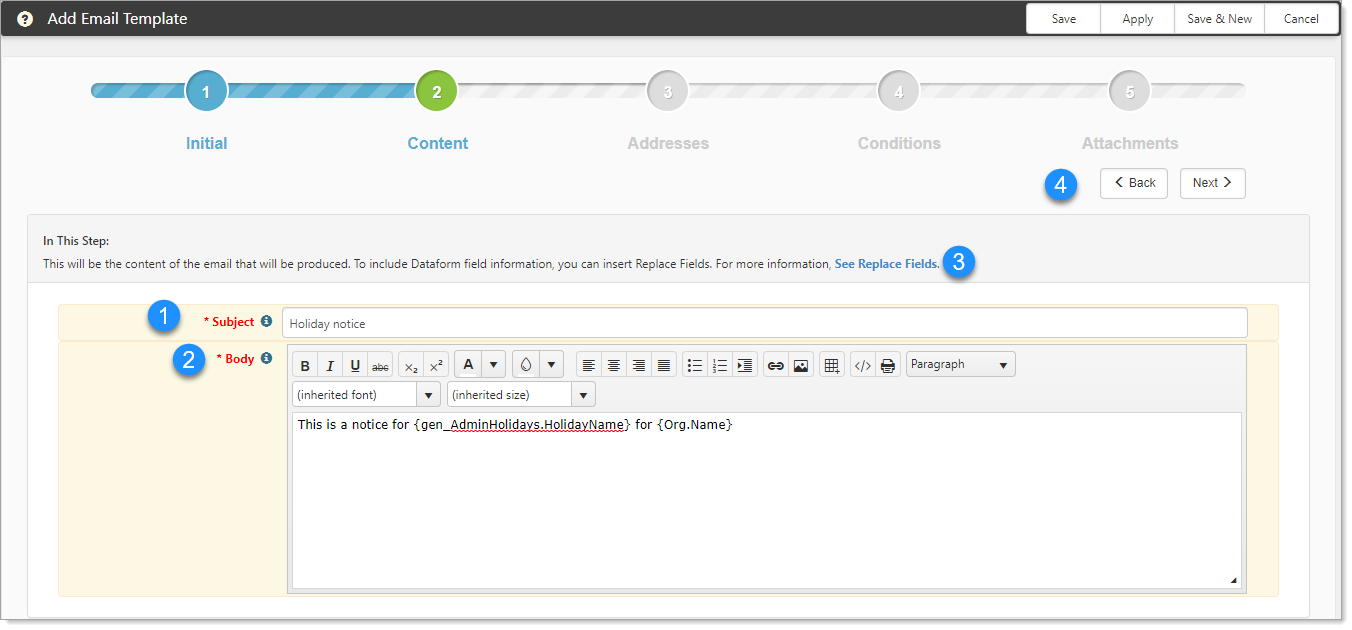
- Subject: Provide a subject line of the email that will be generated.
- Body: Provide the email message. This field uses a rich text editor and supports font styling, embedded images, hyperlinks, and more.
- See Replace Fields:
- Click See Replace Fields to select items to copy to the Clipboard.
- You can paste items in Subject and Body as applicable.
- Field replacement includes:
- Any active fields on the triggering dataform
- The active fields from the tabbed forms related to the triggering form
- The active fields from the related Organization and Org Other Info
- Any fields returned by the Server Data Procs related to the triggering dataform
- See Replacement fields.
- Click Next to proceed.
STEP 3 Addresses
In Step 3 you configure who the email is from and to whom it will be sent.
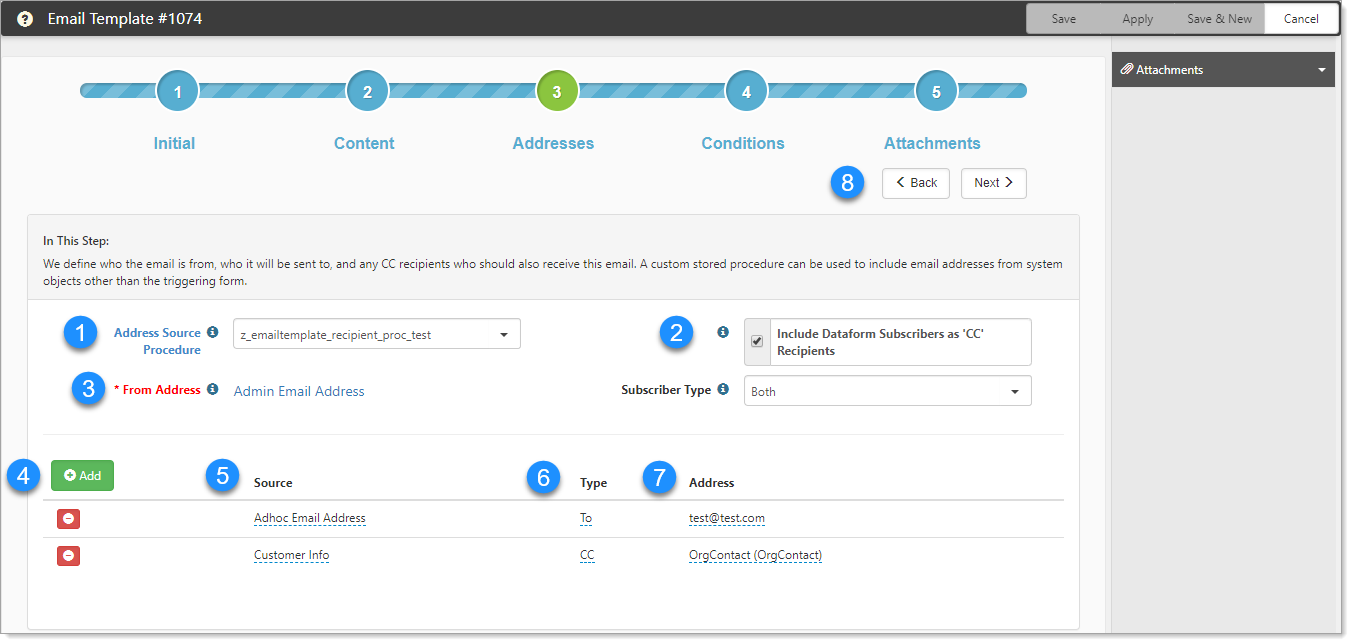
- Address Source Procedure: Select a stored procedure (optional) that can provide additional address options based on system data. A stored procedure can be selected from any stored proc in the system with a name containing emailtemplate_recipient_proc.
- Include Dataform Subscribers as CC Recipients: Adds anyone who has subscribed to the dataform as CC recipients when this notification is sent in addition to any other recipients you configure here.
When enabled (selected), this option presents a list to notify internal, external, or both recipient types:- Internal: When the email template is triggered, only internal dataform subscribers are notified.
- External: When the email template is triggered, only external dataform subscribers are notified.
- Both: If you select Both or leave the field blank, all dataform subscribers are notified.
- From Address: To change the From Address option, click From Address.
The From Address Options dialog opens. From here, you can select the email address source as:- Admin Email: Uses the default admin email set in the system App Settings.
- AdHoc: Allows you to manually add to the From list by simply typing it in.
- User: Select a specific user of the system by selecting them from a list.
- Procedure: Select an address stored procedure and pick the From address.
- Field on a Form: Select a dataform from a list of single forms in the system that have fields from which an email can be extracted. Then pick the appropriate field.
When complete with the From Address Options, click Ok.
- Add: Click to add a new Recipient record to this notification. A new row opens for Source, Type, and Address. Each recipient's source, type, and address must be unique.
- Source: Recipient Source could be the triggering dataform selected in Step 1, an Ad-Hoc email address typed into the address field, or an email address selected from the Address Source Procedure (see below). This third option will only appear if an Address Source Procedure has been selected. The Source list includes all tabbed dataforms included in the tabbed set. The tabbed dataforms (child forms) appear immediately after the triggering form in the Source list and are preceded by a dash (–).
- Type: What kind of email recipient type are you setting? Options are To or CC.
- Address:
- For a dataform source, select the user or contact type field on the form from which you would like to extract the email address. The Source list includes all tabbed forms included in the tabbed set. These appear immediately after the triggering form in the list and are preceded by a dash (–).
- For Address Source Procedure, select the appropriate option.
- For Adhoc Email, use this field to manually type an email address that will be used every time.
- Click Next to proceed.
STEP 4 Conditions
Conditions are Display Conditions and can also include Condition Expressions. Condition Expressions use the Labels that you define for your Display Conditions. For a detailed explanation about conditions, see Condition Expressions.
Email Template triggering can also use multi-lookup fields as triggering conditions. Each value from the multi-lookup can be added as a separate "=" condition. This supports complex AND, OR, and NOT conditions as well.
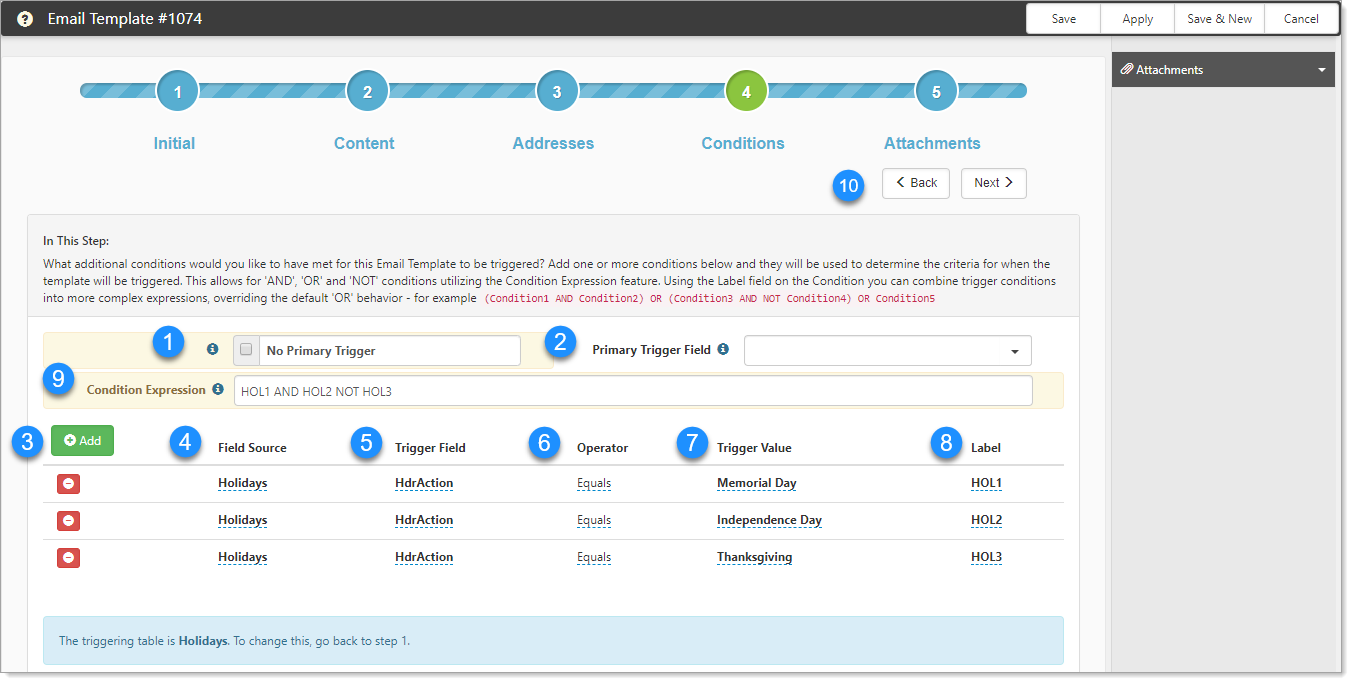
- No Primary Trigger: When selected (enabled), no single condition must be met to trigger the email template. If this field is selected, the Primary Trigger Field is disabled.
- Primary Trigger Field: Optional field (from the Table Name selected in Step 1), which when changed triggers the event. This can also be a HdrAction such as a configured action link on the form. From here, you can also add a trigger field.
- If a field is selected, that field MUST change values to trigger this template and evaluate the conditions.
- If a field is not selected, only the conditions are evaluated.
- If a Primary Trigger Field is selected, the conditions are combined with the Primary Trigger Field using an implied AND.
- If no Condition Expression is used, the additional conditions are treated as OR conditions.
- At this point, you can add a trigger field:
- In Primary Trigger Field, go to the end of the list and select Add Untriggered Field.
- The Select an Untriggered Field dialog opens. Field contains a list of fields currently not marked as Triggerable.
- In Field, select an entry.
- Click Ok.
The selected field is marked as triggerable and will now appear in the Primary Trigger Field list.
- Add: Click to add additional triggering conditions. Entries in this section are Display Conditions. If the Condition Expression field is empty, then the entries under Add are treated as OR conditions.
- Field Source: The dataform or Stored Procedure that provides the triggering condition. All active, single forms are available and adheres to Implementation Groups.
- Trigger Field: Select the dataform or Stored Procedure field that will be compared to the trigger value. Email Template triggering provides multi-lookup fields (Multi Lookup (MultiLookup)) as triggering conditions.
Additionally, you can add a trigger field.- To add a trigger field:
- In Trigger Field, go to the end of the list and select Add Untriggered Field.
- The Select an Untriggered Field dialog opens. Field contains a list of fields currently not marked as Triggerable.
- In Field, select an entry.
- Click Ok.
The selected field is marked as triggerable and will now appear in the Trigger Field list.
- To add a trigger field:
- Operator: Choose the type of comparison. Each value from a Multi Lookup Trigger Field can be added as a separate "=" condition. This supports complex AND, OR, and NOT conditions as well.
- Trigger Value: The criteria against which the trigger field is compared. For a condition that is using a user datatype as the Trigger Field, the Trigger Value field uses a typeahead method so that you do not need to look up the User ID for the text field.
- Label: The label to be used when constructing Condition Expressions for triggering. Make this label short and representative of the Trigger Field.
- Condition Expression: Enables the use of AND, OR, and NOT conditions using the Display Conditions (Label) from the Add section.
- Using the Label field that corresponds to the entries in the Add section, you can combine the conditions into more complex expressions. The Condition Expression field could state, for example (Condition1 AND Condition2) OR (Condition3 AND Condition4) OR Condition5. In the example, the Condition Expression uses the Display Condition Labels HOL1, HOL2, and HOL3.
- Fields marked as triggerable using Add Untriggered Field, are valid fields for Conditions.
For a detailed explanation about conditions, see Condition Expressions.
- Click Next to proceed.
STEP 5 Attachments
You can add attachments at this step to be included with each copy of the email sent.
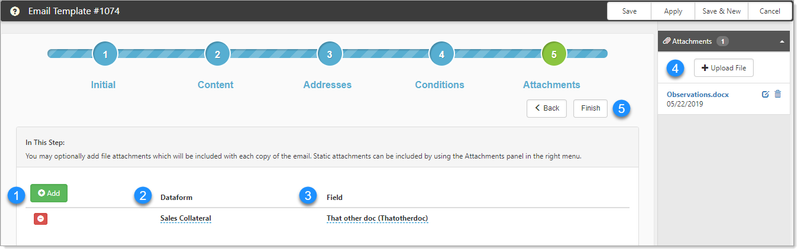
Static attachments can be included through the Attachments panel (see Email Templates Attachments). Recipients will receive any attachments added from the Attachment panel when the template is triggered.
To complete the Attachments step:
- To add file attachments to be included with each copy of the email, click Add.
A new row becomes available. - Select the Dataform from which the attachment will be copied.
- Select the Field from the dataform selected previously that holds the dataform to be copied.
- To add static attachments, click Attachments and Upload File.
- Click Finish to complete your email template configuration.
What's next
- When you click Finish, you receive a prompt "This email template is currently unpublished. Would you like to publish?"
- Yes returns you to the Email Templates list, with the Published view. Your new email template is displayed in the Published list at the bottom.
- No returns you to the Email Templates list. Your email template is displayed at the bottom of the list in italics and bold, meaning it is unpublished.
- To publish your unpublished email template, select the Published check box. See Viewing and Publishing Email Templates.
- To unpublish a template, from the Email Templates list, clear the Published check box.
- Click Search to refresh the list.
Related articles
NOTICE: You are in the old ClientSpace Help system. Please link to the new ClientSpace Help here https://extranet.clientspace.net/helpdoc/home/ClientSpace.htm